Author: Northwest Fishing Gear

  • Best Wet Wading Shoes for River Fishing: 4 Shoes I’d Trust on Slick Rocks

    Best wet wading shoes for river fishing on shallow summer river rocks with clear water and a forested Northwest riverbank in the background.

    Affiliate Disclosure: This post may contain affiliate links. As an Amazon Associate, I may earn from qualifying purchases at no extra cost to you.

    Wet wading is one of the most comfortable ways to fish a river in warm weather, but only if you have the right footwear. The best wet wading shoes for river fishing should drain fast, protect your toes, grip slick rocks, and work comfortably with wet wading socks.

    This is not the same as wearing full stockingfoot waders and wading boots. Wet wading shoes are for summer river fishing, shallow water, gravel bars, warm afternoons, trout and smallmouth sessions, early fall coho conditions, and those days when pulling on full waders just does not make sense.

    Basic beach shoes or flimsy water socks are not something I would trust for serious river fishing. They might be fine around a boat ramp or campground, but they usually do not have the traction, structure, or toe protection you need for slick rocks and uneven riverbanks.

    Below are the wet wading shoes I would look at first.


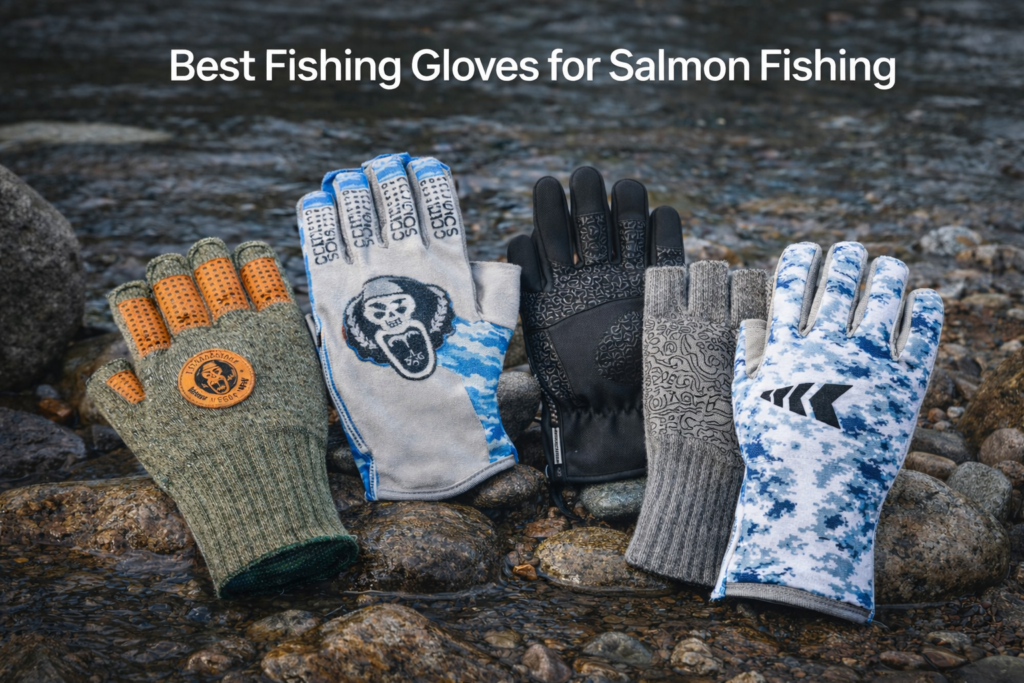
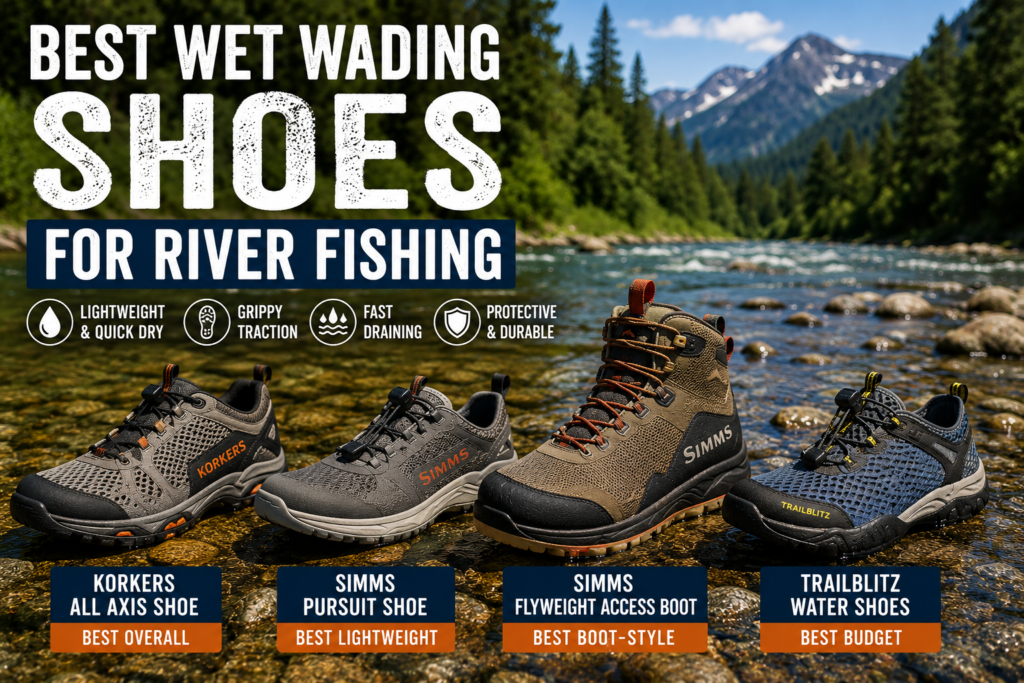
    Quick Picks: Best Wet Wading Shoes for River Fishing

    Best Overall: Korkers Men’s All Axis Shoe

    Best Lightweight: Simms Pursuit Shoe

    Best Boot-Style Option: Simms Flyweight Access Boot Vibram

    Best Budget: Trailblitz Quick-Drying Water Shoes


    Best Wet Wading Shoes for River Fishing Compared

    Wet Wading ShoeBest ForStyleMain StrengthPriceCheck Price
    Korkers Men’s All Axis ShoeBest overall wet wading shoeLow-cut water shoeInterchangeable soles, drainage, and protectionAbout $139.99CHECK PRICE ON AMAZON
    Simms Pursuit ShoeBest lightweight wet wading shoeLow-cut wet wading shoeLightweight comfort and quick adjustmentAbout $150CHECK PRICE ON AMAZON
    Simms Flyweight Access Boot VibramBest boot-style wet wading shoeSupportive wet wading bootMore ankle support and Vibram tractionAbout $149.98CHECK PRICE AT SIMMS
    Trailblitz Quick-Drying Water ShoesBest budget wet wading shoeBudget water shoeLow price with closed-toe protectionAbout $43.99CHECK PRICE ON AMAZON

    Why Wet Wading Shoes Matter for River Fishing

    Wet wading looks simple until you spend a few hours on slick rocks in the wrong footwear.

    Regular water shoes are often too soft. Sandals leave your toes wide open. Hiking shoes hold water and turn into dead weight. Barefoot-style water socks usually do not have enough sole protection for river rock, gravel, basalt, submerged wood, and the kind of uneven bank edges you run into on most Northwest rivers.

    A good wet wading shoe gives you the comfort of a summer water shoe with the traction and protection you actually need to fish.

    That matters when you are walking gravel bars, crossing shallow side channels, working through riffles, or picking your way along slick rock ledges. Even in warm water, your feet still need grip, drainage, and protection from what is sitting on the bottom.

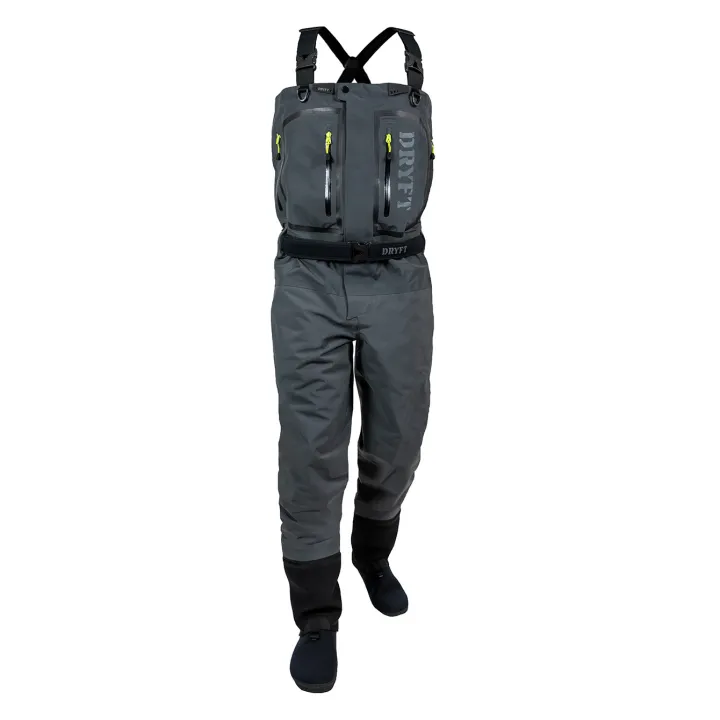
    If you are fishing with stockingfoot waders, this is a different setup entirely. For that, see my guide to the best wading boots for salmon fishing.


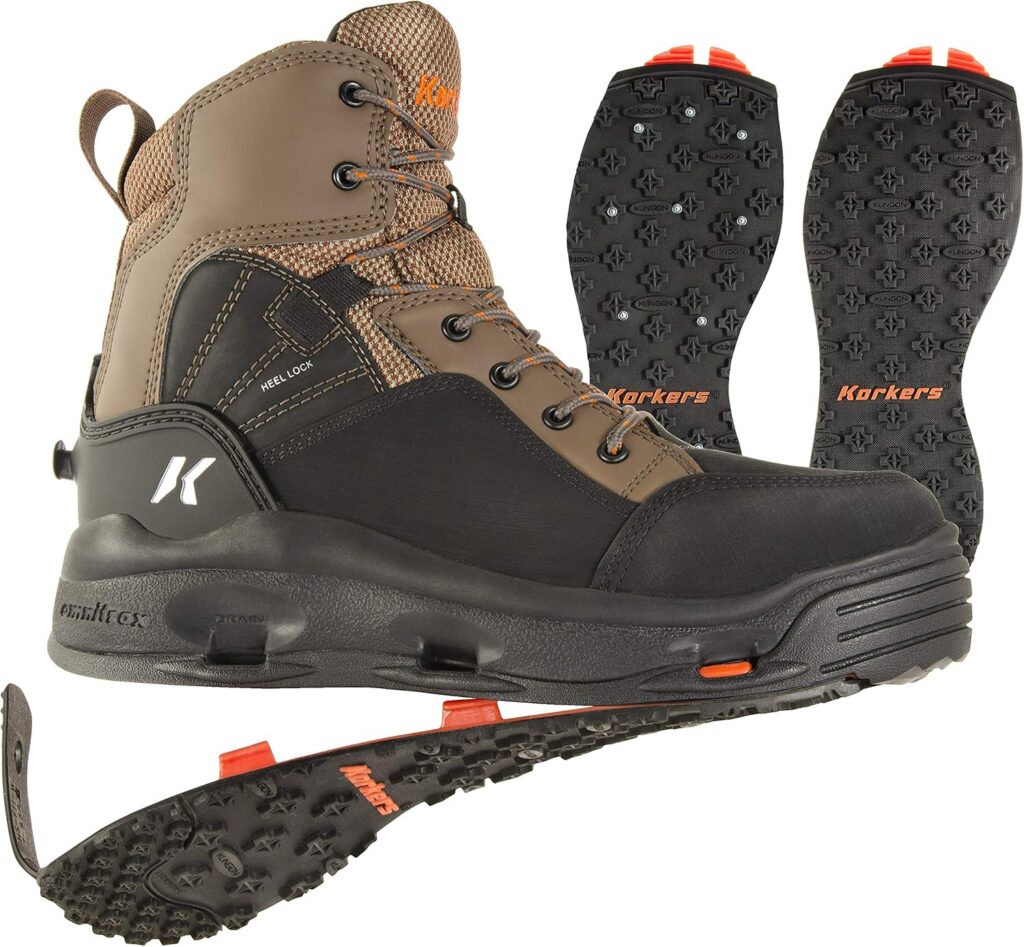
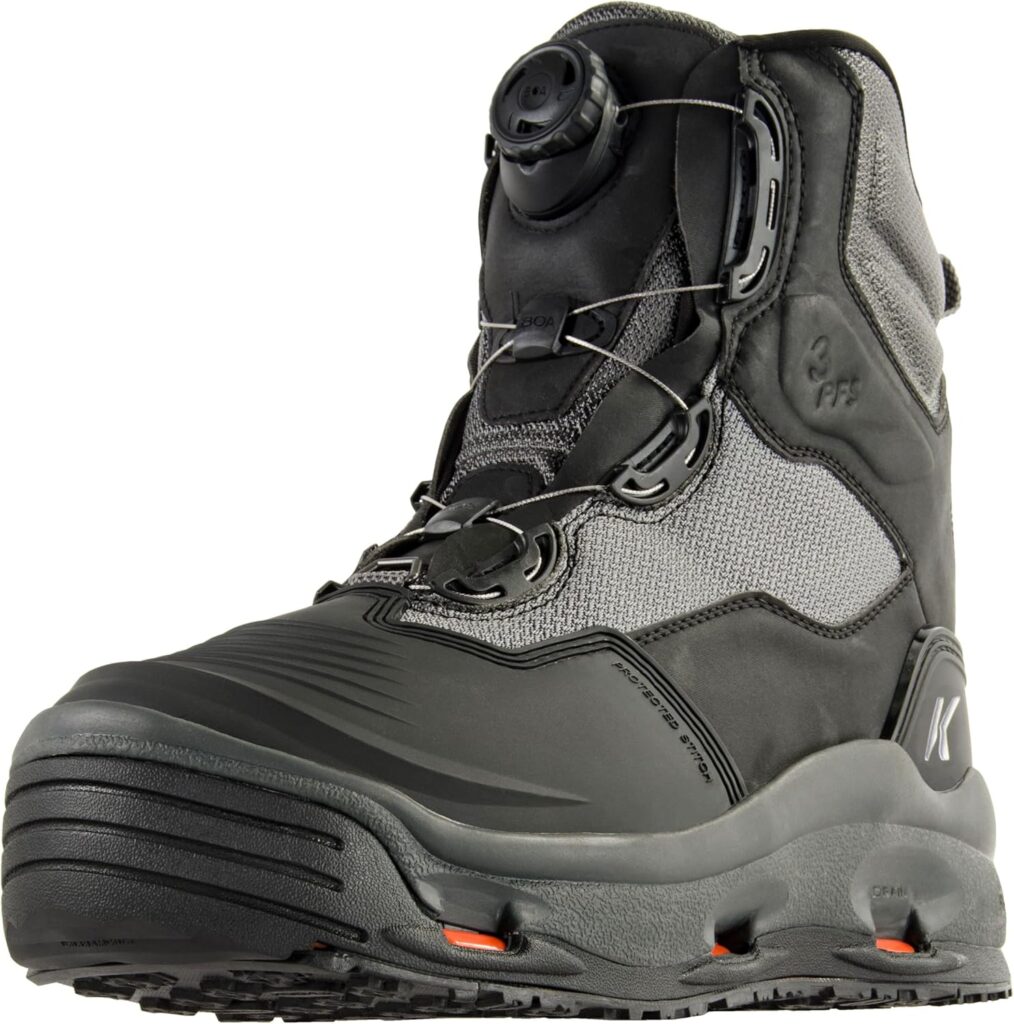
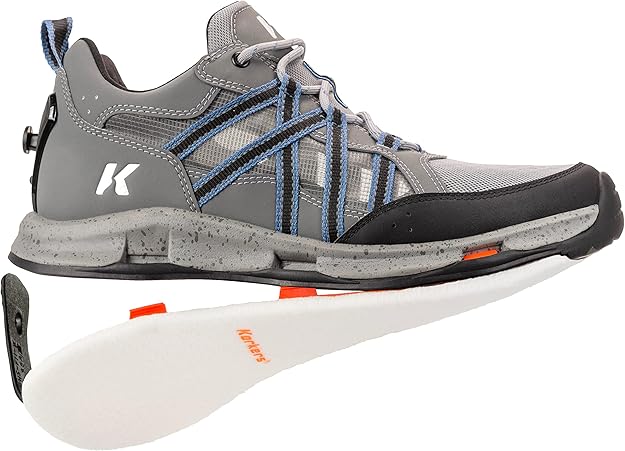
    Best Overall Wet Wading Shoe: Korkers Men’s All Axis Shoe

    The Korkers Men’s All Axis Shoe is my top overall pick because it feels purpose-built for warm-weather river fishing, not just a casual water shoe with a fishing label slapped on it.

    It is built for summer river use, with Korkers’ OmniTrax interchangeable sole system, fast-drying hydrophobic materials, mono-mesh side panels, internal drainage channels, and real toe and underfoot protection.

    That combination is exactly what I want. It is lighter and cooler than a full wading boot, but still more serious than a cheap aqua shoe or sandal.

    Specs:

    Price: About $139.99

    Best for: Most warm-weather river anglers

    Style: Low-cut wet wading shoe

    Traction: OmniTrax interchangeable sole system

    Main reason to buy: Real river traction and protection in a warm-weather wet wading shoe

    My take:

    If I were buying one wet wading shoe for summer river fishing, this is the one I would look at first.

    The biggest advantage is the OmniTrax sole system. Being able to swap soles matters when you fish different rivers. Gravel, slick rock, algae-covered ledges, mud, and uneven bank trails do not all feel the same underfoot, and having options gives you more control over your footing.

    The hydrophobic materials and internal drainage matter too. Wet wading shoes should not feel like waterlogged sneakers. They need to shed water fast so your feet are not dragging extra weight every time you take a step.

    The covered toe and underfoot sole plate round it out. If you have ever kicked a submerged rock, wedged your foot between river stones, or come down hard on sharp gravel, you already know why flimsy water shoes are not enough.

     Korkers Men’s All Axis wet wading shoe for warm weather river fishing.

    This is not the cheapest option, but it is the best fit for an angler who wants a legitimate warm-weather wet wading shoe for actual river fishing.


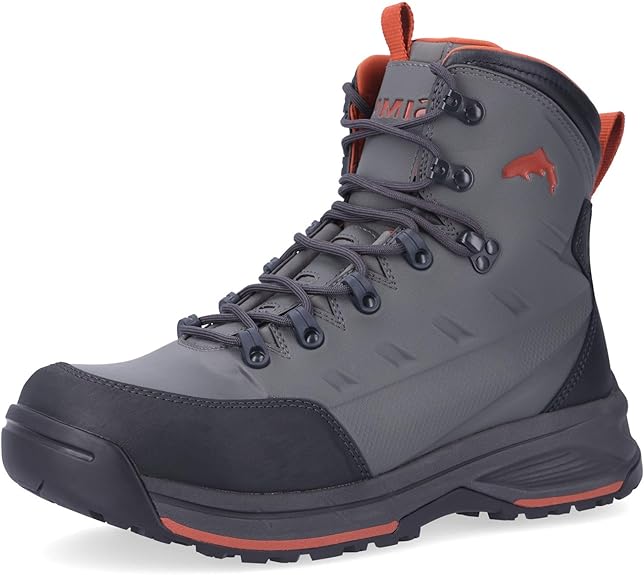
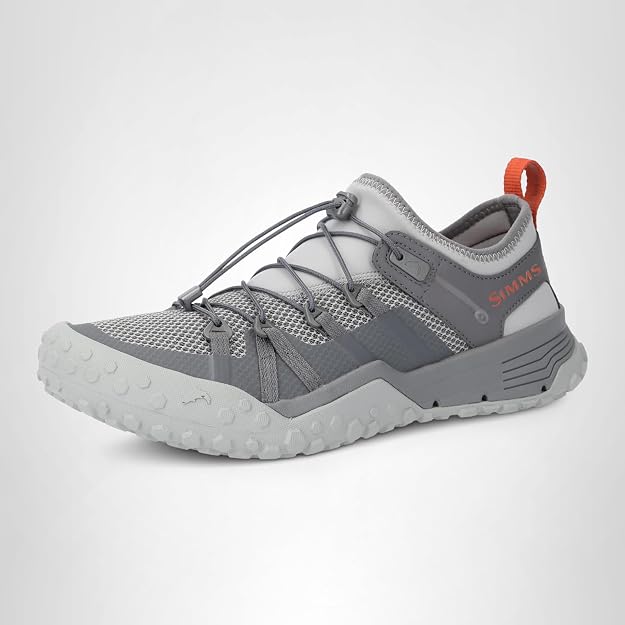
    Best Lightweight Wet Wading Shoe: Simms Pursuit Shoe

    The Simms Pursuit Shoe is what I would look at if you want something lighter, lower profile, and more comfortable for warm summer days on the water.

    It has a quick-lacing system, a non-marking siped outsole for wet-surface traction, and it is designed to be worn with thin wet wading socks for a better overall fit.

    Compared to the Korkers All Axis, the Pursuit leans more toward lightweight comfort. It is not the shoe I would choose for the roughest banks or the most technical footing, but for warmer days, easier access, and anglers who want less bulk, it makes a lot of sense.

    Specs:

    Price: About $150

    Best for: Lightweight summer wet wading

    Style: Low-cut wet wading shoe

    Traction: Non-marking siped outsole

    Main reason to buy: Lightweight comfort with easy fit adjustment

    My take:

    The Simms Pursuit is a good choice if you want a wet wading shoe that keeps things simple.

    The quick-lacing system is useful. You can adjust the fit on the fly without fighting long laces around fishing line, brush, and moving water. I also appreciate that Simms specifically designed this shoe to pair with thin wet wading socks.

    That is a detail worth paying attention to. Wet wading barefoot is fine for about ten minutes, then sand, gravel, and wet skin start doing their thing. A thin wet wading sock gives you a more comfortable fit and keeps grit away from your feet.

    Simms Pursuit lightweight wet wading shoe for summer river fishing.

    For light summer river fishing, trout, smallmouth, and shallow warm-weather sessions, the Pursuit is one of the cleaner options out there.


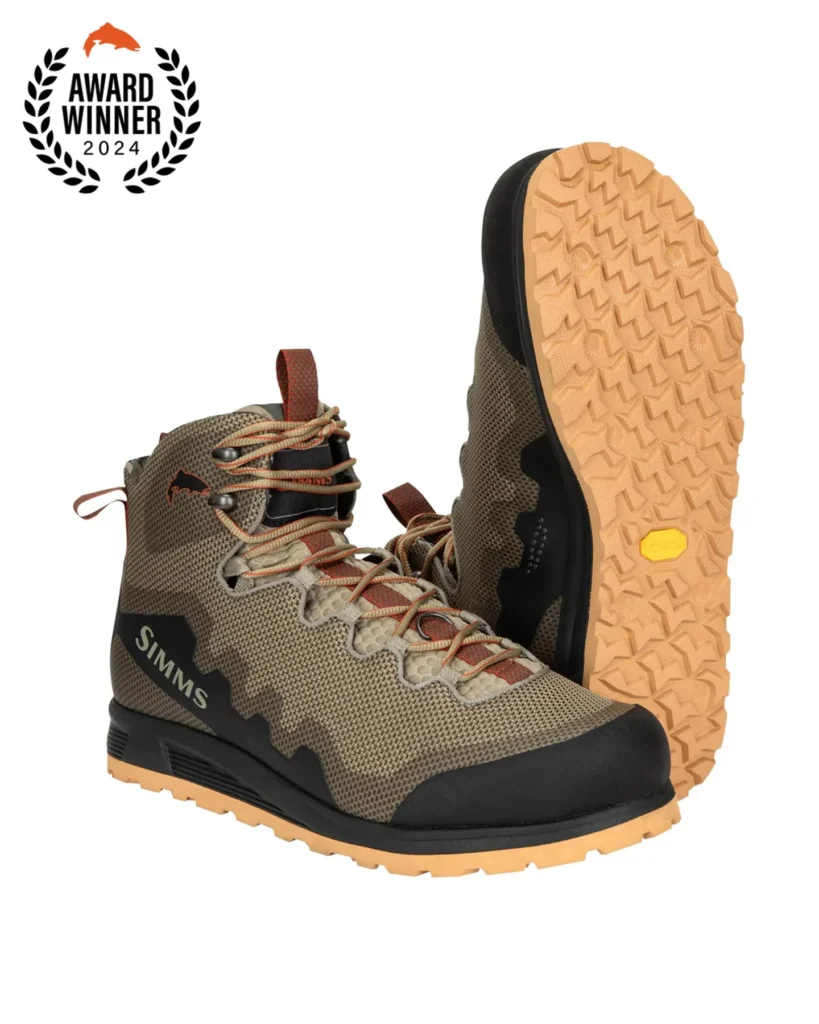
    Best Boot-Style Wet Wading Shoe: Simms Flyweight Access Boot Vibram

    The Simms Flyweight Access Boot Vibram is what I would look at if you want more support than a low-cut wet wading shoe can give you, but do not want the bulk of a traditional wading boot.

    This is the most boot-like option in this lineup. It gives you more ankle coverage, more structure, and a more secure feel for rougher banks and longer walks between spots.

    That makes it a good fit for anglers who wet wade in places where the approach is just as demanding as the water itself. If you are walking trails, climbing over rock, stepping through shallow current, and fishing uneven banks all in one day, the extra support can make a real difference.

    Specs:

    Price: About $149.98

    Best for: Anglers who want more support while wet wading

    Style: Lightweight boot-style wet wading shoe

    Traction: Vibram outsole

    Main reason to buy: More support and structure than a low-cut wet wading shoe

    My take:

    The Simms Flyweight Access Boot Vibram is the pick for the angler who wants a more secure setup on the water.

    A low-cut shoe works great when the water is warm and the walking is easy. But some rivers are not that friendly. Rocky banks, uneven ledges, longer access trails, and pushy shallows can make a little more ankle coverage feel worthwhile pretty quickly.

    This still belongs in a warm-weather wet wading article because it keeps the lightweight idea intact. It is more supportive than the Simms Pursuit and more boot-like than the Korkers All Axis, without crossing into full wading boot territory.

    Simms Flyweight Access Boot Vibram wet wading boot for rocky river fishing.

    One note: this one is not currently available on Amazon. If you want to keep everything in one place, I would lean toward the Korkers or Pursuit. But as a product, the Flyweight Access fills the boot-style slot well.


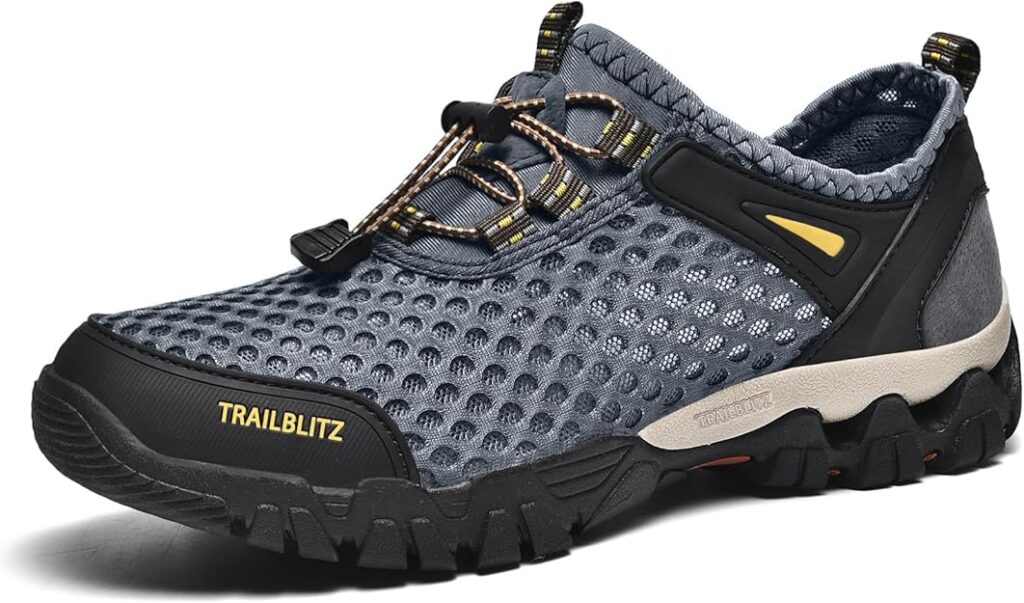
    Best Budget Wet Wading Shoe: Trailblitz Quick-Drying Water Shoes

    The Trailblitz Quick-Drying Water Shoes are the budget pick for anglers who only wet wade a few times per summer and do not want to spend $140 or more on footwear.

    These are not in the same class as Korkers or Simms. I am not going to pretend otherwise. But they are a better call than flip-flops, open-toe sandals, or thin water socks if you want a cheap closed-toe option for occasional river use.

    They have a mesh upper, drainage holes, a lace-lock adjustment, toe protection, and a thicker sole than most cheap water shoes.

    Specs:

    Price: About $43.99

    Best for: Occasional summer wet wading on a budget

    Style: Quick-drying water shoe

    Traction: Slip-resistant outsole

    Main reason to buy: Low price with better protection than basic water socks

    My take:

    This is the shoe I would include for someone who wants to try wet wading without committing a lot of money to it.

    The Trailblitz is not a high-end fishing shoe, and I would not expect it to hold up like the Korkers or Simms options. But for the price, it checks the basic boxes better than most cheap water footwear.

    The closed toe matters. The thicker sole matters. The drainage holes and mesh help keep the shoe from holding water, and the design at least tries to keep bigger gravel from working its way inside.

    Trailblitz quick-drying budget wet wading shoe for river fishing and summer water use.

    For serious river fishing, I would rather have the Korkers or Simms. For occasional summer use, camping trips, light river walks, or someone who just wants an inexpensive starting point, this one makes sense.


    What to Look for in Wet Wading Shoes

    Wet wading shoes do not need to be complicated, but they do need to do a few things well.

    Traction on Slick River Rock

    Traction is the biggest reason to buy actual wet wading shoes instead of basic beach footwear.

    River rock can be covered in algae, silt, moss, and moving water. Even shallow current can put you on your back if your shoes do not grip. Look for a rubber sole built for wet surfaces, siping, aggressive tread, or an interchangeable sole system like Korkers uses.

    This matters even more if you fish different types of rivers. Gravel, slick basalt, mud, and sloped bank edges all feel different underfoot, and what works on one river might not be enough on another.

    Fast Drainage

    Wet wading shoes should drain quickly.

    A shoe that holds water gets heavy and uncomfortable fast. That is one reason normal hiking shoes do not work well for wet wading. They might feel great on a dry trail, but once soaked they turn into dead weight.

    Look for drainage ports, mesh panels, hydrophobic materials, and designs that are actually meant to move water out.

    Toe Protection

    For river fishing, I strongly prefer closed-toe wet wading shoes.

    Open-toe sandals are comfortable, but they leave your feet exposed to rocks, submerged logs, hooks, and sharp gravel. A covered toe gives you a lot more confidence when you are stepping through shallow current or picking your way along an uneven bank.

    Toe protection is one of the biggest differences between a casual water shoe and something worth wearing for fishing.

    Fit With Wet Wading Socks

    Most anglers should be wearing wet wading socks.

    Neoprene socks or thin synthetic wet wading socks reduce rubbing, keep grit off your feet, and add comfort when the water is colder than the air. They also help the shoe fit more securely.

    Do not assume your normal shoe size will work without checking. If you plan to wear neoprene socks, look at the sizing notes and make sure there is enough room without the shoe feeling loose.

    Enough Structure for Walking

    A good wet wading shoe should not fold like a beach slipper.

    If you are walking gravel bars, bank trails, river edges, and rocky shallows, you need enough sole structure to protect the bottom of your feet. The shoe should feel flexible enough for summer use, but sturdy enough that rough ground is not beating you up after an hour.


    Wet Wading Shoes vs Wading Boots

    Wet wading shoes and wading boots are not the same thing.

    Wet wading shoes are lighter, cooler, and faster draining. They are built for warm-weather fishing when you are not wearing full waders.

    Wading boots are heavier and more supportive. They are designed to go over stockingfoot waders and give you more structure for cold water, deep water, and long days of salmon or steelhead fishing.

    If you are still deciding on the full cold-water setup, start with my guide to the best waders for salmon fishing before choosing boots.

    If you are wearing stockingfoot waders, use real wading boots. That setup protects your wader booties, gives you better ankle support, and fits the way the gear is designed to fit.

    For that setup, read my guide to the best wading boots for salmon fishing.

    For hot, shallow, no-waders days, wet wading shoes are the right call.


    What Socks Should You Wear With Wet Wading Shoes?

    For most wet wading, neoprene wet wading socks or thin synthetic wet wading socks are the way to go.

    Neoprene socks add comfort, help block grit, and give your feet a little warmth when the river is colder than the air. Thin wet wading socks work better when the water is warm and you want less bulk between your foot and the shoe.

    Avoid cotton. Cotton holds water, stretches out, and starts grinding against your skin once it is soaked. That is a fast way to end up with sore feet by midday.

    The goal is simple: protect your feet from rubbing, keep grit from grinding against your skin, and make the shoe fit right.


    Are Sandals Good Enough for Wet Wading?

    Sandals can work for casual wet wading, but they are not my first choice for river fishing.

    The problem is protection. Open toes are easy to smash on rocks. Gravel gets under your feet. Straps rub. You also get less side support when you are crossing uneven rock or working along sloped banks.

    For standing around camp or short walks in calm water, sandals are fine. For actual river fishing, I would rather have a closed-toe shoe.

    A closed-toe wet wading shoe gives you better protection, a more secure fit, and more confidence when you are not staring at every step.


    When Wet Wading Makes Sense

    Wet wading makes the most sense in warm weather and shallow water.

    It is great for summer trout fishing, smallmouth, scouting river access, quick evening sessions, and early fall days where pulling on full waders just feels like too much.

    This is also the kind of fishing where a good pair of polarized sunglasses for river fishing helps a lot, especially when you are reading shallow water, spotting rocks, and watching your footing.

    It can also work for some warm, shallow salmon conditions, but wet wading shoes are not a substitute for waders and boots during serious salmon season. Cold water, long days, deep slots, and rough banks still call for a more protective setup.

    If you are building a full salmon rig, start with the basics in my complete salmon fishing setup for rivers.

    For warm-weather river fishing, though, wet wading shoes are one of those pieces of gear that can turn an uncomfortable afternoon into a good one.


    My Recommendation

    For most anglers, I would start with the Korkers Men’s All Axis Shoe.

    It gives you the best overall mix of traction, drainage, protection, and warm-weather comfort. The interchangeable sole system is the biggest selling point, especially if you fish different rivers and want more control over your footing.

    If you want something lighter and simpler, the Simms Pursuit Shoe is the one to look at.

    If you want more support and a boot-style feel, go with the Simms Flyweight Access Boot Vibram.

    If you just need a cheaper pair for occasional summer use, the Trailblitz Quick-Drying Water Shoes are a reasonable budget option.


    Final Thoughts

    Good wet wading shoes are not just beach shoes.

    For river fishing, they need to drain fast, grip wet rock, protect your toes, and hold up while you walk through gravel, current, and uneven banks. The right pair should feel light enough for summer but sturdy enough that you are not thinking about your feet every time you step onto slick rock.

    If you fish warm-weather rivers with any regularity, a good pair is worth having. You will stay cooler than you would in full waders and have more protection than you would in sandals or cheap water socks.


    FAQ

    What are the best wet wading shoes for river fishing?

    The best wet wading shoes for river fishing are lightweight, fast draining, comfortable with wet wading socks, and protective enough for slick rocks, gravel bars, and shallow river crossings. My top overall pick is the Korkers Men’s All Axis Shoe because of its real river traction, drainage, toe protection, and interchangeable sole system.

    Can you wet wade in regular water shoes?

    You can wet wade in regular water shoes for casual use, but they are not ideal for serious river fishing. Most cheap water shoes lack the traction, toe protection, and underfoot support needed for slick rocks and uneven riverbanks.

    Do you wear socks with wet wading shoes?

    Yes. Neoprene wet wading socks or thin synthetic wet wading socks help reduce rubbing, block grit, improve comfort, and give your feet a more secure fit inside the shoe.

    Are wet wading shoes the same as wading boots?

    No. Wet wading shoes are usually lighter and designed for warm-weather fishing without full waders. Wading boots are designed to be worn over stockingfoot waders and offer more support, structure, and durability.

    Can I wear wading boots without waders?

    You can wear wading boots without waders if they fit properly with neoprene socks, but they may feel heavier than necessary for summer wet wading. A lighter wet wading shoe is usually more comfortable for warm-weather river fishing.

    Are sandals good for wet wading?

    Sandals can work for casual wet wading, but they are not my first choice for river fishing. Open toes expose your feet to rocks, submerged wood, hooks, and gravel. Closed-toe wet wading shoes are usually safer.

    Should wet wading shoes have felt soles?

    For most anglers, rubber soles are the safer all-around choice. Felt can grip well on certain slick rocks, but it may be restricted in some waters because of invasive species concerns. Always check local regulations before using felt soles.

    What size wet wading shoes should I buy?

    Check the brand’s sizing chart and account for the socks you plan to wear. If you wear neoprene wet wading socks, you may need to size up from your normal shoe size. The fit should be secure without squeezing your toes.

    Are wet wading shoes good for salmon fishing?

    Wet wading shoes can work for warm, shallow, early-season river fishing, but they are not a replacement for waders and wading boots in cold or deep salmon water. For most serious salmon fishing, stockingfoot waders and proper wading boots are still the better setup.

    When should I wet wade instead of wearing waders?

    Wet wading makes sense during warm weather, shallow river fishing, trout fishing, smallmouth fishing, scouting water, and short summer sessions where full waders are too hot or unnecessary. For cold water, deep water, or long salmon trips, waders are the better choice.

  • Best Fishing Gloves for Salmon Fishing

    Four salmon fishing gloves arranged on wet river rocks beside a flowing river, showing both cold-weather and sun glove styles.

    If you spend much time salmon fishing, you learn pretty quickly that the wrong gloves can make a long day even worse. Cold hands make it harder to tie knots, bait hooks, adjust your setup, and stay focused. In warmer weather, sun exposure adds up fast, especially if you spend long days rowing, running a boat, or standing out on the bank.

    I do not look at the best fishing gloves for salmon fishing as one single category. For me, there are really two types that matter most: a good sun glove for warm days and a warm glove that still lets you fish when the mornings get cold.

    After trying a lot of different gloves over the years, I keep coming back to a few that actually make sense for salmon fishing. Some are better for summer sun protection. Some are much better for cold mornings. And some sound good on paper but fall short once they get wet or start getting in the way when you are trying to fish.


    Quick Picks: Best Fishing Gloves for Salmon Fishing


    Why Gloves Matter More Than People Think for Salmon Fishing

    A lot of fishing gear is nice to have. Good gloves are one of the few things that can actually change how comfortable and effective you are on the water.

    On cold mornings, numb hands make everything harder. Tying knots takes longer. Baiting up gets frustrating. Handling line and making little adjustments to your setup becomes a chore. If you fish a float a lot, you already know how often you are checking stops, changing depth, and making little tweaks to stay dialed in, and you do not want to be pulling gloves off every five minutes to do it. I like gloves that still let me work through a salmon float rig setup without constantly taking them off.

    The same goes for bait fishing. If you are fishing eggs, shrimp, or other natural baits, you need gloves that do not turn simple tasks into a headache. That matters even more when you are constantly re-baiting and working through things like how to rig salmon eggs the right way.

    Then there is warm-weather fishing. A lot of guys think gloves are only for cold weather, but a good sun glove helps a lot on bright days. It keeps the backs of your hands from getting roasted, especially during long summer days on the river.


    Best Fishing Gloves for Salmon Fishing

    Fish Monkey Pro 365 Guide Gloves

    Best Overall Sun Gloves

    These are my favorite sun gloves for salmon fishing. If I want protection from the sun but still want open fingertips for tying knots, handling line, and working tackle without fighting the glove, this is the pair I grab first.

    What I like most about the Fish Monkey Pro 365 Guide Gloves is that they feel purpose-built for actually fishing. The open fingertips are a big deal. For me, that is a must. I do not want to be peeling gloves off every time I need to retie, trim line, or make a quick adjustment. They also have tough palms, breathable material, and enough protection built in to hold up well over time.

    They are also a great fit for salmon anglers who want coverage during long sunny days without going to a full glove that kills dexterity. If you spend a lot of time on the river in brighter conditions, these are hard to beat.

    Price: $29.49

    What I like

    • Open fingertips for knot tying and fine motor tasks
    • Tough palm construction
    • Breathable, quick-dry material
    • UPF 50+ sun protection
    • Pads on the thumb, index finger, and side of glove to help prevent cuts
    • Comfortable second-skin fit

    Downside

    • Not meant for cold-weather warmth

    Best for
    Warm weather, sunny days, boating, and anglers who want the best sun gloves for salmon fishing without losing fingertip control.

    Fish Money 365 Pro Guide Fishing Gloves

    A great warm-weather glove when you want sun protection without giving up the fingertip control you need for actual salmon fishing.


    Fish Monkey Wooly Precision Grip Half Finger Gloves

    Best Cold Weather Gloves for Salmon Fishing

    If I had to pick my favorite cold-weather fishing gloves for salmon fishing, this would be it.

    Anyone who fishes for salmon in the Pacific Northwest knows how miserable numb hands can be on a cold morning. It is not just uncomfortable. It actually makes it harder to fish well. These fix that. They are the warmest half-finger fishing gloves I have used, and they still let me do what I need to do without taking them off constantly.

    The biggest reason I trust these gloves is the wool. Your gloves are going to get wet. That is just part of salmon fishing. Wool still keeps you warm even when damp, and out on the river that matters a whole lot more than most people realize. That alone puts these near the top of my list for the best fishing gloves for cold weather salmon fishing.

    The exposed fingertips also make a real difference. You can still tie knots, rig bait, and work terminal gear without the gloves getting in your way, whether you are adjusting leaders, changing hooks, or working through parts of your terminal tackle for salmon fishing setup in cold weather.

    Price: $25

    What I like

    • Very warm for a half-finger glove
    • Wool keeps insulating even when wet
    • Exposed thumb, index, and middle fingers help with knot tying and bait work
    • Good wet grip from the synthetic leather palm
    • Flexible fit that moves naturally with your hand
    • Breathes well and wicks moisture

    Downside

    • If you prefer all five fingertips open, you may want something different

    Best for
    Cold mornings, wet fall fishing, winter salmon fishing, and anglers who want warmth without losing too much finger control.

    Fish Money Wooly Wool Winter Fishing Gloves

    My favorite glove for cold salmon mornings because it stays warm even when damp and still lets you rig, tie knots, and fish without a struggle.


    Palmyth Wool Fishing Gloves

    Best Alternative Wool Gloves

    These are another solid cold-weather option, especially for someone who likes the idea of wool gloves but wants an alternative to the Fish Monkey version.

    The core advantage is the same. Wool keeps insulating even when conditions are damp, which is a big deal on wet mornings. They also have exposed thumb, index, and middle fingers, so you still get fingertip access for knot tying, line control, and bait work.

    That said, I still prefer the Fish Monkey Wooly gloves over these. The Palmyth gloves only leave three fingers open, and I personally want more fingertip access when I am fishing. They also have a slightly fuzzier feel, which is not a dealbreaker but something I notice. They come in a little more expensive too, so for me the Fish Monkey pair still gets the edge.

    Price: $27

    What I like

    • Wool blend helps keep hands warm in wet conditions
    • Good grip from synthetic leather palm and silicone print
    • Exposed fingers help with dexterity
    • Comfortable flexible fit
    • Good for cold weather fishing, hunting, and general outdoor use

    Downside

    • Only three fingers are exposed
    • Slightly fuzzier feel than the Fish Monkey wool gloves
    • A little more expensive

    Best for
    Anglers who want a wool glove for cold-weather river fishing and do not mind the three-finger-open design.

    Palmyth Wool Fishing Gloves

    A solid wool glove for cold river fishing, but I still prefer the Fish Monkey version because it feels a little cleaner and works better for the way I fish.


    KastKing La Sal Fishing Gloves

    Best Budget Sun Gloves

    If you want a good sun glove without spending as much, this is the one I would look at.

    The thing that stands out most with the KastKing La Sal gloves is the longer wrist area. It tucks nicely under the sleeves of a sun shirt, which helps close that gap between your glove and sleeve that tends to get toasted on long bright days. It is a small detail that makes a real difference if you are fishing from a boat or standing in the sun for hours.

    They also have reinforced palms and fingers, breathable stretch material, and UPF 50 protection, so even at the lower price point, they still check the main boxes for warm-weather salmon fishing.

    Price: Around $20

    What I like

    • Good value for the price
    • Reinforced wear points on palms and fingers
    • Breathable stretch material
    • UPF 50 protection
    • Longer cuff helps with sun coverage
    • Easy pull tabs for taking them on and off

    Downside

    • I still prefer the Fish Monkey Pro 365 gloves overall

    Best for
    Anglers who want a budget-friendly pair of salmon fishing sun gloves with strong wrist and forearm coverage.

    KastKing La Sal Sun Fishing Gloves

    A good lower-cost sun glove that still gives you strong coverage, decent durability, and a longer cuff that works well with a sun shirt.


    Drasry Neoprene Fishing Gloves

    Best Non-Wool Cold Weather Option

    These are the pair I would point people toward if they do not like wool or cannot wear it.

    The Drasry gloves use neoprene with flip-back finger covers, so you still get some finger access for tying knots and handling gear. They can hold warmth well as long as you are not getting the inside soaked.

    That is the catch for me. Once water gets inside these gloves, they lose a lot of their usefulness fast. Wool keeps insulating when wet. Neoprene really does not, and on a salmon river you are rarely going to stay perfectly dry all day. So I think these have a place, particularly for someone who wants a non-wool option or likes more hand coverage, but I want to be upfront about where they fall short.

    One more thing worth mentioning: in my experience, the Drasry neoprene gloves run a little tight, so it is usually smart to order a size up from what you would normally wear.

    What I like

    • Good option for anglers who want a non-wool cold-weather glove
    • Neoprene helps block wind and splashes
    • Flip-back finger slots give access for knot tying and lure work
    • Good grip and reinforced palm
    • Touchscreen-compatible fingertips

    Downside

    • Once water gets inside, they lose a lot of their appeal fast
    • Not my first choice if I know conditions will be wet
    • Fit tends to run a bit tight

    Best for
    Anglers who want a non-wool glove for cold-weather fishing and plan to keep the inside of the glove mostly dry.

    Sizing note
    These usually run a little tighter than standard gloves, so I would consider ordering one size larger than normal if you want a more comfortable fit.

    Drasry Neoprene Winter Fishing Gloves

    A decent cold-weather option if you do not want wool, but I would size up and I still think they work best only if you can keep the inside mostly dry.


    Sun Gloves vs Cold Weather Gloves for Salmon Fishing

    A lot of anglers try to make one pair of gloves do everything. I have never found that to work very well.

    For warmer weather, I want a glove that protects the backs of my hands from the sun but still leaves my fingertips open. The Fish Monkey Pro 365 and the KastKing La Sal both do that well.

    For cold weather, warmth matters more, but I still do not want to lose all my finger control. Half-finger wool gloves hit that balance better than anything else I have tried for salmon fishing. They let you do the small stuff that actually matters when you are out there changing bait, retieing leaders, or adjusting your setup in the cold.

    If you fish through different seasons, the honest answer is to just have one good sun glove and one good cold-weather glove. Trying to find one pair that does both usually means you end up with something that does neither particularly well.


    Why I Prefer Open Fingertips for Salmon Fishing

    For salmon fishing, open fingertips are hard to give up.

    Tying knots, trimming leaders, pinching on weight, baiting hooks, making small rigging changes, all of that is easier and faster with your fingertips free. Gloves that completely cover your fingers can be fine for pure warmth, but once they start slowing down basic fishing tasks, they become more frustrating than helpful.

    If you fish with bait much, your hands are involved in everything constantly, from switching leaders to checking how your bait is sitting to working out the details of the best bait for Chinook salmon with eggs, shrimp, or other natural presentations. Gloves that get in the way of that are not doing you any favors.


    Wool vs Neoprene Fishing Gloves

    If I had to choose between wool and neoprene for salmon fishing, wool wins most of the time.

    The reason is simple. Wool still works when it gets wet. On a real salmon fishing day, your gloves are almost never going to stay perfectly dry. Rain, fish slime, wet line, bait, and river water are all just part of it. Wool handles that. Neoprene, once the inside gets wet and cold, loses most of what made it useful in the first place.

    Neoprene has its place, and it is a solid backup for someone who cannot wear wool. But it would not be my first choice for cold, damp salmon fishing conditions.


    What to Look for in the Best Fishing Gloves for Salmon Fishing

    1. Dexterity

    If your gloves make it hard to tie knots, adjust gear, or handle bait, you are going to notice it fast. A glove can be warm and still not be very fishable.

    2. Warmth in Wet Conditions

    A glove that only works while perfectly dry is not ideal for salmon fishing. Cold weather gloves need to keep doing their job once the day gets damp.

    3. Grip

    Wet rods, wet reels, slime, and cold hands do not mix well. Good palm grip matters more than people think.

    4. Comfort Over a Full Day

    Some gloves feel fine for ten minutes and annoying after a few hours. I want gloves that fit naturally and do not feel bulky or stiff.

    5. Wrist Coverage

    Longer cuffs help more than a lot of people realize, especially in sunny conditions. Good wrist coverage makes a real difference when paired with long sleeves or rain gear.


    My Final Take

    The best fishing gloves for salmon fishing really come down to one question: are you trying to stay protected from the sun, or are you trying to keep your hands warm on cold river mornings?

    For sun gloves, my favorite is the Fish Monkey Pro 365 Guide Gloves. They give you the fingertip access you need while still protecting your hands during long bright days on the water.

    For cold weather, I keep coming back to the Fish Monkey Wooly Precision Grip Half Finger Gloves. They strike the best balance between warmth and fishability, and the wool makes a real difference once conditions get damp, which on a Pacific Northwest salmon river is basically every other morning.

    The best glove is not the one that sounds best on paper. It is the one that still lets you fish the way you want to fish.

    If most of your salmon fishing happens during colder parts of the year, glove choice matters even more. That usually lines up with the same conditions where the best time to fish for Chinook salmon often means gray mornings, cold hands, and wet weather.


    FAQ

    What are the best fishing gloves for salmon fishing?

    The best fishing gloves for salmon fishing depend on the conditions. For warm weather and sun protection, I like the Fish Monkey Pro 365 Guide Gloves. For cold weather, my top choice is the Fish Monkey Wooly Precision Grip Half Finger Gloves because they stay warm, still allow fingertip access, and wool keeps insulating even when damp.

    What are the best cold weather fishing gloves for salmon fishing?

    For cold weather salmon fishing, I prefer half-finger wool gloves over bulky full-finger gloves. The Fish Monkey Wooly Precision Grip Half Finger Gloves are my favorite because they are warm, still work when damp, and let you tie knots and rig bait without pulling them off all the time.

    Are wool gloves better than neoprene gloves for salmon fishing?

    In my opinion, yes. Wool gloves are usually better for salmon fishing because they stay warm even when wet. Neoprene gloves can work, but once water gets inside, they lose a lot of their usefulness. That is why I usually prefer wool for cold, damp salmon fishing conditions.

    Are fingerless gloves better for salmon fishing?

    For a lot of salmon fishing situations, yes. Fingerless gloves make it easier to tie knots, bait hooks, trim line, and make small rigging changes without constantly taking your gloves off. That is a big advantage in both cold weather and day-to-day river fishing.

    What gloves are best for tying knots while salmon fishing?

    The best gloves for tying knots while salmon fishing are the ones that still give you fingertip access and good dexterity. That is why I prefer open-fingertip sun gloves in warm weather and half-finger wool gloves in cold weather instead of bulky full-finger gloves.

    Do Drasry neoprene fishing gloves run true to size?

    In my experience, they run a little tighter than standard gloves. If you are between sizes or prefer a more comfortable fit, I would consider ordering one size up.

  • Best Wading Boots for Salmon Fishing: 4 Boots I’d Trust on Slick Rivers

    Best wading boots for salmon fishing displayed on wet river rocks beside a Northwest salmon river with evergreen trees and mountains in the background.

    Affiliate Disclosure: This post may contain affiliate links. As an Amazon Associate, I may earn from qualifying purchases at no extra cost to you.

    Wading boots are one of those pieces of salmon fishing gear that people don’t think about enough until they slip on a rock, twist an ankle, or realize their cheap boots are falling apart halfway through the season.

    If you fish salmon from the bank with stockingfoot waders, your boots matter a lot. They need to fit over your wader booties, drain water quickly, grip slick rocks, handle mud and gravel, and give you enough support to walk uneven riverbanks safely. A lot of that safety piece gets overlooked when people are buying gear, and it shouldn’t.

    For most salmon anglers, I’d rather see you put money into a solid pair of wading boots than try to get by with old hiking boots. Hiking boots aren’t designed to drain properly, fit over stockingfoot wader booties, or grip wet river rock the same way a purpose-built wading boot does.

    My top pick is the Korkers Buckskin Wading Boot because it’s the pair I personally use. I’ve had mine for about four years now, and they’re still going strong. They’re comfortable, durable, and sit in a middle price range where you get a serious boot without jumping into premium territory.


    Quick Picks: Best Wading Boots for Salmon Fishing

    Best Overall: Korkers Buckskin Men’s Wading Boots

    Best Upgrade: Korkers Darkhorse Wading Boots

    Best Premium Non-Korkers Option: Simms Freestone Rubber Wading Boot

    Best Budget Option: Paramount Outdoors Stonefly Wading Boot


    Best Wading Boots for Salmon Fishing

    PickBootBest For
    Best OverallKorkers BuckskinMost salmon anglers using stockingfoot waders
    Best UpgradeKorkers DarkhorseAnglers who want BOA lacing and upgraded fit
    Best Premium Non-KorkersSimms Freestone Rubber BootAnglers who want a higher-end Simms option
    Best BudgetParamount Outdoors StoneflyBeginners who want a lower-cost wading boot

    Why Wading Boots Matter for Salmon Fishing

    Salmon fishing from the bank is rough on your feet, and the terrain doesn’t give you much room for error.

    You’re walking over wet rocks, loose gravel, mud, roots, riprap, steep banks, and uneven river edges. Add current, cold water, and a hooked fish pulling against you, and bad footing can get dangerous fast. A fall in cold current isn’t just embarrassing. On a Pacific Northwest salmon river in October, it can become a serious situation quickly.

    Good wading boots help you stay on your feet by providing traction on slick rocks, ankle support on uneven banks, protection for your stockingfoot wader booties, proper drainage after stepping in and out of the river, and stability while you’re fighting or landing fish. They also make long bank walks significantly more comfortable than a cheap or poorly fitting boot.

    This is especially important on Pacific Northwest rivers. A lot of salmon water isn’t clean, flat gravel with easy footing. It’s slippery, uneven, muddy, and full of awkward spots where the wrong step matters.

    If most of your fishing is from shore, my bank fishing for salmon guide also covers the kind of river access, walking, and footing situations where good boots matter.

    If you’re still building out your full setup, read my guide to a complete salmon fishing setup for rivers after this. Boots and waders are only part of staying comfortable and effective on the bank.


    Best Overall Wading Boots: Korkers Buckskin

    The Korkers Buckskin Men’s Wading Boots are my top pick because they’re the boots I actually use with my stockingfoot waders.

    I’ve had my Buckskins for about four years now, and they’re still going strong. They’re comfortable, they’ve held up to regular hard use on salmon and steelhead rivers, and at around $142 they hit a price point that feels genuinely fair for what you get. Not the cheapest option in the lineup, but nowhere near the premium end either.

    Korkers is one of the go-to brands for wading boots, and the Buckskin is a good example of why people keep coming back to them. The biggest feature is the OmniTrax interchangeable sole system, which lets you swap traction depending on where you’re fishing and what the conditions look like.

    That matters for salmon fishing more than people might expect. Some days you’re walking flat gravel bars. Other days you’re stepping around slick boulders, navigating muddy banks, or crossing wet ledges where extra grip makes a real difference. Having the ability to change soles gives the Buckskin a versatility that a fixed-sole boot just can’t match.

    The boot comes with both Kling-On and Studded Kling-On soles right out of the box, which gives you a solid starting setup without needing to buy additional soles immediately. The hydrophobic materials help the boot dry faster after use, which also reduces the chance of transporting aquatic invasive species between waterways.

    The construction is built for real river use. Enhanced midsole, scratch rubber toe cap, rubberized anti-abrasion material on the uppers, internal drainage channels, and non-corrosive hardware throughout. Salmon riverbanks are not gentle on gear, and these details add up over a full season.

    Specs:

    • Price: around $142
    • Designed for stockingfoot waders
    • OmniTrax interchangeable sole system
    • Includes Kling-On and Studded Kling-On soles
    • Hydrophobic materials for faster drying
    • Scratch rubber toe cap
    • Rubberized anti-abrasion material
    • Internal drainage channels and midsole ports
    • Traditional laces with non-corrosive hardware
    • Heel lock for secure fit

    My take:
    If I were recommending one pair of wading boots to most salmon anglers, this would be it. I use the Korkers Buckskin with my stockingfoot waders, and after four years mine are still comfortable and holding up well. For the price, durability, and interchangeable traction options, they’re the best overall pick in this lineup.

    Korkers Buckskin wading boots with interchangeable soles for salmon fishing with stockingfoot waders.

    If you’re pairing these with stockingfoot waders, read my guide to the best waders for salmon fishing too. That post explains why I like breathable stockingfoot waders for most bank fishing situations.

    If you’re pairing these with stockingfoot waders, read my guide to the best waders for salmon fishing too. That post explains why I like breathable stockingfoot waders for most bank fishing situations.


    Best Upgrade Wading Boots: Korkers Darkhorse

    The Korkers Darkhorse Wading Boots are the upgrade pick if you like the Korkers system but want a step up from the Buckskin.

    The biggest difference is the BOA M2 lacing system. Instead of traditional boot laces, the Darkhorse uses a dial that lets you tighten and loosen the boot quickly and precisely. BOA systems are known for being reliable under hard use, and when your hands are cold, wet, and covered in bait and river slime, being able to adjust your boots without fighting with wet laces is genuinely useful.

    You still get the OmniTrax interchangeable sole system, which is one of the main reasons to buy Korkers in the first place. This model includes interchangeable felt and Kling-On soles, giving you traction flexibility for different river conditions.

    One important thing to know before buying: always check your local regulations before fishing felt soles. Felt grips well in certain slick-rock situations, but some waters restrict or prohibit felt because it can harbor and transport aquatic invasive species between waterways. If felt isn’t allowed where you fish, Korkers sells compatible rubber and studded rubber soles separately that fit the OmniTrax system.

    I don’t personally run the Darkhorse myself, but I have a fishing buddy who has been wearing his for close to ten years. He travels and fishes year-round, and his Darkhorse boots are definitely beat up at this point. But they still somehow get the job done, which says a lot about the long-term durability of this boot.

    Specs:

    • Higher-budget Korkers option
    • Designed for stockingfoot waders
    • BOA M2 lacing system
    • OmniTrax interchangeable sole system
    • Includes felt and Kling-On soles
    • Hydrophobic abrasion-resistant upper
    • Internal drainage channels and midsole ports
    • 3PFS Achilles stabilization
    • Quick on/off fit adjustment

    My take:
    The Korkers Darkhorse is the boot I’d look at if you want an upgraded Korkers with BOA lacing. The Buckskin is still my top value pick for most salmon anglers, but the Darkhorse makes sense if you fish a lot, want faster fit adjustment, and want a boot built for long-term hard use.

    Korkers Darkhorse wading boots with BOA lacing and interchangeable soles for salmon fishing.


    Best Premium Non-Korkers Wading Boot: Simms Freestone Rubber Boot

    The Simms Freestone Rubber Wading Boot is the option I’d look at if you want a higher-end boot but don’t want to go with Korkers.

    You generally can’t go wrong with Simms products. They’re usually on the higher end of the price range, but the quality backs it up. At around $230, the Freestone Rubber Boot is not cheap, but it gives you a serious stockingfoot wading boot from one of the most trusted names in fishing gear.

    The waterproof synthetic scratch leather upper with reinforced toe and heel is exactly the kind of construction I want to see in a salmon wading boot. Riverbanks beat up the front and back of boots faster than most people expect, and reinforcement in those areas extends the life of the boot significantly.

    The partial neoprene lining adds comfort and makes the boot easier to get on and off over stockingfoot booties. The dual-density EVA midsole is worth mentioning for bank anglers who walk a lot. Long gravel bar walks in a stiff, unsupportive boot wear on your feet faster than you’d think, and a proper midsole makes a real difference over the course of a full day.

    The rubber outsole is compatible with Simms Hardbite Star Cleats, Hardbite Studs, and Alumibite Star Cleats. That matters because plain rubber handles some river conditions well but can struggle on polished, algae-covered rock that’s common on Pacific Northwest salmon rivers. Having the option to add studs or cleats gives you traction flexibility without needing a completely different boot.

    Worth noting as well: this boot is crafted without PFAS, which is an environmental consideration some anglers prioritize when choosing gear.

    Specs:

    • Price: around $230
    • Designed for stockingfoot waders
    • Waterproof synthetic scratch leather upper
    • Toe and heel reinforcement
    • Partial neoprene lining
    • Dual-density EVA midsole
    • Rubber outsole
    • Compatible with Simms Hardbite Star Cleats, Hardbite Studs, and Alumibite Star Cleats
    • Crafted without PFAS

    My take:
    The Simms Freestone Rubber Boot is the premium non-Korkers pick. I’d still put the Korkers Buckskin first because I have years of personal use with them, but if you want a high-end Simms option with a rubber sole, stud compatibility, and serious construction, the Freestone earns its price.

    Simms Freestone rubber wading boots for salmon fishing with stockingfoot waders.


    Best Budget Wading Boots: Paramount Outdoors Stonefly

    HTML Anchor to set on this H2:
    best-budget-wading-boots-paramount-outdoors-stonefly

    The Paramount Outdoors Stonefly Wading Boot is the budget option in this lineup, and it’s the right answer for newer salmon anglers who need proper wading boots without spending Korkers or Simms money yet.

    At around $99, these are the boots I’d point a beginner toward if budget is a real concern. They’re not going to feel as refined as the Korkers or Simms options, and I wouldn’t expect them to hold up to the same years of hard use. But they’re a real wading boot designed for stockingfoot waders, and that matters more than people realize when the alternative is wearing random hiking boots with neoprene booties.

    The cleated rubber outsole with recessed stud insert points is a solid traction setup at this price, and the fact that they include steel wading studs in the box means you’re getting functional grip right out of the packaging. You can run them with or without the studs depending on the conditions.

    The reinforced Rock Jam toe cap and stiff reinforced midsole give you real protection where riverbanks hit boots hardest. The padded collar helps with ankle comfort on longer walks, and the gravel guard D-ring attachment point is a useful feature for keeping debris out of your booties.

    The listing notes that these are sized to fit over stockingfoot wader booties without needing to size up, which is a helpful clarification because wading boot sizing confuses a lot of new anglers.

    Specs:

    • Price: around $99
    • Designed for stockingfoot wader booties
    • Cleated rubber outsole
    • Recessed stud insert points
    • Steel wading studs included
    • Can be worn with or without studs
    • Reinforced Rock Jam toe cap
    • Stiff reinforced midsole
    • Reinforced heel pull
    • Padded collar
    • Gravel guard D-ring attachment point

    My take:
    The Paramount Outdoors Stonefly is the budget starting point I’d include for new salmon anglers who need proper wading boots without spending premium money. The Korkers Buckskin is a better long-term buy if the budget allows, but at around $99 with studs included, the Stonefly is a real wading boot that gives beginners a legitimate foundation to build from.

    Paramount Outdoors Stonefly wading boots with cleated sole and studs for river fishing.


    Rubber vs Felt Wading Boots for Salmon Fishing

    Rubber and felt both have their place, but for most salmon bank anglers, I lean toward rubber or studded rubber as the safer default.

    Felt grips well on certain slick rock surfaces, and in the right conditions it can feel noticeably better than plain rubber. The problem is that felt can be restricted or prohibited on many Pacific Northwest waters because it can harbor and transport aquatic invasive species like New Zealand mudsnails and whirling disease spores between waterways. Felt is also inconsistent in mud, snow, and on long bank walks away from the river, where it doesn’t perform nearly as well as rubber.

    Rubber is more versatile across different conditions, easier to clean properly between waterways, and generally a safer default if you fish multiple rivers in a season. The downside is that plain rubber can be slippery on polished, algae-covered rock, which is exactly the kind of bottom you encounter on a lot of Pacific Northwest salmon rivers.

    That’s where studs come in. Studded rubber is the best all-around traction setup for most salmon bank fishing. You get the versatility and cleanability of rubber with enough bite to handle slick rock situations that would be sketchy on a plain rubber sole.

    A simple framework for thinking about it:

    • Plain rubber: good for easier banks and general walking
    • Studded rubber: best all-around choice for most salmon rivers
    • Felt: can grip well in specific situations, but always check local regulations first
    • Interchangeable sole systems: best option if you fish a wide variety of rivers and want to adapt your traction to the conditions

    Should You Use Studded Wading Boots?

    For salmon bank fishing, studs are worth having in most situations.

    A lot of salmon rivers have slick rocks, algae-covered ledges, muddy banks, and uneven footing where plain rubber loses traction quickly. Studs bite into those surfaces and give you much more confidence on footing that would otherwise keep you tentative and slow.

    The tradeoff is that studs are noisy on hard surfaces, can scratch boat decks if you’re ever on a guided trip, and feel awkward on pavement or concrete. If you fish primarily from a boat or spend a lot of time on hard surfaces, studs all the time can be inconvenient.

    For bank fishing specifically, I want the option. That’s one of the main reasons interchangeable sole systems or boots with stud compatibility make so much practical sense for salmon anglers who fish diverse water.

    For more bank-specific gear and safety considerations, my guide to how to catch Chinook salmon from the bank covers the kind of river situations where footing and mobility matter.

    For more bank-specific gear and safety considerations, my guide to how to catch Chinook salmon from the bank covers the kind of river situations where footing and mobility matter.


    What Size Wading Boots Should You Buy?

    Wading boot sizing varies by brand, and it’s worth paying attention to before you order.

    Some boots are sized to fit over stockingfoot wader booties without any adjustment. Others recommend sizing up one full size to account for the extra bulk of the bootie underneath. Always check the brand’s specific sizing chart and read recent reviews from other buyers before ordering, since sizing advice on wading boots can save you the hassle of a return.

    The boot should have enough room for your stockingfoot wader bootie, a good pair of wool or synthetic wading socks underneath, and enough space for cold-weather layering if you fish in cold temperatures. It should not feel sloppy or allow your foot to slide around inside, which reduces stability and creates hot spots on longer walks.

    For salmon fishing specifically, a secure heel fit and snug ankle are the most important parts of the fit equation. Heel lift inside the boot while walking on uneven ground is a sign the boot is too big and will cause problems over a long day.


    Can You Use Hiking Boots With Stockingfoot Waders?

    You can in a pinch, but I wouldn’t make it your regular setup.

    Hiking boots aren’t designed to fit cleanly over neoprene stockingfoot wader booties. Most hiking boot uppers are too narrow in the ankle and forefoot to accommodate the bootie without compressing it uncomfortably. They also don’t drain the same way a wading boot does, so water that gets in sits in the boot instead of flushing out. And the soles, while grippy on dry trail surfaces, aren’t designed for wet river rock the way wading boot soles are.

    If you’re spending real money on stockingfoot waders, buy proper wading boots to go with them. The investment makes the whole system work the way it’s supposed to.


    Wading Boots vs Wet Wading Shoes

    This post is specifically about wading boots for stockingfoot waders, which is the standard setup for most bank salmon fishing.

    Wet wading shoes are a different category entirely. They’re used when you’re fishing without full waders and expect your feet to get wet, usually during warmer summer or early fall conditions when the water temperature makes wet wading comfortable.

    For the fall and winter conditions most Northwest salmon fishing happens in, proper wading boots with stockingfoot waders are the right setup. Wet wading can make sense in specific warmer-weather situations, but it’s a separate conversation.


    My Recommendation

    If I had to pick one pair for most salmon anglers, I’d go with the Korkers Buckskin.

    That’s not just a spec-sheet decision. It’s because I actually use them. Mine have lasted four years, they’re comfortable all day, and they work well with my stockingfoot waders across different river conditions. The interchangeable sole system is the feature I’d miss most if I switched to a fixed-sole boot.

    The Korkers Darkhorse is the right upgrade if you want BOA lacing and a more premium Korkers fit system. The Simms Freestone Rubber Boot is the best option here if you want a high-end non-Korkers boot with stud compatibility and Simms construction. The Paramount Outdoors Stonefly is the right call for beginners who need a real wading boot but want to stay near the $100 range.

    For most salmon bank anglers, I’d start with the Korkers Buckskin and only move up if you know you specifically want the BOA system or a particular premium brand.


    Final Thoughts

    Wading boots aren’t the flashiest piece of salmon fishing gear, but they’re one of the most important from a practical and safety standpoint.

    A good pair keeps you upright on slick rock, protects your waders from abrasion, supports your ankles on uneven banks, and makes long days on the river easier on your feet. That matters more than people realize until they’ve had a bad experience with cheap or unsuitable footwear on a rough salmon river.

    For my money, the Korkers Buckskin is the best overall pick because it gives you durability, comfort, interchangeable traction, and proven long-term performance at a fair price point.

    If you fish salmon from the bank with stockingfoot waders, don’t treat boots like an afterthought. They’re part of your safety system just as much as your wading belt.


    FAQ: Best Wading Boots for Salmon Fishing

    What are the best wading boots for salmon fishing?

    The best wading boots for salmon fishing have strong ankle support, good traction on slick rock, fast drainage, durable construction, and a secure fit over stockingfoot wader booties. My top pick is the Korkers Buckskin because I’ve used mine for about four years, and they’re still comfortable and holding up well.

    Are Korkers wading boots good for salmon fishing?

    Yes, Korkers wading boots are a great choice for salmon fishing. The interchangeable OmniTrax sole system is especially valuable for salmon anglers who fish different types of rivers and want the flexibility to adapt their traction to changing conditions.

    Are the Korkers Buckskin boots worth it?

    Yes. I’ve used my Korkers Buckskin boots for about four years with regular hard use on salmon and steelhead rivers, and they’re still going strong. For the price, durability, comfort, and interchangeable sole system, they’re a solid long-term buy.

    Are BOA wading boots better than laces?

    BOA wading boots are easier and faster to adjust, especially when your hands are cold and wet. Traditional laces still work fine, but BOA is a real convenience upgrade for anglers who fish in cold conditions regularly. The Korkers Darkhorse is a good example of a well-built BOA wading boot.

    Are rubber or felt wading boots better for salmon fishing?

    For most salmon anglers, rubber or studded rubber wading boots are the safer all-around choice. Felt can grip well on certain slick rock, but it may be restricted or prohibited on some waters because of invasive species concerns. Always check local regulations before using felt soles on any river.

    Should I use studded wading boots for salmon fishing?

    or most salmon bank fishing, yes. Studded wading boots add meaningful grip on slick rocks, algae-covered ledges, and muddy banks. They’re not ideal on hard surfaces or boat decks, but for bank fishing, they’re worth having in most situations.

    Can I wear hiking boots with stockingfoot waders?

    You can wear hiking boots with stockingfoot waders in a pinch, but it’s not the right setup for regular use. Hiking boots don’t fit cleanly over neoprene booties, don’t drain properly, and don’t grip wet river rock the way purpose-built wading boots do. If you’re wearing stockingfoot waders, use proper wading boots.

    Do wading boots keep your feet dry?

    No. Wading boots don’t keep your feet dry on their own. They’re designed to be worn over stockingfoot waders, which are what actually keep water out. The boots provide support, traction, protection for your waders, and drainage.

    What size wading boots should I buy?

    Check the brand’s sizing chart before ordering, since sizing varies. The fit should accommodate your stockingfoot wader bootie and a pair of wading socks without feeling sloppy. A secure heel fit with no lift during walking is what you’re looking for.

    Are wading boots necessary for salmon fishing?

    If you’re wearing stockingfoot waders, then yes. Wading boots protect your waders from abrasion, support your ankles on rough bank terrain, drain water properly, and give you far better traction on slick riverbanks than any substitute. For bank salmon fishing, they’re a core piece of safety gear, not an optional accessory.

  • Best Waders for Salmon Fishing: 4 Bank Picks That Keep You Dry

    Angler wearing chest waders while salmon fishing from a rocky Northwest riverbank with evergreen trees and mountains in the background.

    Affiliate Disclosure: This post may contain affiliate links. If you buy through these links, I may earn a small commission at no extra cost to you. I only recommend gear that makes sense for real salmon fishing.

    Good waders matter a lot when you’re salmon fishing from the bank, more than most people think about until they’re standing in cold current with wet legs at seven in the morning.

    You’re not on a boat deck all day. You’re walking gravel bars, stepping over slick rocks, kneeling on wet banks, crossing shallow side channels, standing in cold current for hours, and fishing through rain that may or may not stop. If your waders leak, fit poorly, or wear out after one season, they can ruin a trip in a hurry.

    For me, the best waders for salmon fishing aren’t just the most expensive pair or the easiest pair to link to. They need to stay dry, move well, handle rough riverbanks, and be comfortable enough to wear for long days without making you miserable. Salmon fishing is hard on gear, and waders take a lot of that abuse directly.

    I’m also going to be upfront about something. My top pick isn’t on Amazon. I’m not going to rank a weaker pair above it because it has an easier affiliate link. If I’m talking about the waders I actually trust most for salmon fishing, my first pick is the pair I’ve personally worn hard for years, and that’s where this guide starts.

    If you’re still putting your overall river setup together, this article pairs well with my complete salmon fishing setup for rivers. That guide covers the full system. This one is about staying dry and comfortable while you fish it.


    Quick Picks: Best Waders for Salmon Fishing


    What Makes Good Waders for Salmon Fishing?

    Salmon fishing puts waders through a lot, and it’s worth understanding why before you buy.

    You might be walking over sharp river rock, sliding down muddy banks, pushing through streamside brush, kneeling on gravel to release a fish, or standing in cold water for hours at a stretch. A pair of waders that works fine for casual pond fishing or the occasional easy wade can feel completely outmatched when you start putting them through regular use on salmon rivers.

    For bank salmon fishing specifically, I care about a few things: waterproofing that actually holds up over time, durable lower-leg material since that’s where most of the abuse happens, a comfortable fit for long days with enough room to layer underneath, good gravel guards, quality stockingfeet or built-in boots depending on the style, a reliable belt system, useful pockets, and enough mobility to walk, crouch, and climb without fighting the fabric.

    Cheap waders can work, especially if you’re new to salmon fishing or only get out a handful of times per season. But once waders start leaking, the day gets uncomfortable fast. If you fish often, better waders are usually worth the investment because they keep you dry longer, move better, and hold up to repeated abuse around rocks, gravel, and rough bank conditions.

    This matters even more for bank anglers who move between spots. I talk more about covering water effectively in my guide on how to catch Chinook salmon from the bank.


    Best Overall Waders: DRYFT Primo Zip Waders

    The DRYFT Primo Zip Waders are my top pick for salmon fishing, and the reason is straightforward: I’ve actually put them through the kind of abuse salmon waders get.

    I’ve worn my DRYFT Primo Zip Waders on remote Alaska float trips for two weeks at a time, sometimes 14-plus hours a day. I’ve also used them all over the Pacific Northwest on salmon and steelhead trips across multiple seasons. After years of that kind of use, I still haven’t had to repair a leak.

    That track record means more to me than any spec sheet.

    These are not on Amazon, and they’re not cheap. But I’m not going to rank a weaker pair above them just because it’s easier to link. If I’m recommending the best waders for salmon fishing, the DRYFT Primo Zip is the honest answer.

    I also like that DRYFT is a Pacific Northwest company based in Washington State. These waders feel designed by people who understand the specific conditions we deal with out here: cold water, wet weather, rocky banks, and long days. The fact that every sale plants a tree through their One Tree Planted partnership is a nice bonus too.

    The zip-front design is one of those features that’s hard to give up once you’ve used it. Getting in and out of waders is easier, layering adjustments are faster, and streamside relief during a long day is significantly less miserable. Once you fish in zip-front waders regularly, going back to conventional entry feels like a step backward.

    The construction backs up the performance: a waterproof TIZIP main zipper, reinforced four-layer lower, breathable upper, fully taped seams, reinforced neoprene gravel guards, 4.0mm neoprene stockingfeet, handwarmer pockets, inner drop-in pockets, a waterproof media pouch, adjustable shoulder straps, wading belts, a storage bag, and a basic repair kit.

    The 20,000mm-plus waterproof fabric rating is also worth noting. Waterproofing ratings measure how much water pressure a fabric can resist before leaking, and 20,000mm is a strong rating for hard river use. Combined with fully taped seams, it helps explain why these waders have stayed dry for me under real fishing conditions.

    Specs:

    • Zip-front breathable chest waders
    • Waterproof TIZIP main zipper
    • Reinforced four-layer lower
    • Breathable upper
    • Fully taped seams
    • 20,000mm-plus waterproof fabric rating
    • PFAS-free DWR
    • Reinforced neoprene gravel guards
    • High-density 4.0mm neoprene stockingfeet
    • Handwarmer pockets
    • Inner drop-in pockets
    • Waterproof media pouch
    • Adjustable shoulder straps
    • Wading belts included
    • Storage bag included
    • Basic repair kit included
    • Washington-based PNW company
    • One tree planted per sale
    • Around $649

    My take: These are the waders I trust most because I’ve worn them hard for years and they’ve held up. Remote Alaska, long days, PNW salmon rivers, cold rain, rocky banks, and still no leak repairs. They’re expensive, but they cost less than the Simms G3, have a zip front, and have already proven themselves to me in the field. That confidence is worth something.

    DRYFT Primo Zip Waders for salmon fishing with waterproof zipper, reinforced lower, and breathable chest wader design

    These are my top overall pick because they are the pair I personally trust most for serious salmon bank fishing.

    One practical tip: if you’re not in a rush, sign up for the DRYFT newsletter before you buy. They occasionally send discount offers that help offset the price on a premium purchase like this.


    Best Budget Waders: FROGG TOGGS Hellbender Breathable Waders

    The FROGG TOGGS Hellbender Breathable Waders are the budget pick in this lineup, and they’re popular at that price point for good reason.

    For around $100, you get breathable waders with reinforced knees, taped seams, gravel guards, neoprene booties, and useful pockets. That’s a solid starting point for someone new to salmon fishing or someone who only gets out a few times each season and doesn’t want to commit premium wader money yet.

    I’m not going to pretend these are in the same class as the DRYFT or Simms waders. They’re not. Budget waders usually use thinner materials, lighter construction, and simpler seaming than premium options, and that shows over time with heavy use.

    The waterproof breathable material FROGG TOGGS uses, their DRIPORE Gen 2 / Dri2Pore system, is functional at this price point, but I would not expect it to match the durability or long-term performance of premium multi-layer fabrics.

    What they are is a reasonable entry point. Get on the water, learn what matters to you in a wader, and upgrade when you know you’re going to use them enough to justify spending more.

    They’re available in stockingfoot and bootfoot versions, and in men’s, women’s, and youth sizing, which is more flexibility than some budget options offer.

    Specs:

    • Breathable waterproof chest waders
    • 4-ply nylon upper
    • DRIPORE Gen 2 / Dri2Pore waterproof breathable material
    • Abrasion-resistant construction
    • Fully taped seams
    • Double-reinforced knees
    • 4mm neoprene booties
    • Attached gravel guards with lace hooks
    • Oversized multifunctional chest pocket
    • Zippered flip-out security pocket
    • Zippered handwarmer pockets
    • Available in stockingfoot and bootfoot versions
    • Multiple men’s, women’s, and youth sizes
    • Around $100

    My take: These are not premium waders, and I wouldn’t recommend them to someone who fishes hard all season and expects them to last for years. But for a beginner, a casual angler, or someone who needs a backup pair without spending premium money, the Hellbenders get you into breathable waders at a price that doesn’t hurt. Just keep your expectations realistic and take care of them.

    FROGG TOGGS Hellbender breathable stockingfoot waders with reinforced knees and gravel guards for salmon fishing

    The biggest reason to choose these is price. They get you into breathable waders for a lot less money, which makes them a good starting point if you’re still figuring out how much time you’ll spend salmon fishing.

    If you are still learning the basics, these pair well with the beginner approach I cover in my bank fishing for salmon guide.


    Best Premium Brand-Name Alternative: Simms G3 Guide Stockingfoot Waders

    The Simms G3 Guide Stockingfoot Waders are the premium brand-name alternative in this lineup, and they deserve their reputation.

    Simms has been building serious waders for a long time, and the G3 Guide is one of the most recognized waders in the fishing world. These are a direct premium competitor to the DRYFT Primo Zip, and they’re excellent waders.

    I just personally still prefer the DRYFT. They cost less, have the zip front, and I’ve already proven them to myself through years of hard use. But if you’re committed to a major brand name or already have a relationship with Simms gear, the G3 is the right choice at this level.

    The construction is genuinely top-tier. The G3 uses a GORE-TEX 3-layer upper and GORE-TEX Pro 4-layer lower. The adjustable spacer air-mesh suspender system is a comfort-focused detail that makes a real difference on long days. The anatomically engineered neoprene stockingfeet are designed with a better shape than most standard booties.

    Simms also backs the G3 with a 60-day leak replacement warranty and 365-day repair support, which is meaningful for a wader at this price point. That warranty structure gives you real recourse if something goes wrong early.

    One thing worth noting clearly: Simms lists the G3 as manufactured using PFAS chemicals. The DRYFT Primo Zip Waders use PFAS-free DWR. That is a factor some anglers care about when choosing gear, and it’s worth knowing before you buy.

    Specs:

    • Premium stockingfoot chest waders
    • GORE-TEX 3-layer upper
    • GORE-TEX Pro 4-layer lower
    • Adjustable spacer air-mesh suspender system
    • Integrated webbing attach point for net carry
    • Top-access zippered stretch pocket
    • Zippered micro-fleece handwarmer chest pocket
    • Removable Tippet-Tender pocket
    • Interior flank pocket
    • Low-profile back belt loops
    • 2-inch stretch nylon belt included
    • Built-in gravel guards
    • Anatomically engineered neoprene stockingfeet
    • Made in USA of imported materials
    • 60-day leak replacement warranty
    • 365-day repair support
    • Around $750

    My take: The Simms G3 Guide Waders are excellent, and I wouldn’t argue with anyone who swears by them. GORE-TEX Pro construction, strong warranty support, and a brand reputation built over decades of serious fishing all matter. I still put DRYFT first for my own fishing, but if you want the premium big-name option with Simms behind it, the G3 earns that spot.

    Simms G3 Guide stockingfoot waders with GORE-TEX construction and gravel guards for salmon fishing

    These are the premium big-name alternative. They cost more than the DRYFT waders, but Simms has a long-standing reputation and strong warranty support.


    Best Beginner Bootfoot Waders: Orvis Clearwater Bootfoot Waders

    The Orvis Clearwater Bootfoot Waders are the beginner bootfoot pick in this lineup, and they sit in a useful middle ground that doesn’t get enough attention.

    At around $300, they’re not budget waders, but they’re also well below the $650 to $750 premium tier. For an angler who wants something more serious than a $100 starter pair but isn’t ready to commit premium wader money, that middle ground is exactly where the Clearwater Bootfoot lives.

    The bootfoot design is the main reason I’d point a beginner toward these. With stockingfoot waders you still need to buy separate wading boots, which adds another purchase, another sizing decision, and another variable to figure out when you’re new. Bootfoot waders eliminate that step. The boots are built in, the setup is simpler, and you can focus on learning how to fish rather than sorting out gear.

    The Orvis Clearwater Bootfoot uses a 4-layer waterproof fabric with a 30K/8K breathability rating. That is solid for a midrange bootfoot wader and better than what you usually see in very cheap options.

    The side-release buckles that convert the wader from chest to waist height are a useful detail too. They give you flexibility to fish in warmer conditions without overheating in full chest waders.

    One important thing to check before purchasing: the Clearwater Bootfoot comes with felt sole boots, and felt soles are regulated or prohibited on some waters due to invasive species concerns. Always check your local fish and wildlife regulations before fishing felt soles on any river.

    Specs:

    • Bootfoot chest waders
    • Built-in vulcanized neoprene felt sole wading boots
    • 4-layer waterproof fabric
    • 30K/8K breathability rating
    • Side-release buckles for chest-to-waist conversion
    • Chest pocket
    • Handwarmer pocket
    • Modern fit
    • Around $300

    My take: These are the pair I’d recommend if you want a beginner-friendly all-in-one setup that’s more serious than a budget wader but still well below premium pricing. The built-in boots make the buying process simpler for a newer angler, and the 4-layer construction is a real step up from the cheapest options. Just verify felt sole regulations for your local rivers before you buy.

     Orvis Clearwater bootfoot chest waders with felt sole boots for beginner salmon fishing

    The big advantage is simplicity. You get waders and boots together, which can make the buying process easier for a newer angler. The tradeoff is that bootfoot waders are less customizable than stockingfoot waders with separate boots.

    If you are just getting started, focus on safe bank access and basic gear before trying to wade too aggressively. I cover more about fishing from shore in my guide on where to cast for salmon in a river.


    Stockingfoot vs Bootfoot Waders for Salmon Fishing

    The two main wader styles are stockingfoot and bootfoot, and the difference matters more for salmon bank fishing than it does for easier fishing situations.

    Stockingfoot waders have neoprene booties built into the lower leg, and you wear separate wading boots over them. This is the style I prefer for most serious salmon bank fishing. Separate boots give you control over fit, ankle support, traction, and replacement.

    If your boots wear out before your waders do, which happens, you replace the boots without replacing the waders. You can also choose different boot sole types for different rivers.

    Bootfoot waders have the boots built in as a single unit. The setup is simpler and more convenient, which makes them a good fit for beginners. The tradeoff is less customization. You can’t choose your sole type or get a perfect boot fit independently, and if either the wader or the boot fails, you’re dealing with the whole unit.

    For ankle support specifically, separate wading boots are usually better than built-in bootfoot boots. Salmon bank fishing involves walking uneven gravel, climbing over rocks, and navigating rough bank access. Good ankle support in a proper wading boot is a real safety factor, not just a comfort one.

    A simple way to think about it:

    • Stockingfoot waders: better for serious use, better boot options, better ankle support
    • Bootfoot waders: simpler for beginners and fewer separate purchases
    • Felt soles: good grip on some slick rock, but check local regulations
    • Rubber soles: easier to clean, more regulation-friendly, and still useful on most river bottoms

    If you’re choosing wading boots for Pacific Northwest salmon rivers, rubber soles with studs can be a strong all-around choice and avoid some of the regulatory uncertainty that comes with felt.

    Breathable vs Neoprene Waders for Salmon Fishing

    For most salmon fishing situations, breathable waders are the better choice, and that’s what this guide focuses on.

    Breathable waders use waterproof-breathable fabrics that keep water out while allowing moisture vapor from your body to escape outward. That combination keeps you dry from external water while reducing the sweaty, clammy feeling that comes from wearing a fully sealed non-breathable wader during active use.

    For bank fishing where you’re walking, moving between spots, and potentially covering a lot of ground, that breathability matters.

    Neoprene waders are warm, and they still have their place in very cold-water situations. Thick neoprene traps body heat effectively and can keep you comfortable in frigid late-fall or winter conditions. The tradeoff is that neoprene is heavy, bulky, and restrictive. It can feel like wearing a wetsuit on land, which gets uncomfortable fast if you’re walking any real distance.

    For the majority of salmon fishing, breathable waders with appropriate layering underneath cover the conditions better than neoprene for most bank anglers. Neoprene makes more sense for anglers standing in one spot for long periods in extreme cold, or for winter steelhead fishing in very cold conditions where active walking isn’t part of the plan.

    A separate guide specifically on winter salmon and steelhead waders would make sense later. For a general salmon wader guide, breathable waders are the right recommendation for most anglers and most conditions.

    What Features Matter Most in Salmon Fishing Waders?

    You don’t need every possible feature, but a few things make a meaningful difference when you’re actually on the river.

    Durable Lower Legs

    The lower half of your waders takes most of the abuse: rocks, gravel, brush, kneeling, and scrambling over bank obstacles.

    Reinforced material from the knee down, strong seam construction, and good abrasion resistance in the lower leg are worth prioritizing. This is one of the main reasons I like the DRYFT Primo Zip design. The lower is reinforced for abuse, while the upper stays lighter and more breathable.

    Comfortable Fit for Long Days

    Salmon fishing can mean eight or ten hours in waders. A pair that feels fine for one hour can become genuinely miserable after five.

    You want enough room to layer underneath in cold conditions without the waders feeling baggy and sloppy. You also want enough mobility to crouch, step up onto rocks, and walk comfortably without fighting the material.

    Room for Layering

    This deserves its own mention because it affects what waders you buy.

    In cold fall and winter salmon fishing conditions, you need to layer underneath your waders. Moisture-wicking base layers, insulating mid-layers, and sometimes heavier fleece can make a big difference.

    Waders that fit too tight with light layers become uncomfortable when you add proper cold-weather insulation underneath. Buy with layering room in mind.

    Good Gravel Guards

    Gravel guards keep rocks, sand, and river debris from working their way into your wading boots during walking.

    On salmon rivers where you’re constantly moving over gravel bars and rocky banks, gravel inside your boot is more than just annoying. It can also accelerate bootie wear. Built-in gravel guards with proper attachment systems are worth having.

    Reliable Stockingfeet or Boots

    For stockingfoot waders, the neoprene booties should be comfortable, well-sealed, and durable. Thin or poorly constructed booties wear out faster and can develop leaks at the seams.

    For bootfoot waders, boot fit and sole type are the main considerations.

    Pockets That Actually Work

    Pockets are useful, but they come with an important caveat: not all wader pockets are waterproof or submersion-rated.

    A standard zippered chest pocket on waders may resist rain, but it may not protect your phone if you take a spill in the river. Anything important like a phone, wallet, or car keys should go in a fully waterproof pocket or a separate waterproof pouch inside the wader.

    The DRYFT Primo Zip has a waterproof media pouch for this reason.

    A Proper Belt System

    A wading belt is not optional. It’s a safety device.

    If you fall in a river, a snug wading belt helps limit how much water can enter your waders. Without a belt, waders can fill with water fast and become extremely difficult to move in.

    Always wear your belt snug, especially in any water with real current.

    Wading Safety Matters More Than the Brand

    Good waders keep you dry, but they don’t make you invincible, and this is worth saying plainly.

    Salmon rivers can be cold, pushy, slick, and unpredictable. Water that looks knee-deep from the bank can be deeper mid-channel. Current that looks mild can knock you off your feet on slick rock.

    A few basic safety practices matter regardless of which waders you buy:

    • Always wear your wading belt snug
    • Move slowly on slick or uneven bottom
    • Use a wading staff in rough or pushy water
    • Do not wade deeper than you need to
    • Do not cross heavy current alone
    • Let someone know where you’re fishing
    • Watch for drop-offs and soft edges
    • Keep felt sole regulations in mind
    • Back out if the water feels stronger than expected

    A wading staff doesn’t need to be expensive. A simple collapsible staff that clips to your waders when not in use can make a real difference on slick or uneven bottom. For serious bank fishing on rough water, I’d call it close to essential.

    A lot of the time, you do not need to wade as far as you think. Many salmon travel close enough to the bank that positioning and casting angle matter more than standing waist-deep in current.

    I talk more about positioning and reading bank water in my guide on how to read a river for salmon.

    My Recommendation

    If I were buying one pair of waders for salmon fishing, I’d buy the DRYFT Primo Zip Waders.

    That’s the honest answer. They’re the pair I personally trust most because I’ve used them hard for years and they’ve held up without a single leak repair. They cost less than the Simms G3, have a zip front, come from a Washington-based PNW company, and have already proven themselves to me across two weeks in Alaska and multiple seasons in the Pacific Northwest.

    If you need a budget pair to get started, the FROGG TOGGS Hellbender Breathable Waders are the right starting point.

    If you want the premium big-name alternative with GORE-TEX Pro construction and strong Simms warranty support, the Simms G3 Guide Stockingfoot Waders are excellent.

    If you’re a beginner who wants a simpler all-in-one bootfoot setup without buying separate boots, the Orvis Clearwater Bootfoot Waders are the pair I’d look at. Just verify felt sole regulations for your local rivers first.

    Pick based on how often you fish, how rough your rivers are, and what you can realistically spend. Don’t buy premium waders just because they look impressive, and don’t underestimate how badly a leaking pair can ruin a long day on a cold river.

    Final Thoughts

    The best waders for salmon fishing are the ones that keep you dry, fit well, and hold up to the way you actually fish.

    If you’re serious about bank salmon fishing and spend long days on the river, breathable waders with good construction are worth spending real money on. You don’t need the most expensive pair on the market, but you do need a pair you can trust when you’re standing in cold water for hours in the rain.

    For me, that’s the DRYFT Primo Zip.

    For someone just starting out, a budget or midrange option makes more sense. Get on the water, learn what matters to you, and upgrade when you know you’re going to use them enough to justify it.

    Either way, wear your belt, use a wading staff when the water is rough, check your footing before you commit your weight, and don’t let a good pair of waders give you false confidence in water that’s stronger than it looks.

    Staying dry matters. Staying safe matters more.

    FAQ:

    What are the best waders for salmon fishing?

    The best waders for salmon fishing are durable breathable waders that stay dry, fit comfortably with room for layering, have reinforced lower legs, good gravel guards, and a reliable belt system. My top pick is the DRYFT Primo Zip Waders because I’ve used them for years on Alaska and Pacific Northwest trips without needing a leak repair.

    Are breathable waders good for salmon fishing?

    Yes, breathable waders are the better choice for most salmon fishing situations because they’re more comfortable for walking, better suited to active bank fishing, and more versatile across fall and winter conditions than neoprene. Neoprene still has a place in very cold, stationary fishing situations, but breathable waders are the right starting point for most salmon anglers.

    Are bootfoot or stockingfoot waders better for salmon fishing?

    Stockingfoot waders are usually better for serious salmon bank fishing because separate wading boots give you better ankle support, more control over fit and traction, and the ability to replace boots independently when they wear out. Bootfoot waders are simpler for beginners who want a complete all-in-one setup without a separate boot purchase.

    Are felt sole waders legal for salmon fishing?

    Felt soles are legal in many places but restricted or prohibited on some waters because felt can hold aquatic invasive species and move them between waterways. Always check your local fish and wildlife regulations before using felt soles on any river. Rubber or studded rubber soles are a safer default choice for most Northwest salmon rivers.

    Are FROGG TOGGS waders good for salmon fishing?

    FROGG TOGGS waders can be a reasonable budget option for beginners or anglers who fish a few times per year. They’re not in the same construction class as premium waders, but the Hellbender Breathable Waders offer usable features at around $100. Keep expectations realistic and consider upgrading if you start fishing hard and often.

    re Simms waders worth it for salmon fishing?

    Simms waders are worth it for serious anglers who want GORE-TEX Pro construction, a major brand name, and strong warranty support. The G3 Guide Waders are excellent. I personally still prefer the DRYFT Primo Zip because they cost less, have a zip front, and I’ve proven them through years of hard use, but the G3 is a legitimate premium choice.

    How much should I spend on salmon fishing waders?

    For beginners or casual anglers, $100 to $300 is a reasonable starting range. For anglers who fish hard and often, investing $600 to $750 in premium waders can make sense because better waders usually offer better durability, comfort, waterproofing, and long-term performance.

    Do I need waders for salmon bank fishing?

    You don’t always need waders, but they help significantly. Waders let you wade shallow edges, stand comfortably in wet conditions, land fish more safely, and fish through rain or cold weather without getting soaked. Just remember that waders aren’t a reason to wade deeper than necessary. Many salmon are closer to the bank than people think.

    Are zip-front waders worth it?

    Yes, zip-front waders are worth the extra cost if you fish long days or want easier entry, exit, and bathroom breaks during cold weather. Once you get used to the convenience, going back to pulling waders on and off over boots feels unnecessarily difficult. The key is a high-quality waterproof zipper, which is why the TIZIP zipper on the DRYFT Primo Zip is one of the features I specifically value.

    What should I wear under waders for salmon fishing?

    In cold conditions, start with a moisture-wicking synthetic base layer against the skin. Avoid cotton because it absorbs moisture and gets cold fast. Add an insulating mid-layer of fleece or synthetic fill depending on the temperature. In very cold fall and winter conditions, heavier fleece pants under waders make a real difference. In mild weather, lightweight synthetic layers are usually enough.

    Do I need a wading staff for salmon fishing?

    A wading staff isn’t required, but it’s worth having for any river with slick bottom, strong current, or uneven terrain. A staff gives you a third point of contact and dramatically improves stability, especially when you’re wading in current. Collapsible wading staffs that clip to your waders when not in use are the most practical option for bank fishing.

  • Best Tackle Bag for Salmon Fishing: 5 Bank Fishing Packs Worth Carrying

    Tackle backpack with salmon fishing lures, pliers, rod, and gear on a rocky Northwest riverbank with evergreen trees and mountains in the background.

    Affiliate Disclosure: This post may contain affiliate links. If you buy through these links, I may earn a small commission at no extra cost to you. I only recommend gear that makes sense for real salmon fishing.

    A good tackle bag matters more for bank salmon fishing than it does for almost any other style of freshwater fishing, and most people don’t think about it until they’ve had a bad one.

    When you’re on a boat, your gear sits in compartments, trays, and open boxes. You don’t carry anything. Bank fishing is a completely different situation. You might be walking long gravel bars, climbing over riprap, navigating around logjams, carrying a net and a rod, packing extra layers for the weather, and trying to keep both hands free while you work your way down a river looking for fish.

    What you carry your gear in matters a lot when all of that is going on.

    That’s why I lean toward backpack-style tackle bags for salmon fishing. A shoulder bag can work for shorter, simpler trips, but if I’m walking any real distance, I want the weight on my back and my hands free. It just makes everything easier.

    The best tackle bag for salmon fishing needs room for the gear you actually use: spoons, spinners, plugs, leaders, floats, weights, hooks, scents, pliers, extra line, and small tools. It also needs to be tough enough to sit on wet rocks, damp gravel, and muddy riverbanks without falling apart after one season.

    If you’re still building out your whole setup, this article pairs well with my complete salmon fishing setup for rivers. That guide covers the bigger gear system. This one is specifically about how to carry it.


    Quick Picks: Best Tackle Bag for Salmon Fishing


    What Makes a Good Tackle Bag for Salmon Fishing?

    Salmon fishing gear gets bulky fast, and that’s worth understanding before you buy a bag.

    You’re not just carrying a few small lures and a handful of hooks. A normal bank salmon setup can include floats, bobber stops, beads, leaders, swivels, bait loops, sliding weights, pencil lead, hooks in multiple sizes, spoons, spinners, plugs, soft beads, scents, pliers, split ring pliers, extra line, and bait gear depending on how you fish.

    All of that needs to go somewhere organized so you can actually find things when you need them.

    That’s why the best salmon tackle bag isn’t always the smallest or cheapest option. It needs to carry enough gear without turning into a tangled mess every time you open it.

    For bank fishing specifically, I look for comfortable backpack straps or a carry system that’s actually designed for walking, enough room for multiple tackle trays, water-resistant material, a tough base that can handle wet ground without soaking through, easy access to tools and small accessories, separate storage for lures and terminal tackle, and zippers and stitching that hold up to regular abuse.

    For serious bank fishing where you’re covering water, I lean toward backpacks. If you’re walking far, moving between holes, or carrying a rod and net along with your tackle, a backpack-style bag is just easier to live with.

    For shorter sessions close to the truck, a sling bag or traditional tackle bag can still make sense.


    Best Overall Tackle Backpack: Evolution Fishing Drift Series

    The Evolution Fishing Drift Series Tackle Backpack is my pick for best overall because it gives you serious storage capacity, good organization, and a layout that’s genuinely thought out for bank anglers who carry more than just a couple of lures.

    This is not a minimalist pack. It’s made for anglers who bring a real spread of gear, and for salmon fishing, that’s usually exactly what you need.

    The main compartment holds up to six 3700-size trays, and the top compartment fits four 3600 trays. That’s a lot of organized storage for a single bag, and it covers the size range that makes sense for salmon gear. 3700 trays give you more room for bigger spoons, spinners, plugs, and float components that don’t always fit well in smaller trays.

    It also comes with six matching Drift Series trays included, which is a genuinely useful detail. A lot of tackle bags are priced without accounting for the trays you’ll immediately need to buy to make them functional. Getting six trays in the box is a real bonus.

    The open-access largemouth lid design is one of the better features for river use. When you’re on the bank and you need to find a specific spoon, change a float size, or grab a different leader, you don’t want to be digging through a dark bag blind.

    Being able to see and reach your gear quickly matters more on the river than it might seem when you’re shopping at home.

    The backpack-specific features are also worth noting for bank anglers: two rod holders, a built-in line spool feed, rubberized mesh pockets for small accessories, a non-slip dimpled PVC bottom, an integrated plier holster, padded backpack straps, and a sternum strap.

    The sternum strap especially matters on longer walks because it keeps the bag from swinging when you’re moving over uneven ground.

    Specs:

    • Rugged 1680D wear-resistant construction
    • Open-access design with largemouth lid opening
    • Holds up to six 3700 trays in the main compartment
    • Fits four 3600 trays in the top compartment
    • Includes 6 Drift Series tackle trays
    • Integrated tie-down Y-strap
    • 2 rod holders
    • Built-in line spool feed
    • 4 rubberized mesh slip pockets
    • Non-slip dimpled PVC bottom
    • Integrated plier holster
    • Adjustable padded backpack straps
    • Sternum strap
    • Around $150

    My take: If I were picking one serious tackle backpack for salmon bank fishing, this is where I’d start. The storage capacity covers a full salmon setup, the included trays save you money right out of the box, and the organization layout actually makes sense for how bank anglers use their gear on the water.

    The price is fair for what you get.

     Evolution Fishing Drift Series tackle backpack with fishing trays, rod holders, and storage pockets for salmon fishing gear

    The biggest reason I like this one is organization. You can separate spoons, spinners, plugs, floats, weights, hooks, leaders, and tools instead of letting everything pile together. That matters when you are trying to re-rig quickly on the bank.

    If you carry a lot of lures, this backpack pairs naturally with the gear I cover in my best salmon lures for river fishing guide.


    Best Premium Tackle Backpack: Plano Atlas 3700

    The Plano Atlas 3700 Tackle Backpack is the premium option in this lineup, and the price reflects that. But if you want the most polished, structured, and durable tackle backpack here, this is it.

    I’m not going to tell every angler they need to spend $245 on a tackle bag. For a lot of people, the Evolution backpack is more than enough. But if you fish hard, fish often, and want a bag that feels built to last well beyond a single season, the Plano Atlas is the step up that makes sense.

    The biggest structural advantage is the combination of EVA side panels and a waterproof, non-skid HDPE base. Most soft-sided tackle bags feel floppy and shapeless when they’re not packed full. The Atlas holds its form, which makes it easier to access gear and more protective of what’s inside.

    For salmon fishing where your bag is regularly sitting on wet gravel, rocky shorelines, muddy banks, and boat ramps, a base that’s genuinely waterproof and non-skid is a practical advantage every single trip.

    The patented Dropzone magnetic top is a feature I didn’t think I’d care about until I understood what it’s for. It gives you a quick magnetic surface right at the top of the bag to set down small tools, lures, or terminal tackle while you’re rigging instead of immediately losing them in the rocks or grass at your feet.

    For bank fishing where you’re often standing on uneven ground, that’s a genuinely useful spot.

    It includes three Plano 3750 StowAway utility boxes, padded adjustable backpack straps with a sternum strap, internal zippered pockets, molded side pockets, a bungee rod holder, tool holders, and a water-resistant cell phone pocket.

    Specs:

    • Gray EVA material
    • Waterproof/non-skid HDPE base
    • EVA side panels
    • Includes 3 Plano 3750 StowAway utility boxes
    • Padded adjustable backpack straps
    • Sternum strap
    • Patented Dropzone magnetic top
    • Internal zippered pockets
    • Molded side pockets
    • Bungee strap rod holder
    • Water-resistant cell phone pocket
    • Tool holders
    • Dimensions around 18″L x 13″W x 8″H
    • Around $245

    My take: The price is real and I won’t pretend otherwise. But if you want the most durable, structured, and well-organized tackle backpack in this lineup, the Plano Atlas earns that spot. The waterproof base, the EVA structure, and the Dropzone magnetic top are all features that solve actual problems bank anglers run into.

    Plano Atlas 3700 tackle backpack with waterproof base and utility boxes for salmon fishing gear

    The price is the main drawback. For most anglers, the Evolution backpack gives you plenty of storage for less money. But if you want the premium build and a more structured pack, the Plano Atlas is a strong upgrade.

    If you are building a full river system with rods, reels, line, tools, and tackle, this is the kind of bag that fits into a more complete salmon fishing setup for rivers.


    Best Heavy-Duty Bank Fishing Backpack: EGO Kryptek Tactical

    The EGO Kryptek Tactical Tackle Box Backpack is the heavy-duty bank fishing pick, and it looks a little different from the other bags on this list in a way that actually makes sense for how bank anglers fish.

    The tactical-style design isn’t just aesthetic. The 1000D nylon fabric with water-resistant PVC backing is genuinely tough. It is tougher than the standard materials on most fishing-specific bags in this price range.

    The laser-cut MOLLE loops on the exterior let you attach tools, pouches, or accessories to the outside of the bag, which is useful if you like keeping pliers, a fish gripper, or a small tool kit clipped and accessible without opening the main compartment.

    For bank anglers who are constantly moving and reaching for tools, having external attachment points is a practical feature.

    The removable main compartment divider gives you flexibility depending on what you’re carrying that day. Running a full float setup with lots of loose gear? Keep the divider in. Carrying a mix of large spoons and plugs that need more open space? Take it out.

    Four clear tackle trays are included, which is a nice touch at this price point. The contoured backpack straps are designed for extended carry, which matters if you’re covering serious ground on a river walk.

    The EGO sits in a reasonable middle ground between the budget bags and the higher-end Plano Atlas, giving you a tough, well-built backpack without crossing into the $200-plus range.

    Specs:

    • 1000D nylon fabric
    • Water-resistant PVC backing
    • Kryptek camo/tactical design
    • Laser-cut MOLLE loops
    • Tactical Velcro patch area
    • Contoured backpack straps
    • Removable main compartment divider
    • Multiple storage pockets
    • Includes four 10″ x 7″ clear tackle trays
    • Water-resistant construction
    • Around $160

    My take: This is the bag I’d look at if you want a rugged backpack-style tackle bag built more like serious outdoor gear than a standard fishing bag. The fabric is tough, the MOLLE loops are genuinely useful for attaching tools, and the included trays are a good size for salmon lures and hardware.

    If you walk far and fish hard, this one holds up.

    EGO Kryptek tactical tackle backpack with MOLLE loops and tackle trays for salmon bank fishing

    The EGO backpack is not the smallest or cheapest option. But if you like backpack-style storage and want something built more like a rugged gear bag than a basic tackle box, it has a lot going for it.

    This style of backpack works especially well for bank anglers who move between holes, which I talk more about in my guide on how to catch Chinook salmon from the bank.


    Best Budget Sling Bag: KastKing Karryall

    The KastKing Karryall Sling Tackle Bag is the budget option for lighter trips and simpler salmon setups, and it’s honest about what it is.

    This is not the bag I’d choose for a full Chinook setup with multiple large trays, a spread of lures, float gear, bait components, extra layers, and all the tools that go with it. But not every trip needs all of that.

    Sometimes you’re making a quick session, throwing spoons or spinners, fishing a stretch of river where you only need a couple boxes and a few tools. For that kind of day, hauling a giant backpack is overkill.

    The KastKing Karryall is a single-shoulder sling bag that can be worn as a sling, crossbody, chest bag, or handbag depending on what’s comfortable. It fits up to three 3600-size tackle trays, though trays are not included.

    It also has multiple zippered pockets, a mesh beverage holder, a side rod pocket, a rear storage pocket, an integrated pliers sheath, MOLLE webbing, and D-rings for attaching extras.

    The 600D Oxford fabric with PVC coating gives it decent water resistance for the price, and the reinforced stitching and heavy-duty zippers are better than you’d expect at this price point.

    For around $24, it’s a solid budget option for anglers who want something compact and portable for lighter sessions.

    Specs:

    • Sling/crossbody tackle bag
    • Fits up to three 3600-size tackle trays
    • Trays not included
    • Multiple zippered pockets
    • Front slit pocket
    • Mesh beverage holder
    • Side rod pocket
    • Rear zippered storage pocket
    • Integrated pliers sheath
    • MOLLE webbing
    • D-rings
    • 600D Oxford fabric with water-resistant PVC coating
    • Heavy-duty zippers
    • Reinforced stitching
    • Breathable mesh back panel
    • Dimensions approximately 9.06″ x 7.87″ x 15″
    • Around $24

    My take: Don’t try to make this your full salmon setup bag. It’s not built for that. But as a light-trip option for days when you’re only carrying a few lures, some leaders, and a couple tools, it does the job for a price that’s hard to argue with.

    For beginners who aren’t sure yet how much gear they’ll need to carry, starting here and upgrading later is a perfectly reasonable approach.

    KastKing Karryall sling tackle bag with rod holder and storage pockets for light salmon fishing trips

    The main tradeoff is capacity. This is a light-trip bag, not a full salmon system. But for the price, it gives beginners and casual bank anglers a simple way to carry the basics.

    If you fish mostly lures on quick trips, this is a good size for carrying a few spoons and spinners like the ones in my best spinners for salmon fishing and best spoons for salmon fishing guides.


    Best Budget Traditional Tackle Bag: Plano Weekend 3500

    The Plano Weekend 3500 Tackle Bag is the best choice here if you want a simple traditional shoulder bag rather than a backpack, and there’s still a real place for that style depending on how you fish.

    I personally prefer backpack-style bags for bank salmon fishing because I like having both hands free, especially on longer walks. But a traditional shoulder bag still makes complete sense for shorter sessions, simpler setups, or anglers who fish close to the truck and don’t need to carry much.

    Not everyone is hiking a mile down a riverbank for every trip.

    The Plano Weekend 3500 keeps it straightforward: a molded waterproof base, a large main compartment sized for 3500-style storage, die-cut tool sleeves for keeping pliers and scissors accessible, quick-access slip pockets, Daisy Chain attachment points, and a shoulder strap.

    The molded waterproof base is the detail I appreciate most for river use. Bank anglers are constantly setting bags down on damp gravel, wet rocks, muddy shorelines, and boat ramps. A bag with a soft, unprotected bottom soaks up water and wears out faster than it should.

    The molded base on this bag solves that problem at a price point that doesn’t hurt.

    Specs:

    • Traditional shoulder-style tackle bag
    • Molded waterproof base
    • Large main compartment
    • Sized for 3500 tackle box storage
    • Die-cut tool sleeves
    • Quick-access slip pockets
    • Daisy Chain attachment points
    • Shoulder strap
    • Durable construction
    • Around $45

    My take: This is the simple, no-nonsense option in the lineup. It won’t carry as much as the bigger backpacks and it won’t keep your hands free on long walks, but it’s affordable, well-built for the price, organized enough for a basic salmon setup, and the waterproof base makes it more river-worthy than a lot of bags at this price.

    For short trips and lighter setups, it works.

    Plano Weekend 3500 traditional tackle bag with waterproof base and shoulder strap for salmon fishing gear

    This is the simple option in the lineup. It does not have the storage of the bigger backpacks, but it is affordable, easy to use, and better than carrying loose boxes and tools by hand.

    If you are mostly carrying smaller terminal tackle, this bag can work well with the hooks, weights, swivels, and rigging pieces I cover in my terminal tackle for salmon fishing guide.


    Backpack vs Shoulder Bag for Salmon Bank Fishing

    For salmon bank fishing, I usually prefer a backpack, and it’s not really a close call for most situations.

    That doesn’t mean shoulder bags are useless. For short walks, quick sessions, or trips where you’re fishing close to where you parked, a shoulder bag or sling is perfectly fine.

    But when you’re covering water, moving between holes, navigating rough bank access, or carrying a rod, net, and extra gear on top of your tackle, a backpack just makes everything easier.

    The practical advantages of a backpack for bank fishing are:

    • Both hands free for balance and rod carrying
    • Better weight distribution across your back instead of one shoulder
    • Less swinging and shifting while moving over uneven ground
    • More room for the extra gear that bank fishing requires
    • More comfort on longer trips

    The hands-free piece especially matters. Bank fishing can involve a lot of scrambling over rocks, through brush, down steep banks, and across shallow riffles. Trying to do that with a shoulder bag swinging around is clumsy at best.

    A backpack stays put.

    A shoulder bag or sling bag still makes sense for lighter trips where you’re not carrying much and not walking far. But if I’m gearing up for a serious day on the bank, the backpack goes on every time.


    What Size Tackle Bag Do You Need for Salmon Fishing?

    The right size depends almost entirely on how you fish and how much gear you actually carry.

    If you primarily fish bait and float setups, you need room for weights, bobber stops, floats in multiple sizes, hooks, leaders, beads, swivels, scents, and bait components. If you fish lures, you need organized space for spoons, spinners, plugs, jigs, and soft beads across multiple color options.

    Most serious salmon anglers carry both, plus tools.

    For a full salmon setup, I like bags that can carry multiple 3700-size trays. The reason is simple: bigger salmon lures, float gear, and larger hardware components don’t always fit cleanly in smaller 3600 trays.

    Having that extra tray depth and width makes organization easier.

    A simple framework for sizing:

    • Small sling bag: quick lure trips and light bank sessions with minimal gear
    • Traditional 3500-size bag: short trips with a basic tackle spread
    • Medium backpack: most bank anglers carrying a normal full salmon setup
    • Large 3700 backpack: anglers who carry lots of lures, floats, weights, tools, and extra gear
    • Premium structured backpack: serious anglers who prioritize durability and organization

    If you’re unsure, go with a little more room than you think you need. A bag that’s slightly too big is a minor inconvenience. A bag that’s too small to hold what you need is a constant frustration.


    What Should You Carry in a Salmon Tackle Bag?

    A salmon tackle bag should match your fishing style, but most bank anglers end up carrying a similar core spread of gear regardless of whether they primarily fish bait or lures.

    Common items include salmon hooks in multiple sizes, pre-tied leaders, swivels, beads, bobber stops, floats, sliding weights, pencil lead or drift weights, spoons, spinners, plugs, twitching jigs, soft beads, scents, extra braid or leader material, fishing pliers, split ring pliers, scissors or line cutters, gloves, a small towel, a headlamp for early morning starts, and a rain shell or extra layer depending on the season.

    You don’t need all of that every trip, but salmon fishing has a way of making you wish you’d brought the one thing you left at home. A well-organized bag that holds what you actually use is worth more than a fancy bag that’s packed so tight you can’t find anything.

    For float fishing gear specifically, my salmon float rig setup guide covers all the components worth keeping organized together.


    Features I Look For in a Salmon Tackle Bag

    A tackle bag doesn’t need to be complicated, but a few specific features make a meaningful difference when you’re actually on the river.

    Comfortable Backpack Straps

    For bank fishing, padded backpack straps and a sternum strap are worth having. They keep the load distributed evenly, reduce shoulder fatigue on longer walks, and keep the bag stable while you’re moving over uneven ground.

    A sternum strap specifically keeps the bag from swinging sideways. That matters more than it sounds when you’re navigating rough bank access with a rod in your hand.

    Water-Resistant Material

    Your bag is going to get wet. It’ll sit on damp gravel, get rained on, ride in a wet truck bed, and occasionally get splashed.

    Water-resistant fabric isn’t the same as fully waterproof, but it slows moisture absorption significantly and protects your tackle during normal river conditions.

    Fully waterproof bags exist but are usually more expensive. For most bank anglers, good water resistance is enough.

    Tough Waterproof Base

    The bottom of a tackle bag takes more abuse than any other part of it. It sits directly on wet rocks, muddy banks, sandy boat ramps, and damp gravel bars for hours at a time.

    A molded waterproof base or non-slip PVC bottom is one of the most practical features in a river fishing bag. Bags with soft, unprotected bottoms wear out faster and let moisture into the bag from below.

    Good Tray Storage

    Trays are what keep salmon gear organized and findable.

    I prefer bags that accommodate 3600 or 3700-size trays depending on the load I’m carrying. If you’re fishing a mix of larger salmon lures, spoons, spinners, plugs, float gear, and terminal tackle, having the right tray sizing matters for keeping things sorted.

    Easy Tool Access

    Pliers, split ring tools, scissors, and small accessories should be reachable without digging through the main compartment.

    Integrated plier holsters, exterior tool pockets, and MOLLE attachment points all help with this. When you’re handling fish, re-rigging quickly, or changing hooks on a lure, not having to excavate your whole bag to find your pliers is a real quality-of-life improvement.

    A good bag should also make room for small tools like the ones I cover in my best fishing pliers for salmon fishing guide.

    Enough Room Without Being Overkill

    Bigger isn’t always better.

    A massive tackle backpack that forces you to carry more than you need on every trip gets heavy fast and becomes something you start leaving in the truck.

    The best bag is the one that holds what you actually use without making the walk back to the truck something you dread.


    My Recommendation

    If I were picking one tackle bag for salmon fishing, I’d go with the Evolution Fishing Drift Series Tackle Backpack.

    It has the best combination of storage capacity, tray organization, included trays, rod holders, plier storage, and backpack comfort for the price. For bank anglers who carry a real salmon setup, it covers the most ground without requiring a premium budget.

    If money isn’t a limiting factor and you want the most structured, durable option, the Plano Atlas 3700 is the right upgrade.

    If you want a tough, rugged backpack built more like outdoor gear than a fishing bag, the EGO Kryptek Tactical is worth a look.

    For lighter trips where a full backpack is overkill, the KastKing Karryall Sling Bag is the right call.

    For a simple traditional shoulder bag under $50, the Plano Weekend 3500 does the job.

    Pick based on how you actually fish, not just what looks most impressive on a gear list.


    Final Thoughts

    The best tackle bag for salmon fishing is the one that fits how you actually fish.

    If you’re a bank angler who walks serious distance and carries a real spread of gear, a backpack-style tackle bag is usually the right tool for the job. Having both hands free makes a genuine difference when you’re moving along a river, navigating rough access, and carrying a rod and net on top of everything else.

    If you fish shorter sessions or only carry a few trays, a sling bag or traditional shoulder bag can be completely sufficient.

    The main thing is staying organized. Salmon fishing involves a lot of small pieces: hooks, leaders, floats, weights, lures, scent, tools, and extra line. A good bag keeps all of that ready to go instead of buried at the bottom, tangled together, or sitting on the kitchen counter because you forgot to pack it.

    Buy the bag that fits your fishing style. Not the biggest one on the shelf, and not the cheapest one that’ll fall apart by the end of the season.


    FAQ

    What is the best tackle bag for salmon fishing?

    For most bank anglers, a backpack-style tackle bag with room for multiple 3600 or 3700-size trays is the best choice. It keeps both hands free while walking, distributes weight better than a shoulder bag, and has enough room for the full spread of gear salmon fishing requires.

    Is a tackle backpack better than a shoulder bag for salmon fishing?

    For bank fishing where you’re walking any real distance, yes. A backpack distributes weight more evenly, keeps your hands free, and stays stable while you’re moving over rocks and uneven ground. A shoulder bag is fine for short sessions close to where you parked.

    What size tackle bag do I need for salmon fishing?

    Most salmon anglers should look for a bag that fits multiple 3600 or 3700-size trays. Larger 3700 trays are especially useful for bigger salmon lures, float gear, and terminal tackle that doesn’t fit cleanly in smaller trays. A sling bag can work for light lure-only trips.

    What should I keep in my salmon tackle bag?

    The core carry for most bank anglers includes hooks, pre-tied leaders, swivels, beads, bobber stops, floats, weights, lures, scent, pliers, split ring pliers, extra line, and small tools. What you carry beyond that depends on whether you primarily fish bait, float rigs, drift gear, or lures.

    Are waterproof tackle bags worth it?

    A fully waterproof bag is nice but not essential for most river fishing. Good water-resistant fabric and a molded waterproof base cover the practical needs of bank salmon fishing: rain, wet gravel, damp storage, and setting your bag down on riverbanks.

    Are sling tackle bags good for salmon fishing?

    For light trips and simple setups, yes. For a full salmon system with multiple large trays, float gear, bait components, and tools, a sling bag runs out of room quickly. Use a sling bag for quick sessions and a backpack for serious full-day trips.

    What is the best budget tackle bag for salmon fishing?

    The KastKing Karryall Sling Bag is the best budget option for light trips. The Plano Weekend 3500 is the best budget traditional shoulder bag for anglers who want basic organized storage without spending much.

    Do I need a tackle bag for bank fishing?

    Yes. Salmon fishing involves too many small components: hooks, leaders, floats, weights, lures, scent, and tools. A good tackle bag keeps everything accessible and ready instead of buried, tangled, or forgotten at home.

    What features matter most in a salmon tackle bag?

    Comfortable backpack straps for walking, water-resistant material, a tough waterproof base, good tray storage in the right sizes, easy tool access, and a size that matches what you actually carry matter most. For bank fishing specifically, the carry system matters more than almost any other feature.

    Can I use a regular tackle box for salmon fishing?

    A regular tackle box works fine for fishing close to the truck or from a boat. For bank fishing where you’re walking, climbing, and keeping both hands free, a tackle bag or backpack is significantly more practical. A box with no carry system becomes a burden fast on any real bank fishing trip.

  • Best Fishing Pliers for Salmon Fishing: Cut Braid, Remove Hooks & Swap Lures

    Fishing pliers and salmon tackle on a wet river rock with a Northwest river, evergreen trees, and mountains in the background.

    Affiliate Disclosure: This post may contain affiliate links. If you buy through these links, I may earn a small commission at no extra cost to you. I only recommend gear that makes sense for real salmon fishing.

    Fishing pliers are one of those tools that feel optional right up until the moment they aren’t.

    If you salmon fish long enough, you’re going to need to cut braid in a hurry, trim a fluorocarbon leader, pull a hook from a fish that isn’t cooperating, open a split ring, or deal with a big Chinook that’s still rolling around at the bank while you’re trying to get your rig sorted.

    Cheap pliers turn all of those jobs into a frustration. Cutters that won’t slice braid cleanly, jaws that feel flimsy around bigger salmon hooks, handles that get slippery the second your hands are wet — none of that is what you want when you’re trying to move quickly on the water.

    For me, the best fishing pliers for salmon fishing aren’t necessarily the most expensive pair on the shelf. I want pliers that are easy to carry, strong enough for the gear I’m actually using, comfortable with wet hands, and useful for more than one job.

    One solid pair clipped to my belt covers most situations. From there, a specialty tool or two makes sense depending on how you fish.

    If you’re still building out your river gear, pliers belong in the same conversation as your rods, reels, and terminal tackle. They’re not flashy, but you’ll reach for them constantly. My complete salmon fishing setup for rivers covers the bigger picture if you’re putting the whole system together.


    Quick Picks: Best Fishing Pliers for Salmon Fishing


    What Makes Good Fishing Pliers for Salmon Fishing?

    Salmon fishing is harder on pliers than a lot of lighter freshwater fishing, and it’s worth thinking about why before you buy.

    You’re dealing with bigger hooks, heavier line, wet hands, river sand, rain, and fish that can be genuinely awkward to handle from the bank. A pair of pliers that works fine for bass or trout fishing can feel completely outmatched when you’re trying to cut 50 lb braid or work a large octopus hook out of a Chinook at the bank.

    A good pair of salmon fishing pliers needs to handle a few key jobs reliably: cutting braided line cleanly, trimming mono and fluorocarbon leader without fraying, gripping larger salmon hooks securely, helping remove hooks safely, working around split rings on lures, and holding up to water, slime, river grit, and whatever the weather decides to do.

    For salmon specifically, dull or weak cutters aren’t just annoying. They slow you down at exactly the moments when you need to move quickly. Most river salmon setups use heavier line than trout or bass gear. If your pliers can’t handle 40 to 65 lb braid without making you work for it, they’re not the right tool for this fishing.

    They also belong with the smaller tools and rigging pieces I cover in my terminal tackle for salmon fishing guide.


    Best Overall Value: Danco 7.5″ Aluminum Fishing Pliers

    The Danco 7.5″ Aluminum Fishing Pliers are my pick for best overall value because they cover the main salmon fishing jobs without costing a lot of money. For most bank anglers, that’s exactly what you need.

    You don’t have to spend a lot on pliers to get a functional pair for river salmon fishing. What you do need is something that cuts braid cleanly, handles basic hook work, stays easy to carry, and doesn’t fall apart after a season of wet conditions.

    These Danco pliers hit that practical middle ground better than most options at this price point.

    At 7.5 inches, the size is right for salmon fishing. Long enough to work around bigger hooks and heavier rigs without feeling cramped, but not so big that they’re a nuisance clipped to your belt or sitting in a tackle bag.

    The side cutters are built for braided, mono, and fluorocarbon line, which matters when you’re running 40 to 65 lb braid or heavier salmon leaders. The aluminum frame keeps them light, and the marine-grade stainless steel construction gives them enough corrosion resistance for river use.

    The included safety lock and protective sheath are worth mentioning too. A sheath might sound like a small thing, but when you’re moving around on uneven bank, stepping over rocks, or wading, having your pliers in a secure place instead of rattling around in a bag or sitting on a rock makes a real difference.

    Specs:

    • 7.5-inch overall length
    • Aluminum frame
    • Marine-grade stainless steel build
    • Side cutters for braid, mono, and fluorocarbon
    • Safety lock
    • Protective sheath included
    • Lifetime warranty
    • Around $19.99

    My take: For around twenty bucks, these cover the main jobs salmon anglers actually need: cutting line, handling hooks, and trimming leaders. They also come with a sheath so you can keep them within reach.

    This is where I’d tell most bank anglers to start, especially if you’re not sure yet how much you’ll use them. If you wear them out or find yourself wanting more, you’ll have a much better idea of what to upgrade to.

    Danco 7.5 inch aluminum fishing pliers with side cutters and sheath for salmon fishing

    These are not ultra-premium pliers, but that is part of why they make sense. They cover the basic jobs without making you spend premium money on a tool you might be buying for the first time.


    Best Premium Heavy-Duty Pick: BUBBA 8.5″ Stainless Steel Pliers

    The BUBBA 8.5″ Stainless Steel Pliers are the upgrade pick for anglers who want a heavier-duty pair and are willing to pay for it.

    These cost significantly more than the Danco pliers, so I’m not going to tell everyone they need them. But if you fish big hooks regularly, handle a lot of salmon gear, or just want a pair of pliers that feels more serious and substantial in the hand, they make sense.

    The 8.5-inch overall length gives you more working room than a standard 7-inch pair. That’s useful when you’re dealing with larger Chinook hooks, bigger plugs and spoons, or fish that are still actively moving at the bank.

    The 3.5-inch jaw length is also a practical advantage when you’re working around salmon-sized hardware rather than small trout tackle.

    The grip is the standout feature here. BUBBA built its reputation around non-slip handles, and that reputation is earned. Wet hands, cold fingers, bait slime, fish slime — the grip stays secure through all of it. That matters a lot when there’s a sharp hook involved and you need control.

    The included coiled lanyard is also worth calling out specifically. Lanyard attachment holes are common on fishing pliers, but a lot of pliers don’t actually include one. For bank fishing where you’re moving around, crossing gravel bars, and occasionally dealing with uneven footing, a lanyard that keeps your pliers tethered to you is genuine insurance against a frustrating loss.

    Specs:

    • 8.5-inch overall length
    • 3.5-inch jaw length
    • High-strength stainless steel construction
    • TiN-coated corrosion-resistant finish
    • Patented BUBBA non-slip grip
    • Spring-loaded design
    • Side cutters
    • Crimper tool
    • Lanyard hole
    • Coiled lanyard included
    • Water-resistant molded sheath with belt/pocket clip
    • Limited 1-year warranty
    • Around $79

    My take: These are more expensive than most salmon anglers need, and I’d never tell a casual angler they have to spend $79 on pliers. But if you fish hard, use big hooks often, and want a pair that feels built to last, the BUBBA 8.5″ pliers are the right upgrade.

    The grip alone is worth a lot when your hands are wet and cold and you’re working around sharp hardware.

    BUBBA 8.5 inch stainless steel fishing pliers with non-slip handle, lanyard, and sheath

    The price is the main drawback. For casual anglers, the Danco pliers are probably enough. But if you want a tougher, longer pair with a better grip and more reach, these are a strong premium option.

    If you fish larger hooks for Chinook, these pair well with the hook sizes I talk about in my guide to the best hooks for salmon fishing.


    Best Long-Reach Hook Removal Pliers: CUDA 10.25″ Titanium Bonded Needle Nose Pliers

    The CUDA 10.25″ Titanium Bonded Long Needle Nose Pliers are the pair I’d reach for when hook removal is the priority.

    There are situations on the river where extra reach isn’t just nice. It’s the right call. A big Chinook that’s still moving, a hook sitting deeper than you expected, a larger plug or bait rig where the hardware is packed together — in those situations, a standard 7-inch pair puts your fingers a lot closer to the action than you want them.

    Extra length is also a safety consideration, not just a convenience one.

    At 10.25 inches, these give you noticeably more working room than a standard pair, and the long needle nose design is built specifically for reaching into tight spots and deeper hook positions.

    The titanium-bonded stainless steel construction is rated at three times the hardness of untreated steel, and the non-slip scale pattern handles keep them in your grip even when conditions are wet.

    They also include an integrated crimper and cutters for mono and fluorocarbon, so they’re not a single-purpose tool, though the long reach is the main reason to choose them over a shorter pair.

    One thing worth noting: these cutters are rated for mono and fluorocarbon, not braided line. If braid cutting is your main need, these aren’t the right primary choice. They’re best used as a long-reach companion to a standard pair rather than a standalone all-purpose tool.

    Specs:

    • 10.25-inch long needle nose design
    • Titanium-bonded stainless steel construction
    • Built for freshwater and saltwater use
    • Integrated crimper
    • Mono and fluorocarbon cutter
    • Full-tang construction
    • Non-slip CUDA scale pattern handles
    • Compatible with CUDA sheath #18189
    • Around $40

    My take: I wouldn’t choose these as my primary belt pliers for quick rigging, but I genuinely like them as a long-reach option for hook removal and awkward situations.

    The extra length keeps your fingers where they should be when a hook is involved, and for around forty bucks they’re a solid specialty addition to the kit.

    CUDA 10.25 inch titanium bonded long needle nose fishing pliers for salmon hook removal

    The main drawback is size. At 10.25 inches, these are not as compact as a standard pair, but that extra reach is the whole point. If hook removal is where you usually want more control, these make sense.


    Best Split Ring Pliers for Salmon Lures: Texas Tackle 30101 Split-Ring Plier

    The Texas Tackle 30101 Split-Ring Plier is the specialty tool in this lineup, and it earns its spot if you fish a lot of salmon hardware.

    These aren’t for cutting braid or removing hooks. They do one job, opening split rings, and they do it well. If you fish salmon spoons, spinners, plugs, or twitching jigs, that job comes up more than you’d think.

    Swapping out dull treble hooks, replacing bent hardware, changing from trebles to single hooks, or setting up lures to match local gear rules is much easier with a dedicated split ring tool than it is with the tip of a standard pair of needle nose pliers.

    Salmon-sized split rings are stiff. Trying to muscle them open with a tool that isn’t designed for it gets old fast, and you can damage both the ring and the lure if you’re forcing it. A proper split ring plier makes the job clean and quick.

    The surgical stainless steel construction gives these good corrosion resistance, which matters for a tool that’s likely to live in a wet tackle bag alongside spoons, spinners, and bait rigs.

    Specs:

    • Large-size split ring pliers
    • Designed specifically for opening split rings
    • Surgical stainless steel construction
    • Corrosion-resistant
    • Well-suited for salmon spoons, spinners, plugs, and hook swaps
    • Check current Amazon price

    My take: Don’t try to make these your only pair of salmon pliers. They won’t cut braid and they’re not built for hook removal. But if you keep a box full of salmon lures and you’re constantly swapping or replacing hooks, these earn their spot fast.

    The first time you cleanly swap out a set of dull hooks instead of fighting with the wrong tool for five minutes, you’ll understand why they’re worth having.

    Texas Tackle 30101 large split ring pliers for changing hooks on salmon spoons and spinners

    This is more of a specialty tool than a general river plier. But if you keep a lot of salmon lures in your box, it is the kind of tool that earns its spot fast.

    If you fish a lot of hardware, this pairs naturally with the spoons, spinners, and plugs I cover in my best salmon lures for river fishing guide.


    Do You Really Need Fishing Pliers for Salmon?

    Yes. I’d put them in the category of basic gear every salmon angler should carry, not optional accessories.

    You might not use them on every cast or even every trip. But when you need them, you need them right then. Salmon fishing involves too much heavy line, sharp hardware, and unpredictable fish to rely on your teeth, your fingernails, or whatever rusty hardware store pliers happen to be rattling around in the back of the truck.

    The jobs come up constantly: cutting braided mainline cleanly when you’re re-rigging, trimming fluorocarbon leader after tying knots, removing hooks from fish quickly and safely, holding hooks while you’re rigging, opening split rings on lures, swapping hooks on spoons and spinners, crimping or pinching hardware, and handling gear without tearing up your fingers in the process.

    A good pair of pliers is also a fish-handling tool. Getting a hook out of a salmon quickly and cleanly, especially a wild fish that needs to go back, is easier and better for the fish when you have the right tool.

    Digging around for a hook with your bare fingers while a fish is in the net wastes time and stresses the fish unnecessarily.


    Fishing Pliers vs Regular Needle Nose Pliers

    Regular needle nose pliers are better than nothing, but they’re not built for salmon fishing and it shows.

    The biggest problem is braid. Most standard hardware store pliers won’t cut braided fishing line cleanly. They mash it, fray it, or make you saw back and forth until something finally gives.

    That’s genuinely annoying when you’re trying to re-rig quickly on the river, and it gets worse as the cutters dull.

    Beyond braid cutting, regular pliers typically have worse grip in wet conditions, corrode faster when exposed to water and fish slime, are heavier than purpose-built fishing pliers, and don’t come with a sheath or lanyard. Both of those matter for bank fishing.

    Fishing pliers are designed around the specific jobs and conditions anglers actually deal with. For salmon fishing specifically, that specialization is worth having. Regular pliers can work as a temporary backup in an emergency. They’re not what I’d carry as my primary tool.


    What Size Fishing Pliers Are Best for Salmon?

    For most salmon fishing, I like pliers in the 7 to 8.5 inch range as the primary carry tool.

    That size handles salmon hooks, leaders, and lure hardware comfortably without being bulky. Smaller ultralight pliers designed for trout or panfish can feel genuinely undersized when you’re working around bigger Chinook gear.

    Larger octopus hooks, heavier split rings, bigger swivels, and stronger leaders need a tool that matches the size of the hardware you’re using.

    Longer pliers in the 10-inch range are useful specifically for hook removal and situations where extra reach matters. I wouldn’t necessarily want them as my quick-rigging tool, but they’re a smart addition for anglers who regularly deal with bigger hooks or fish that are hard to handle at the bank.

    A simple way to think about it:

    • 7 to 7.5 inches: best all-around carry size for most salmon fishing
    • 8 to 8.5 inches: better for heavier-duty use, bigger hooks, and more premium construction
    • 10 inches or longer: best for hook removal and extra reach
    • Dedicated split ring pliers: best for lure work and hook swaps

    What Features Matter Most in Salmon Fishing Pliers?

    You don’t need every possible feature, but a few things genuinely matter for salmon fishing specifically.

    Sharp Braid Cutters

    This is the most important one. If your pliers can’t cut braid cleanly, they’ll frustrate you every single time you re-rig.

    Most salmon river setups use heavier braid. 40, 50, or 65 lb is common for float fishing and drift fishing, and weak or dull cutters simply don’t handle that well.

    Look for pliers with cutters specifically rated for braided line, not just mono and fluoro. For more on line choice, my guide to the best braided fishing line for Chinook salmon covers the options in detail.

    Strong Jaws

    Salmon hooks, swivels, split rings, and lure hardware are bigger and heavier than most light freshwater gear. You want jaws that feel solid and confident, not like they might flex under real pressure.

    This matters especially if you fish bait rigs with larger octopus hooks, plugs with heavy-duty split rings, or bigger spoons and spinners with thick hardware.

    If you want more detail on hook size and style, I cover that in my guide to the best hooks for salmon fishing.

    Good Grip in Wet Conditions

    Wet hands are just part of salmon fishing. So are cold fingers, bait slime, fish slime, and rain.

    A pair of pliers with slick handles is a liability when there’s a sharp hook involved and you need control. Non-slip handle designs, textured grips, rubberized grips, or pattern-grip handles are worth prioritizing, especially if you’re fishing in typical Northwest river conditions where everything is wet most of the time.

    Corrosion Resistance

    Even purely freshwater river fishing exposes your pliers to a lot of moisture. Add coastal weather, brackish water in tidal sections of rivers, fish slime, sand, and damp storage, and corrosion becomes a real issue with lower-quality materials.

    Marine-grade stainless steel, titanium-bonded construction, or treated aluminum are all better options than basic steel. You still want to rinse and dry your tools when you can, but better materials give you a lot more margin before rust becomes a problem.

    Sheath and Lanyard

    For bank fishing specifically, a sheath and lanyard are more important than people give them credit for.

    When you’re moving over rocks, crossing gravel bars, stepping into current, or just moving quickly up and down a run, having your pliers in a secure sheath keeps them accessible without the risk of dropping them in the water.

    A lanyard adds a second layer of security. Losing a pair of pliers to the river because they weren’t secured is an entirely preventable frustration.

    Split Ring Tip or Dedicated Split Ring Pliers

    If you fish primarily with bait, split ring capability may not matter much to you.

    If you fish spoons, spinners, plugs, or twitching jigs regularly, it matters a lot. Being able to open split rings cleanly and quickly makes hook swaps, hook replacements, and lure maintenance much easier.

    Some general pliers include a split ring tip, which handles lighter split ring work fine. For heavier salmon-sized rings, a dedicated split ring tool like the Texas Tackle pair is cleaner and faster.

    I also have separate guides on the best spinners for salmon fishing and best spoons for salmon fishing.


    Do You Need More Than One Pair of Fishing Pliers?

    Most salmon anglers can start with one good all-around pair and be fine for a long time.

    If I were keeping it simple, I’d start with the Danco 7.5-inch pliers. They cut line, handle basic hook work, come with a sheath, and cost around twenty bucks. That covers the majority of what a bank angler actually needs on the water.

    After that, it comes down to how you fish.

    If you deal with deeper hooks, bigger fish, or situations where extra reach matters, the CUDA long-reach pliers make a smart addition. If you fish lures often and do regular hook maintenance, dedicated split ring pliers like the Texas Tackle pair earn their spot in the lure box quickly.

    If you want one stronger, more premium all-purpose upgrade, the BUBBA 8.5-inch pliers are the right step up.

    You don’t have to start with all four. One good pair gets you on the water. The specialty tools make more sense once you’ve fished enough to know exactly where your current setup is falling short.


    My Recommendation

    If I were buying one pair of fishing pliers for salmon fishing, I’d start with the Danco 7.5″ Aluminum Fishing Pliers.

    They’re affordable, easy to carry, come with a sheath, and handle the main jobs most salmon anglers need. For around twenty bucks, that’s hard to argue with.

    If you want a more serious, heavier-duty pair, step up to the BUBBA 8.5″ Stainless Steel Pliers. Better grip, more reach, stronger construction.

    If hook removal is your main concern and you want extra reach, add the CUDA 10.25″ Long Needle Nose Pliers to the kit.

    If you fish spoons, spinners, and plugs regularly, keep the Texas Tackle Split-Ring Plier in the lure box.

    That’s a simple framework based on how you actually fish, not just buying the fanciest option because it looks good on a gear list.


    Final Thoughts

    Fishing pliers aren’t the most exciting piece of salmon gear. They’re not going to make someone a better caster or help them read water. But they’re one of the tools you reach for constantly, and the difference between a good pair and a bad pair shows up every single trip.

    For most salmon anglers, one solid all-around pair with sharp cutters and a sheath is genuinely enough. If you fish bigger hooks, heavy lures, or a lot of split rings, adding a specialty tool makes the whole system work better.

    Don’t overthink it, but don’t buy cheap junk either.

    Salmon fishing already gives you enough small problems to solve on the water. Your pliers shouldn’t be one of them.


    FAQ

    What are the best fishing pliers for salmon fishing?

    The best salmon fishing pliers have sharp braid cutters, strong jaws, corrosion resistance, a comfortable grip in wet conditions, and a sheath or lanyard for bank carry. For most anglers, a 7 to 8.5 inch pair covers the main jobs. If you fish lures regularly, dedicated split ring pliers are worth adding.

    Do fishing pliers cut braided line?

    Good fishing pliers should cut braided line cleanly, but cheap or dull cutters often fray braid instead of slicing through it. This matters for salmon fishing because most river setups use heavier braid. 40 to 65 lb is common, and weak cutters make re-rigging genuinely frustrating. Look for pliers with cutters specifically rated for braid.

    What size fishing pliers should I use for salmon?

    For most salmon fishing, 7 to 8.5 inches is the right primary carry size. That is long enough for bigger hooks and heavier leaders, but still manageable on the belt or in a bag. Longer pliers around 10 inches are useful specifically for hook removal and situations where extra reach keeps your fingers away from sharp hardware.

    Do I need split ring pliers for salmon lures?

    Not for every salmon setup, but if you fish spoons, spinners, plugs, or twitching jigs regularly, they’re worth having. Dedicated split ring pliers make hook swaps, hardware changes, and lure maintenance much cleaner and faster than trying to force salmon-sized split rings with a standard needle nose tip.

    Are split ring pliers useful for salmon spoons and spinners?

    Yes, split ring pliers are useful for salmon spoons and spinners because they make it easier to change hooks, replace bent hardware, or switch from trebles to single hooks when needed. Salmon-sized split rings can be stiff, so a dedicated split ring plier is much easier than fighting them with regular needle nose pliers.

    Are aluminum fishing pliers good for salmon fishing?

    Yes, aluminum pliers are lightweight and resist corrosion well, which makes them a solid choice for river fishing. The key is making sure the cutters, jaws, and grip are up to the size of salmon hooks, heavier braid, and fluorocarbon leader. Cheap aluminum pliers can feel flimsy, but quality aluminum pliers like the Danco handle the job well.

    Can I use regular needle nose pliers for salmon fishing?

    In a pinch, yes. As a primary tool, no. Most regular pliers won’t cut braid cleanly, corrode faster in wet conditions, offer poor grip when wet, and don’t come with a sheath or lanyard. For river salmon fishing specifically, purpose-built fishing pliers are a better choice in almost every way.

    Should fishing pliers have a lanyard?

    Yes, especially for bank fishing. A lanyard keeps your pliers tethered when you’re moving over rocks, stepping into current, or working quickly at the bank. A sheath with a belt clip keeps them accessible without rattling around loose. Both features are simple, but they’re the difference between having your pliers when you need them and not.

    What features matter most in salmon fishing pliers?

    Sharp braid cutters, strong jaws, corrosion-resistant construction, a comfortable non-slip grip, and a sheath or lanyard matter most. If you fish lures, split ring capability is worth adding. For bank fishing specifically, the grip and carry system matter more than they do from a boat where conditions are more controlled.

    What is the difference between fishing pliers and split ring pliers?

    Fishing pliers are general tools for cutting line, removing hooks, gripping hardware, and trimming leader. Split ring pliers are specialized for opening split rings to change hooks on lures. If you fish a lot of hardware, having both makes the whole system work better. If you fish primarily with bait, general pliers are usually enough.

  • Best Salmon Fishing Net for Bank Fishing: Landing Big Fish from Shore

    Affiliate Disclosure: Some of the links below may be affiliate links. As an Amazon Associate, I may earn from qualifying purchases at no extra cost to you. I only recommend gear that makes sense for this style of fishing and fits the way I would actually approach salmon fishing in Northwest rivers.


    Most anglers spend months obsessing over rods, reels, braid, leaders, hooks, bait, and lures. Then they finally hook a good salmon from the bank, the kind of fish they’ve been chasing all season, and they realize the net they brought is too short, too small, or sitting back at the truck.

    That is a rough way to lose a fish. And it happens more than people want to admit.

    Choosing the best salmon fishing net for bank fishing matters because salmon are big, heavy animals. A solid Chinook at your feet is nothing like landing a trout in a small creek. From the bank you might be standing above the water on rocks, gravel, riprap, or a steep edge. You may need real reach. You probably need a bigger hoop than you think. And if the fish is wild and has to go back, you want a net that’s actually easy on it too.

    For bank fishing specifically, I want a salmon net with an oblong hoop, a deep bag, coated or rubber-style mesh, and a long or adjustable handle. A small round trout net is easy to carry, and completely wrong for the job when a big Chinook is rolling at the bank.

    If you’re building out your whole salmon setup, my complete salmon fishing setup for rivers covers the full rod, reel, line, and tackle system. This guide is focused entirely on the net, because that final ten feet of the fight is where more fish are lost than most people realize.

    One thing I’d genuinely recommend if you have the chance is to walk into a sporting goods store and put your hands on a few nets before you buy. Look at the hoop size, feel the handle, and honestly picture trying to scoop a big Chinook with it from a rocky bank. Some nets look huge online and feel surprisingly small in person. Some look awkward in photos but make total sense once you’re holding them.

    That said, not everyone has that option, and plenty of stores don’t carry salmon-sized nets anyway. If you’re shopping online, this guide is the next best thing.


    Quick Answer: What Is the Best Salmon Net for Bank Fishing?

    The best salmon net for bank fishing is a large landing net with an oblong hoop, a deep coated or rubber-style bag, a strong frame, and a long or adjustable handle.

    For Chinook specifically, I’d look for a hoop around 26 x 34 inches or larger, a deep bag, and a handle that gives you at least four to seven feet of reach depending on where you fish. If you regularly stand on steep banks, riprap, or rocky edges, a telescoping handle isn’t optional. It’s necessary.

    My ideal salmon net for the bank has:

    • An oblong hoop instead of a small round one
    • A deep bag that can actually hold a big fish
    • Coated or rubber-dipped mesh to protect fish and reduce hook tangles
    • A strong aluminum frame
    • A long or adjustable handle
    • Enough reach to net fish from higher or awkward bank positions

    The worst time to discover your net is too small is when a salmon is already tired, rolling, and almost within reach.


    Best Salmon Fishing Nets for Bank Fishing

    I’m not going to try to list every salmon net available online. I’d rather keep this focused on options that actually make sense for bigger fish, real bank access situations, and the kind of landing problems you actually run into chasing Chinook from shore.


    Best Heavy-Duty Salmon Net for Big Chinook: StowMaster TS116Y Tournament Series Landing Net

    The StowMaster TS116Y is technically marketed as a muskie net, but the size and design make it one of the most serious options out there for big Chinook from the bank. That is exactly why it is at the top of this list.

    The hoop measures 36 x 38 inches with a 48-inch deep bag. To put that in perspective, that is a lot of room. When you’ve got a 30-pound Chinook rolling sideways at your feet, you want that margin. A small round net in that situation is a disaster waiting to happen.

    The handle is the other big reason this net makes sense for bank anglers. It telescopes for extended reach and has an overall length of 116 inches, nearly ten feet. If you’re standing above the water on rocks or riprap and need to reach down to a fish, this is the kind of net that actually gives you that option instead of forcing you to scramble for a foothold while a tired fish recovers and bolts.

    Specs:

    • 36″ x 38″ hoop
    • 48″ deep net bag
    • 116″ overall length
    • Telescoping handle
    • Handle slides into the net for storage
    • Aircraft-quality aluminum alloy handle, hoop, and yoke
    • Non-slip and non-twist handle extension
    • Rubber-dipped nylon netting
    • Made in USA
    StowMaster TS116Y salmon landing net with large oblong hoop, deep bag, and telescoping handle

    My take:
    This is the serious big-fish option. It is larger than some anglers will want to carry on a long walk-in trip, but if you’re targeting big Chinook from the bank and you want maximum reach and real scooping room, this checks every box. I’d rather carry a slightly heavier net and land my fish than carry a light net and watch it come off at my feet.


    Best Big Hoop Salmon Net with Extra Leverage: Frabill Trophy Haul Predator Fishing Net

    The Frabill Trophy Haul Predator is a large salmon-capable net that makes sense if you want a serious hoop and a strong handle without going quite as massive as the StowMaster.

    The hoop comes in at 27 x 30 inches, which is genuinely salmon-sized, and the reinforced 72-inch sliding handle gives you solid reach from rocks, gravel bars, or uneven bank edges. Where this net stands out is the extra handle near the yoke. That detail might not sound like much until you’ve got a heavy, thrashing Chinook in the bag and you’re trying to maintain control on uneven footing. Extra leverage at that point is not a small thing.

    The netting is conservation-style and tangle-free, which I appreciate. The lighted yoke feature is not something I’d specifically seek out because I’m not usually netting salmon in the dark, but the hoop size, handle length, and fish-friendly mesh are all worth the price of admission.

    Specs:

    • 27″ x 30″ hoop
    • 72″ reinforced sliding handle
    • Conservation-style tangle-free netting
    • Flat-bottom net design
    • Extra handle near the yoke for leverage
    • Lighted yoke and reflective hoop
    Frabill Trophy Haul Predator landing net with large hoop, long handle, and extra yoke handle for salmon fishing

    My take:
    This is the right call if you want a large salmon net with a manageable hoop size and that extra leverage handle at the yoke. It is not trying to be the biggest net on the market. It is trying to be a practical, well-built salmon net with smart features. It delivers on that.


    Best Mid-Budget Salmon Net: Beckman Coated Landing Net

    The Beckman Coated Landing Net is the mid-budget option I’d point someone toward if they want a legitimate salmon net without going all the way up to the heavy-duty choices above.

    At around the $130 range, it is not cheap, but it is less expensive than the other two and still has the features that actually matter for salmon bank fishing. The 26 x 34 inch oblong hoop is the right shape for a long fish. The four to seven foot adjustable handle gives you real reach from the bank. And the 32-inch deep PVC-coated bag is a big deal. Coated mesh on a salmon net reduces hook tangles dramatically compared to plain rope-style netting, and that difference adds up over a season.

    Beckman is a brand that has earned its reputation in the salmon and steelhead world, and this net feels like a practical, no-nonsense middle ground. Not as massive as the StowMaster, not as feature-heavy as the Frabill, but the hoop shape, coated bag, adjustable handle, and reinforced aluminum build all check the right boxes.

    Specs:

    • 26″ x 34″ hoop
    • 4′ to 7′ adjustable handle
    • 32″ deep PVC-coated net bag
    • Reinforced aluminum yoke and frame
    • Internal Y-Bar construction
    • Reinforced aluminum handle
    • Quick-Connect pin
    • Coated nylon net bag
    • Lifetime limited warranty
    Beckman coated landing net with oblong salmon hoop, deep coated bag, and adjustable handle

    My take:
    This is probably the most practical middle-ground salmon net of the three. It has everything you actually need: the right hoop shape, real handle reach, coated netting, and a brand name that has been trusted in Northwest salmon and steelhead fishing for a long time. If I wanted a strong salmon net with good reach and did not want to carry an oversized monster net all day, this is where I’d land.


    What Makes a Good Salmon Fishing Net?

    A good salmon net does not need to be fancy, but it does need to be big enough and strong enough for the fish you’re actually trying to land.

    For bank fishing specifically, I look at five things:

    • Hoop size
    • Net shape
    • Bag depth
    • Handle length
    • Mesh material

    A net can look solid online and still be completely wrong for salmon. A lot of landing nets are sized for trout, bass, or general freshwater fishing. They work great for smaller fish and are completely outmatched the moment a big Chinook rolls at the bank.

    Salmon are long. They’re strong. And when they get close to shore they often roll, turn sideways, kick hard, or make one last desperate run. The net has to be ready for all of that.

    The net is part of the system, not an afterthought. My bank fishing for salmon guide goes into positioning and approach from shore, but once you actually hook a fish, the net becomes one of the most important pieces of gear you brought.


    What Size Net Do You Need for Salmon?

    Salmon net and trout net size comparison showing larger hoop, deeper bag, and longer handle for salmon fishing

    For salmon, especially Chinook, I’d rather have too much net than not enough.

    A small trout net is easy to carry, but it can make landing a big salmon genuinely miserable. If you have to aim perfectly just to get half the fish in the hoop, the net is too small. It is that simple.

    For bank fishing, I’d look for:

    • Hoop width around 26 to 36 inches
    • An oblong shape when possible
    • A bag depth of at least 30 inches
    • A handle in the four to seven foot range
    • A longer handle if you regularly fish steep or rocky banks

    A bigger hoop gives you room to lead the fish in head-first without needing a perfect angle. A deeper bag keeps the fish contained once it is inside. A longer handle bridges the gap when you cannot get all the way down to the water’s edge.

    If you’re asking yourself whether a net is big enough for Chinook, it probably is not the net I’d choose.

    That does not mean every angler needs the largest net ever made. If you’re fishing smaller rivers with easy gravel bar access, a mid-sized salmon net will get the job done. But on bigger water, steep banks, or anywhere landing is awkward, hoop size and handle length matter a lot.


    Why I Prefer Rubber or Coated Mesh for Salmon

    For salmon and steelhead, I want rubber mesh, rubber-coated mesh, or coated nylon over plain rope-style nylon netting, and I feel pretty strongly about that.

    The first reason is fish protection. Salmon and steelhead have a slime coating that plays a real role in their health, and that coating matters even more on a wild fish that has to go back. A rough nylon net is harder on that slime layer. If I’m releasing a wild fish, I want it handled as carefully as possible, and a coated mesh net is part of that.

    The second reason is purely practical: hooks do not tangle in coated mesh the way they do in plain nylon rope netting. If you’ve ever landed a salmon on a treble hook or a spinner and then spent the next five minutes fighting the hook out of the net while your bait washes away and your partner loses patience, you know exactly what I’m talking about. It wastes time, it can damage the net, and it is completely avoidable.

    Plain nylon nets are cheaper and lighter, and they’re fine for a lot of fishing. But for salmon fishing with bigger hooks and bigger gear, coated or rubber-style mesh is worth it every time.


    Oblong Nets vs Round Nets for Salmon

    For salmon I prefer an oblong or teardrop-shaped hoop, and it is not really a close call.

    Salmon are long, heavy fish. That extra length in the hoop gives you more room when the fish is coming in head-first, and it gives you a little forgiveness when the fish rolls, turns, or comes in at an awkward angle. From the bank where you might be reaching down or fishing from an uneven edge, that margin matters.

    Round nets are not useless. But they are not what I’d choose for salmon bank fishing. When a big Chinook is rolling at your feet on a rocky bank, the last thing you want is to be trying to thread a long fish through a small round hoop.

    More room in the hoop means more chances to finish the job cleanly.


    Long Handle vs Short Handle Salmon Nets

    For bank fishing, a long or adjustable telescoping handle is not a luxury. It is a practical necessity a lot of the time.

    There are plenty of bank situations where you’re standing above the water on a rock ledge, steep bank, riprap edge, or gravel drop-off, and the fish is still a few feet below you. A short handle in that situation means you’re either scrambling for a different position or hoping the fish holds still while you figure it out. Neither is a good plan.

    A telescoping handle solves this cleanly. You keep the net shorter while you’re walking, then extend it when you need reach at the water. The StowMaster and the Beckman both handle this well. The StowMaster gives you extreme overall length for serious reach situations, and the Beckman gives you a practical four to seven foot adjustable range that covers most bank fishing scenarios.

    Short handles only make sense when the fish is right at your feet on a flat, easy bank. The moment you’re on rocks, riprap, or standing above the water, you’ll wish you had more reach.


    How to Net a Salmon from the Bank

    A good net helps a lot, but how you use it matters just as much.

    The biggest mistake is chasing the fish around with the net. That almost always spooks the fish, triggers one last run, and turns a controlled landing into a scramble. The netter’s job is not to chase the salmon. It is to hold the net steady and let the angler lead the fish into it.

    Here’s how it should go:

    Fight the fish until it is genuinely tired and controllable. Keep steady pressure and avoid high-sticking the rod when the fish is close. That is a great way to break a rod tip or pop a hook at the worst possible moment. Get the net in the water before the fish is right on top of you so there is no last-second splashing and scrambling. Lead the salmon in head-first toward the hoop. Keep the net low and still. Scoop only when the fish is fully committed and lined up. Then lift smoothly once it is fully inside the bag.

    Head-first is almost always better. If you try to scoop from behind, the fish can kick forward and shoot right out. You’ll want to say some words you’d regret in polite company.

    This applies whether you’re float fishing, drift fishing, or throwing hardware. If you’re still working on the techniques that get fish to the bank in the first place, my guides on how to drift fish for salmon and how to fish salmon with lures both cover the presentation side of things.

    The net closes the deal. Make sure you know how to use it before the moment arrives.


    Do You Always Need a Net for Salmon?

    Not always, but for bank fishing, I almost always want one with me.

    There are gravel bars where you can carefully beach a hatchery fish in shallow water if conditions allow and retention is legal. But that is not the situation you’re dealing with most of the time.

    A net becomes much more important when you’re fishing steep banks, riprap, deep edges, brushy banks, fast current, rocky shorelines, or anywhere a wild fish might need to be released cleanly. If you’re releasing a fish, a net lets you control it without dragging it onto rocks, gravel, or mud. If you’re keeping a legal hatchery fish, a net still prevents that last-second heartbreak when the hook pops right at your feet.

    Always check your local regulations for retention rules, hatchery versus wild rules, and any specific handling requirements. Salmon regulations change by river, season, and species, and it is your responsibility to know what applies where you’re fishing.


    Common Mistakes When Choosing a Salmon Net

    A net is simple gear, but people still end up with the wrong one all the time.


    Buying a Trout Net

    The most common mistake on this list. A trout net looks fine until there’s a Chinook halfway in it and halfway out of it. Salmon need more hoop room, more bag depth, and more handle strength. It is a different fish.


    Choosing a Handle That Is Too Short

    Short handles work from boats and perfect gravel bars. They do not work when you’re standing above the water and the fish is several feet below you. Bank anglers need to think about reach before they buy.


    Using Plain Nylon Mesh

    Plain rope-style nylon is rougher on fish and more frustrating with hooks. For salmon and steelhead, coated, rubber-dipped, or rubber-style mesh is worth the upgrade every time.


    Picking a Net That Is Too Round

    Round nets can work, but oblong nets give you more room for a long fish coming in at an imperfect angle. Extra hoop length is insurance.


    Trying to Net a Green Fish

    A green fish is a fish that is not ready. If you push the net at a salmon too early, it bolts. Fight the fish until it is controlled, then lead it in.


    Scooping Tail-First

    Tail-first netting gives the fish a perfect chance to kick forward and escape. Lead it head-first, every time.


    Leaving the Net in the Truck

    This one sounds obvious. It still happens. The best salmon net ever made does not help if it is sitting in the parking lot while your fish is rolling at the bank. If you brought the net, keep it with you.


    Final Thoughts

    A salmon net is not the most exciting piece of gear to think about until a big fish is finally at the bank and everything comes down to whether you can actually land it.

    For bank fishing, I want a net with a large oblong hoop, a deep bag, coated or rubber-style mesh, a strong frame, and a long or adjustable handle. I want a net that can handle a real Chinook without turning into a tangled mess every time a hook touches the bag.

    The StowMaster is the heavy-duty option for anglers who want maximum reach and maximum hoop room for big Chinook. The Frabill gives you a large salmon-capable hoop and that smart leverage handle at the yoke. The Beckman is the practical mid-budget choice with a proven reputation in Northwest salmon and steelhead fishing.

    If I’m standing on a river bank and a Chinook rolls at my feet, I want a net that gives me a real shot at finishing the job cleanly. That is the whole point.

    If you’re still building the rest of your system, my complete salmon fishing setup for rivers and bank fishing for salmon guides are good next reads.


    FAQ

    What size net is best for salmon fishing?

    For salmon, especially Chinook, look for a hoop around 26 to 36 inches wide with a deep bag. Smaller trout nets are usually too small for big salmon, and from the bank an oblong hoop gives you more room to lead the fish in head-first without needing a perfect angle.

    What is the best salmon fishing net for bank fishing?

    A large oblong net with a deep coated or rubber-style bag, strong frame, and long or adjustable handle is the best salmon fishing net for bank fishing. Bank anglers often need extra reach from rocks, gravel bars, steep banks, or riprap, so handle length matters almost as much as hoop size.

    Do I need a net for salmon bank fishing?

    In most bank fishing situations, yes. A net helps prevent last-second losses and makes it easier to control salmon near rocks, steep edges, brush, or fast current. It is especially important if you hook a wild fish that needs to be released as carefully as possible.

    Is rubber mesh better for salmon nets?

    Yes, rubber mesh, rubber-coated mesh, or coated nylon is generally better than plain rope-style nylon for salmon. It is easier on the fish’s slime coating, tangles hooks far less, and is less frustrating when you’re dealing with bigger salmon hooks, spinners, spoons, or bait rigs.

    How long should a salmon net handle be?

    For bank fishing, four to seven feet is a solid starting point. If you fish steep banks, rocks, or riprap regularly, a telescoping handle is worth having so you can extend when you need the extra reach.

    Can I use a trout net for salmon?

    A trout net is usually too small, especially for Chinook. It might work in perfect conditions with a smaller fish, but a small hoop and shallow bag will make landing a big salmon from the bank much harder than it needs to be.

    What is the best way to net a salmon?

    Lead it head-first into the net when it is ready and tired. Keep the net low in the water, hold it still, and do not chase the fish. Scoop once the salmon is fully committed and inside the hoop, then lift smoothly.

    Should I net a salmon head first or tail first?

    Head-first, every time. Scooping from behind gives the fish a chance to kick forward and escape. Lead it toward the hoop, keep the net steady, and scoop once it is fully in.

  • How to Catch Chinook Salmon from the Bank: Beginner River Guide

    Bank angler fishing for Chinook salmon from a riverbank at sunrise with mountains and evergreen trees in the background.

    Affiliate Disclosure: Some of the links below may be affiliate links. As an Amazon Associate, I may earn from qualifying purchases at no extra cost to you. I only recommend gear that makes sense for this style of fishing and fits the way I would actually approach salmon fishing in Northwest rivers.


    Learning how to catch Chinook salmon from the bank does not require a secret bait, a magic hole, or some technique nobody else knows about.

    Most of the Chinook I’ve seen consistently caught from shore come down to the same basic things done well: fishing the right water, getting the presentation deep enough, using gear that can actually handle a big salmon, and staying patient when the bite is slow.

    That is it.

    The anglers who figure those things out catch more fish than everyone else. It really is that simple, and that hard.

    Chinook are not easy fish. They are big, stubborn, and a lot of the time they are not chasing anything down out of excitement. You usually need to put your bait, lure, or drift rig right in their lane, close enough that the fish reacts, gets annoyed, or eventually just decides to eat it.

    That is what this guide is about.

    This is not meant to replace every detailed guide on the site. Think of it as the full beginner game plan: where to fish, which setups work, when bait makes sense, when lures are worth throwing, how deep to go, and the mistakes that cost beginners fish they should have landed.

    If you are still building your full rod, reel, line, and tackle system, start with my complete salmon fishing setup for rivers. If you are mostly working out shore access and positioning, my bank fishing for salmon guide is a good place to start there.


    Quick Answer: How Do You Catch Chinook Salmon from the Bank?

    Fish known travel lanes and holding water with a strong setup, the right depth, and a clean presentation.

    For most bank anglers, bait under a float is the best starting point when it is legal and water conditions allow it. Cured salmon eggs, sand shrimp, coon shrimp, and egg-and-shrimp combos are all strong Chinook baits. The key is getting that bait into the right lane and close enough to the bottom without dragging it unnaturally through the zone.

    If bait is not producing or you need to cover more water, spinners, spoons, plugs, twitching jigs, and soft beads can all catch Chinook from the bank.

    The short version: fish seams, deep slots, tailouts, current edges, and softer lanes beside heavier water. Start close before you cast far. Get your bait or lure down. Use strong line, sharp hooks, and a setup built for big fish. Adjust your depth and casting angle before you start swapping out bait or lures every ten minutes.

    Most Chinook are not caught on random long casts. They are caught because a presentation went through the right lane at the right depth.


    Why Chinook Salmon Are Different from Other River Salmon

    Chinook are a different animal than most other river salmon, and if you have spent time chasing both coho and kings you already know what I mean.

    They are bigger, stronger, and a whole lot more stubborn. Mature Chinook in Northwest rivers can be heavy fish, and even an average king has enough power to expose weak gear fast.

    They also tend to hold deeper than coho in a lot of river situations, and they do not always want to chase. A coho might dart across a seam and crush a twitching jig or spinner that came within ten feet of it. A Chinook might sit in a deep slot, watch five decent presentations go by, and finally grab the sixth one because the depth was just a little different or the drift was a little more natural.

    That is just the fish.

    By the time Chinook are pushing upriver, they are not feeding the same way they did in the ocean. Most river strikes come from aggression, territorial instinct, scent response, or reaction rather than true hunger. That is a critical thing to understand because it explains why presentation, depth, and lane placement matter so much more than simply having the right bait or lure.

    You are trying to trigger a response.

    That is exactly why depth and location matter more for Chinook than almost anything else.

    It is also why I have more confidence in bait when I am specifically targeting kings. A good bait presentation carries scent, sits in the zone longer, and drifts more naturally than most lures. Even though river Chinook are not actively feeding the way ocean fish are, they can still respond to familiar scents like eggs and shrimp.

    That instinctive response to scent is one of the main reasons bait keeps producing even when fish are not in a feeding mood.

    That does not mean lures do not work. They absolutely do. But when I am starting from scratch on a Chinook river and I want to put the odds in my favor, bait is usually where I begin.

    Chinook also expose weak gear in a way that smaller fish just do not. A light rod, a weak leader, a dull hook, an undersized net, you might not notice any of those problems until a big Chinook makes one hard run near the bank and suddenly the problem is very obvious.

    If you are still dialing in your setup, my guide on what pound line for salmon fishing is worth reading before you find out the hard way.


    Best Bank Fishing Spots for Chinook Salmon

    The biggest mistake beginners make is fishing water that looks comfortable to fish instead of water that Chinook actually use.

    Kings move upriver using current efficiently. They do not want to fight the heaviest flow all day, so they travel and hold in lanes where they can save energy while staying near moving water. Those lanes are where you need to be putting your presentation.

    Good bank fishing spots for Chinook include:

    • Deep slots
    • Current seams
    • Soft current edges
    • Tailouts
    • Heads of pools
    • Inside bends
    • Bank-side travel lanes
    • Slow pockets beside faster water
    • Structure edges near depth

    A few things are worth understanding about each.

    Deep slots are especially important for Chinook because of their size and preference for deeper, cooler water. In warmer conditions, Chinook will often push into the deepest available water in a run to find more comfortable holding water. If you are fishing warmer weather and not seeing fish in shallower lanes, go deeper before you go anywhere else.

    Tailouts can be productive because they act like a natural funnel. The river starts to shallow and tighten, which can concentrate fish moving through.

    The heads of pools are worth fishing because the broken, oxygenated water where current drops into depth gives Chinook cover, comfort, and the ability to rest. Fish often stack near the head of a pool, especially on rivers with heavy angling pressure, because the broken water gives them security.

    A lot of anglers walk right past productive water because they assume the fish are somewhere far across the river.

    That is not always true.

    Chinook can travel surprisingly close to the bank along softer inside edges, tailouts, and seams that are well within reach without a long cast.

    Fish the close water before you step into it. Work the middle lane. Then cast farther if the far seam or slot actually makes sense from where you are standing.

    I would rather make one good cast through a real Chinook lane than throw ten long casts across water that only looks good from a distance.

    For a deeper breakdown on seams, slots, tailouts, and travel lanes, read my guide on where to cast for salmon in a river. If you are still learning how to identify good holding water in the first place, my guide on how to read a river for salmon is the right starting point.


    Best Setups for Catching Chinook from the Bank

    There is more than one way to catch Chinook from the bank, but most effective bank setups fall into three main categories:

    • Float fishing
    • Drift fishing
    • Lure fishing

    Each one has its place depending on water depth, current speed, regulations, river pressure, and how active the fish seem on any given day.


    Float Fishing Setup

    Chinook salmon float fishing setup with sliding float, weight, swivel, leader, and hook

    Float fishing is one of my favorite ways to target Chinook from the bank, and it is where I would tell most beginners to start.

    It lets you present bait naturally through seams, slots, tailouts, and travel lanes while giving you real control over depth. When the water is deep enough and the current allows a clean drift, bait under a float is hard to beat for Chinook.

    A basic salmon float setup includes:

    • Bobber stop
    • Bead
    • Corky
    • Sliding float
    • Weight
    • Second bead
    • Swivel
    • Leader
    • Hook
    • Bait

    The goal is to drift your bait naturally through the lane. Not dragging bottom on every cast, but not riding so high that it is floating above the fish either. Your float should track with the current, moving at the same speed as the lane you are fishing, not tilting hard or ripping sideways.

    One thing beginners often get wrong with float fishing is setting the depth incorrectly for the water they are actually fishing. The depth on your float needs to match the depth of the lane, not just an approximate guess.

    In a run that is eight feet deep, a float set at four feet is fishing half the water column above the fish. Take the time to adjust until your bait is consistently reaching the bottom third of the water column where Chinook hold.

    The weight you use matters too. You want enough weight to get the bait down efficiently, but not so much that it drags the bait unnaturally or kills the drift. A bait that sinks too fast can look wrong. A bait that drifts at the same speed as the current and settles naturally into the zone looks right.

    For Chinook, I want the bait running in the bottom third of the water column. That is where the fish typically are, and that is where your presentation needs to be.

    For the full rig breakdown, my salmon float rig setup guide covers it in detail. For hooks, weights, beads, swivels, and other small components, my terminal tackle for salmon fishing guide covers the complete system.


    Drift Fishing Setup

    drift fishing setup diagram for salmon

    Drift fishing can also be very effective from the bank, especially when you are fishing defined slots, seams, or current edges where you can get your rig ticking naturally through the lane.

    The idea is simple: cast slightly upstream, let your weight find the bottom, and drift your bait or presentation through the zone with controlled bottom contact.

    You want the rig ticking along at roughly the speed of the current. Not dragging like an anchor, not floating too high. Just enough bottom contact to know you are in the zone.

    A basic drift fishing setup includes your mainline, a weight or dropper setup, a swivel, leader, hook, and bait, whether that is eggs, shrimp, corky and yarn, or a combination.

    One important detail beginners often miss with drift fishing is the dropper setup. Many experienced drift anglers use a separate dropper line with lighter monofilament to attach the weight instead of tying the weight directly to the mainline. The reason is simple. When the weight snags, the lighter dropper can break first and you lose the weight but save the hook, leader, and bait.

    Losing a piece of pencil lead is a lot better than losing the whole rig.

    Leader length in drift fishing also matters more than people think. Too short a leader and your bait is riding right next to the weight, which can look unnatural and spook fish. A leader somewhere in the 18 to 36 inch range is a common starting point for Chinook drift fishing, with adjustments based on water clarity and current speed.

    Drift fishing from the bank is not about bombing random casts across the river and hoping something happens. It is about putting the rig in the right lane with the right weight and letting the current do the work.

    Too much weight and you are hanging up constantly. Too little and you are never actually fishing the bottom where the fish are.

    For the full technique breakdown, my guide on how to drift fish for salmon goes through the whole approach.


    Lure Fishing Setup

    Diagram showing how deep to fish salmon lures, with spinners, spoons, and beads positioned in the strike zone near the bottom third of the water column.

    Lures are not always my first choice for Chinook, but there are plenty of situations where they are the right call, and having them in the bag matters.

    Spinners, spoons, twitching jigs, plugs, and soft beads can all catch Chinook from the bank. Lures make the most sense when you need to cover water quickly, fish a travel lane efficiently, or try to trigger a reaction bite from fish that are not responding to bait.

    The biggest mistake beginners make with lures is fishing them too fast and too high.

    A spinner needs to get down and swing through the lane, not ride over the fish’s head. The blade needs to be turning, but the lure also needs to be in the zone. If you cannot occasionally feel the lure working near the bottom, it may be too high.

    A spoon needs time to sink and wobble naturally through the current.

    A twitching jig needs to actually fall into the zone on a semi-slack line, because most bites happen on the drop, not the lift.

    If your lure is above the fish all day, the color does not matter.

    For a full breakdown of lure techniques, my guide on how to fish salmon with lures covers each style in detail. If you are still deciding what to carry, my best salmon lures for river fishing guide covers the main lure types.


    Line and Leader Setup

    Chinook are not the fish to target with underpowered line, and that is not an exaggeration.

    For most bank fishing setups, strong braided mainline paired with a fluorocarbon leader is the standard starting point. A lot of salmon anglers run braid in the 40 to 65 lb range depending on the river, technique, and current strength. Leader size typically falls around 20 to 30 lb fluorocarbon for Chinook, with adjustments for water clarity, pressure, and fish size.

    Fluorocarbon is preferred by a lot of salmon anglers because it is less visible than many other leader materials and has good abrasion resistance. That matters when you are fishing around rocks, gravel, wood, and heavy fish in moving water.

    One thing worth noting on braid: high-visibility braid colors like neon yellow, chartreuse, or orange can be fine for the mainline because you are running a fluorocarbon leader between the braid and your terminal tackle. The fish rarely sees the braid itself, and high-visibility colors help you track your line and manage the drift more effectively.

    For float fishing, heavier braid helps with line control and mending. For drift fishing, you need enough strength to fight a big fish but enough sensitivity to feel bottom contact. For lures, your line and leader need to match the size of the lure and the water you are fishing.

    For more detail, my guides on best braided fishing line for Chinook salmon and best leader line for Chinook salmon break down the specific options.


    Best Bait for Chinook Salmon from the Bank

    Cured salmon eggs used for float fishing chinook salmon

    If I am specifically targeting Chinook from the bank, bait is where my confidence starts, and it has been that way for a long time.

    Chinook respond well to scent. Even though river Chinook are not actively feeding the same way ocean fish are, they still have strong scent response. Familiar scents, especially eggs and shrimp, can trigger a response even from fish that have no interest in chasing hardware.

    A good bait presentation can stay in the strike zone longer than most lures, drift more naturally, and give a fish sitting in a deep slot a real reason to commit.

    Good Chinook baits include:

    • Cured salmon eggs
    • Sand shrimp
    • Coon shrimp
    • Egg-and-shrimp combos
    • Tuna belly chunks
    • Scented bait presentations

    Cured eggs are the classic for good reason. A well-cured cluster drifting naturally through the bottom of a seam or slot is one of the most effective Chinook presentations there is.

    The curing process does more than preserve the eggs. It firms them up so they stay on the hook longer, and different cure recipes can change the color and scent profile to match what fish are responding to on a given river or day.

    Pink and orange cures are common all-around starting points, while brighter chartreuse or red cures can be worth trying in stained water or when fish have seen a lot of standard-colored bait.

    Sand shrimp and coon shrimp are both strong options on their own, and the egg-and-shrimp combo is one of those setups I keep coming back to when fish are being picky. The combination of egg scent and shrimp profile covers multiple triggers at once, which can be the difference on a tough day.

    Tuna belly, while less commonly talked about, is worth having in the rotation. It is an oily, scent-heavy bait that can work well in off-color or higher water when you want something with strong scent dispersal.

    I also like adding scent when it makes sense. Chinook can be very scent-driven, and sometimes a small change in the scent profile is what tips a fish from ignoring the bait to eating it.

    But here is the thing: the bait itself is only part of the equation.

    A perfect bait drifting too high, too fast, or outside the lane is not doing much. A simple bait drifting naturally through the bottom third of the right seam has a much better chance than the best-looking bait in the world running five feet above the fish.

    For more bait-specific detail, read my guide on the best bait for Chinook salmon. If you are fishing eggs, my guide on how to rig salmon eggs will help you keep your presentation working correctly. I also have guides on best salmon egg cures and best salmon fishing scents if you want to dial in that side of things.


    Best Lures for Chinook Salmon from the Bank

    Lures absolutely have their place for bank fishing Chinook, and I do not want to undersell them.

    I generally prefer bait when I am grinding out a Chinook bite, but there are plenty of days when lures make more sense. If bait is not getting touched, if I need to cover water, or if fish seem to be moving through a run without stopping, I will reach for hardware.

    Spinners are good for covering seams, current edges, and travel lanes. The flash and vibration combination is hard for salmon to ignore, especially in lower-visibility water. For Chinook specifically, I am usually thinking in the larger size range, often a #4 or #5 blade for most water, sizing up in bigger or more turbid conditions. When I can feel that blade working through the rod and the lure is swinging naturally through the zone without riding too high, I have confidence in it.

    Spoons can be excellent in bigger water where they have room to swing and wobble through the lane. The key difference between a spoon and a spinner is that spoons rely more on flash and wobble without the added vibration of a spinning blade. That can actually be an advantage on pressured water where fish have seen a lot of spinners. A spoon gives them a different look and action.

    Do not think of spoons as simple cast-and-reel lures. The casting angle, sink time, and swing all matter just as much as they do with other salmon presentations.

    Twitching jigs work well in slower holding water, deeper pools, and softer edges. Anywhere you can work the jig through a defined zone and keep it in front of fish that are sitting rather than traveling.

    The lift-and-drop action triggers that reaction response river Chinook still have even when they are not feeding.

    Plugs are worth having when current can help them dig and hold in front of fish. What makes plugs useful is that they can stay in the strike zone longer than some other lure styles. The current does the work of keeping the plug action going. Bait-wrapping plugs with herring or sardine can add scent to the visual trigger, which can improve results.

    Soft beads give you an egg-style presentation when you want something subtle without dealing with real bait. They are particularly useful when fish are keyed in on eggs but have seen a lot of standard bait presentations.

    For the full lure breakdown, my best salmon lures for river fishing guide covers each type in detail. I also have dedicated posts on the best spinners for salmon fishing and best spoons for salmon fishing if you want to go deeper on either of those.


    How Deep Should You Fish for Chinook Salmon?

    Diagram showing the correct depth to fish for Chinook salmon, with bait in the bottom third of the water column.

    Most beginners fish too high.

    It is probably the single most common reason people do not catch Chinook when the fish are actually there.

    They might be in the right area, using decent bait, fishing a real seam, and still going home empty because the presentation is riding above the fish the whole time.

    Chinook often hold in the bottom third of the water column in many river situations, and in deeper or warmer water they may push even lower, tight to the bottom in the deepest available part of the lane.

    That does not mean you need to drag bottom on every cast, but your bait, drift rig, or lure needs to get down close enough that a fish actually sees it.

    Water temperature can play a role in depth too. Chinook are cold-water fish, and they generally become tougher to catch and harder to safely release as river temperatures climb. In warm conditions, fish often push into deeper, cooler holding water and become less willing to move for anything. In those situations, getting your presentation down into the deepest part of the slot becomes even more important.

    For float fishing, this means setting your depth so your bait reaches near the bottom without constantly snagging. In deeper or faster water, you need to cast far enough upstream that the bait has time to sink before it hits the best part of the lane. If your float is still pulling the bait down when it is already past the seam, you are wasting the drift.

    For drift fishing, you want controlled bottom contact. Ticking is exactly what you are after. Dragging hard and hanging up every few casts means you are too heavy or too slow. Never feeling bottom means you are probably not in the zone.

    For lures, give them time to sink before you start the retrieve. A lot of people cast a spinner or spoon and start reeling before the lure has come anywhere close to where the fish are holding. Let it get down first. Count it down if you have to. Cast, count a few seconds, then start the retrieve. That habit alone can make a big difference.

    If your presentation is above the fish all day, it does not matter how good it looks.

    For a more detailed breakdown, my salmon float fishing depth guide covers depth control specifically.


    When Is the Best Time to Bank Fish for Chinook?

    The honest answer is that the best time depends on the river, the run timing, water conditions, and regulations. But there are patterns worth paying attention to.

    Low light is almost always better than bright midday sun. Early morning and evening can both be productive, especially when fish are moving through shallower travel lanes or transitioning between holding spots. The low light gives fish more confidence to move through less-protected water, and it can also make them more reactive to both bait and lures.

    Overcast days can also fish well throughout the day for similar reasons. Direct bright sunlight on a clear river can push fish tight to the bottom and make them much harder to provoke.

    Water and weather changes matter too. A bump in river level after rain can bring fresh fish in or get fish that have been sitting to move again. Blown-out, muddy water can shut things down completely. Most salmon lures and bait need at least some visibility to work effectively. Slightly stained or off-color water, on the other hand, can actually be productive because it gives fish more confidence and makes them less cautious.

    Run timing is one of the most important factors of all, and it gets overlooked by a lot of beginners.

    Chinook runs are river-specific and often broken into early, peak, and late-run timing windows that vary a lot by watershed. Fishing during peak run timing, when the most fish are actively moving through, matters more than almost anything else. Knowing the specific run timing for the river you are fishing is worth researching before you go.

    Things I pay attention to:

    • Early morning and evening windows
    • Overcast days
    • Cooler water temperatures
    • Fresh rain after a low-water period
    • River levels rising or dropping into fishable shape
    • Water clarity
    • Seasonal run timing
    • Tide influence in lower tidal sections of rivers

    Always check current regulations before you go. Salmon seasons, retention rules, bait restrictions, hook rules, and closures can all change by river and date. Do not assume what was legal last year still applies.

    For a deeper timing breakdown, read my guide on the best time to fish for Chinook salmon.


    How to Fight and Land Chinook from the Bank

    Hooking a Chinook is only half the job, and a surprising number of fish are lost in the last ten feet of the fight.

    That is when anglers get excited, high-stick the rod, rush the fish, or try to drag a green salmon into the shallows before it is anywhere close to ready. I have done it. Most people have.

    When you hook a Chinook from the bank, the most important thing is to stay calm and keep steady pressure. Let the rod do what it is designed to do. Do not point it straight at the fish. That removes all the rod’s shock-absorbing ability and puts direct pressure on the hook and knot, which is where things break. But do not lift so high that you risk a broken tip or a popped hook either. Keep the angle somewhere in between and maintain contact.

    Setting the drag correctly before you start fishing is something a lot of beginners skip. Your drag should be set so it releases line under sustained pressure before the line reaches its breaking point. Too tight and a hard run can break the leader. Too loose and you cannot control the fish near the bank.

    If the fish runs, let the drag work. That is what it is there for. Do not try to thumb-stop the spool or clamp down on the line when a big Chinook decides to make a run. That is how leaders get broken and how fish are lost.

    If you can safely move with the fish, move. Step downstream or reposition on the bank if it helps. Sometimes that is smarter than trying to stop a big Chinook in heavy current by force.

    Side pressure is a useful tool during the fight. Instead of pulling straight back, angling the rod to the side creates more leverage and can help turn the fish. Switching rod angles during a long fight can also keep the fish off-balance and prevent it from sitting in the current.

    When the fish gets close, do not rush it. A green Chinook at your feet still has a hard run or two left. Lead it toward softer water when you can, keep the pressure steady, and wait until the fish is genuinely tired before you make a move with the net.

    Speaking of the net, a good one matters a lot from the bank, especially around rocks, riprap, steep edges, or fast current. I want a big oblong hoop, a deep bag, and a long handle. Net the fish head-first, hold the net steady, and let the angler lead the fish in instead of chasing it around. Chasing almost always ends badly.

    If the fish has to be released, keep it in the water as much as possible. Use the net to control it while you remove the hook, support the fish upright in the current, and let it kick away on its own. A quick, careful release is always better than dragging the fish onto rocks or holding it out of the water longer than necessary.

    Sharp, strong hooks are also part of this equation. A big Chinook will find every weak point in your terminal setup, and a dull or undersized hook is one of the most common ones. My best hooks for salmon fishing guide covers size, strength, and style in more detail.


    Common Beginner Mistakes

    Most Chinook mistakes are simple. They are also responsible for a lot of lost fish.


    Fishing Too High

    This is the biggest one.

    If your bait or lure is riding above the fish all day, you are not really in the game. Adjust your float depth, sink time, lure angle, or weight before you decide the fish are not biting.


    Casting Randomly

    Random casting feels like you are covering water. Usually you are not covering much of anything useful.

    Work the run in lanes: close, middle, far. Focus on seams, slots, tailouts, and soft edges. My guide on where to cast for salmon in a river covers this in detail.


    Using Gear That Is Too Light

    Chinook are big, strong fish and they will find the weakest link in your setup fast.

    A light rod, weak leader, cheap hook, or underpowered drag may work fine until the first real fish shows up. Check your drag setting before you start fishing, not after you have broken off.


    Changing Bait Too Often

    Sometimes the bait is not the problem.

    Before you swap bait every ten minutes, adjust your depth, drift speed, leader length, casting angle, and lane. Good bait in the wrong water is still the wrong presentation.


    Standing in the Travel Lane

    This one costs people fish constantly.

    They walk straight into the soft inside lane to reach the far bank, not realizing Chinook were using that exact path. Fish the close water before you ever step into it.


    Fishing in Water That Is Too Warm

    This one gets overlooked a lot.

    Chinook can become stressed and much harder to release safely when river temperatures climb. In warm summer conditions, check the water temperature before you fish. Many rivers post real-time temperature data, and some fisheries close or restrict fishing when conditions get too warm.

    Fishing for and fighting Chinook in very warm water can reduce survival odds after release, especially if the fish is played too long or handled poorly.


    Not Checking Regulations

    Some rivers have barbless hook requirements, bait restrictions, wild fish release rules, or seasonal closures. Always check your local fish and wildlife regulations before you make a single cast.

    Do not guess.


    Trying to Land Fish Without a Net

    Sometimes you can beach a hatchery fish on an easy gravel bar. A lot of the time, trying to hand-land or drag a big Chinook from rocks or a steep bank is how fish get lost right at the end.

    If you bank fish regularly, a good salmon net should be standard equipment.


    Final Thoughts

    Learning how to catch Chinook salmon from the bank is not about one trick or one secret bait.

    It comes down to fishing the right water, getting your presentation deep enough, using gear that is up to the job, and staying patient through the slow stretches. Chinook can be genuinely frustrating fish. They do not always bite just because they are there. But if your bait or lure keeps passing through the right lane at the right depth, your odds go up considerably.

    If I were starting from scratch, I would focus on bait under a float, learn how to read seams and slots, dial in my depth, and carry a few lures for covering water or changing things up when bait is not producing. I would also make sure my line, leader, hooks, and net were all strong enough before I ever hooked the fish.

    Most beginners do not need more gear. They need a simple plan and the patience to fish it right.

    If you want to keep building the full system, my complete salmon fishing setup for rivers, bank fishing for salmon, and best bait for Chinook salmon guides are all good next reads.


    FAQ

    What is the best way to catch Chinook salmon from the bank?

    The best way to catch Chinook salmon from the bank is to fish known travel lanes and holding water with the right depth and a strong setup. Bait under a float is one of the best starting methods when legal. Cured eggs, shrimp, or an egg-and-shrimp combo in the right lane at the right depth is hard to beat for Chinook.

    What bait is best for Chinook salmon from shore?

    Cured salmon eggs, sand shrimp, coon shrimp, and egg-and-shrimp combos are all strong options. Scent and bait quality matter, but depth, drift speed, and fishing the right lane matter just as much, if not more.

    How deep should I fish for Chinook salmon?

    Most Chinook salmon presentations should run near the bottom third of the water column. In warmer water conditions, Chinook often push even deeper into the coldest available water. If your bait, drift rig, or lure is riding too high, you can be in the right area and still go home without a fish.

    What lures work for Chinook salmon from the bank?

    Spinners, spoons, plugs, twitching jigs, and soft beads can all work for Chinook salmon from the bank. Lures are especially useful when you need to cover water, fish travel lanes efficiently, or trigger a reaction bite from fish that are not responding to bait.

    Where do Chinook salmon hold in rivers?

    Chinook salmon typically hold in deep slots, pools, seams, tailouts, and softer current edges near travel lanes. They prefer water where they can rest without fighting the heaviest current, and in warmer conditions they often seek out deeper, cooler water.

    What line should I use for Chinook salmon from the bank?

    Strong braided mainline with a fluorocarbon leader is a good starting point for Chinook salmon from the bank. Many bank anglers run 40 to 65 lb braid with a 20 to 30 lb fluorocarbon leader, adjusted for water clarity, technique, and fish size.

    Is float fishing good for Chinook salmon?

    Yes, float fishing is one of the best bank methods for Chinook salmon because it lets you present bait naturally through seams, slots, and travel lanes while giving you real control over depth.

    What is the biggest mistake beginners make fishing for Chinook salmon?

    Fishing too high or in the wrong lane is usually the biggest mistake. Before you change bait or lures, adjust your depth, casting angle, sink time, and presentation. A good bait or lure in the wrong water or at the wrong depth is still the wrong presentation.

  • Where to Cast for Salmon in a River: Best Holding Water Explained

    Angler casting for salmon from a rocky bank on a Northwest river

    Affiliate Disclosure: Some of the links below may be affiliate links. As an Amazon Associate, I may earn from qualifying purchases at no extra cost to you. I only recommend gear that makes sense for this style of fishing and fits the way I would actually approach salmon fishing in Northwest rivers.


    Knowing where to cast for salmon in a river is one of the biggest things that separates guys who consistently catch salmon from guys who don’t.

    Walk up to most beginners on a river and you’ll see the same thing. They look across the water, pick the farthest-looking seam they can see, and bomb a cast as far as they possibly can. I understand the instinct. The far bank looks untouched. Long casts feel like you’re being thorough. The water right at your feet seems too obvious.

    But salmon aren’t always sitting on the far side of the river.

    A lot of fish are using soft inside lanes, current edges, seams, tailouts, and deeper slots that are much closer than people think. Some of the best water you’ll ever fish might be ten feet from your boots, and most anglers step right into it before they ever make a cast.

    That’s what this guide is really about. Not just finding fishy-looking water, but knowing which lane to fish first, how to approach the bank without blowing up a run, how to cover water efficiently, and how to match your casting angle to the technique you’re using.

    If you’re still working on identifying good salmon water in general, start with my guide on how to read a river for salmon. This article builds on that and gets into where to actually put your cast once you’re standing in front of a run.


    Quick Answer: Where Should You Cast for Salmon in a River?

    The best places to cast for salmon in a river are seams, current edges, deep slots, tailouts, inside bends, soft water beside faster current, and travel lanes close to the bank.

    Start by fishing the close water before you step into it. Then work the middle lane, the main seam, and the far edge if you can reach it. Salmon use softer current paths to move upriver efficiently, and they hold where they can rest without fighting the heaviest water.

    For float fishing, cast slightly upstream of the target lane so your bait has time to settle and drift naturally into the zone. For drift fishing, cast slightly upstream and let your weight tick through the slot or seam. For spinners and spoons, cast across or slightly downstream so the lure swings through the travel lane instead of ripping out too fast.

    The main idea is simple: don’t just cast far. Cast where salmon are most likely to travel or hold.


    Why Casting Location Matters

    Salmon fishing isn’t just about having the right bait, lure, rod, or rig.

    Those things matter, but only if your presentation is actually passing through water that salmon are using.

    A perfect bait in the wrong lane is still just a perfect bait drifting past nothing.

    Salmon use current to save energy. They’re not out there fighting the heaviest water every second as they push upriver. Instead, they slide along seams, softer current edges, inside bends, and deeper lanes where they can travel efficiently. When they stop, they usually pick water that gives them depth, cover, current relief, or a comfortable resting spot near a travel lane.

    That’s why casting location matters so much. You’re not trying to cover every inch of river. You’re trying to find the small lanes and holding spots where a salmon is most likely to see your bait or lure and stay in those spots long enough to get a reaction.

    A good setup helps, but the setup has to be fished in the right water. If you’re still building your overall system, my complete salmon fishing setup for rivers breaks down the full rod, reel, line, and tackle approach.


    Where Salmon Hold vs Where Salmon Travel

    One of the things that helped me most when I was figuring out river salmon fishing was learning to separate holding water from travel water.

    They can overlap, but they’re not always the same thing, and how you fish them is different.


    Holding Water

    Holding water is where salmon pause.

    They might be resting, waiting on water conditions, adjusting to temperature changes, or just sitting in a comfortable spot before pushing farther upriver.

    Good holding water often includes deep pools, deep slots, tailouts, soft current edges, boulders and current breaks, undercut banks, slow pockets beside faster water, and the heads of pools where current drops into depth.

    When I’m fishing holding water, I want a slower, more controlled presentation. That usually means bait under a float, a drifted rig, a twitching jig, or a lure that stays in the zone long enough to irritate a fish into committing.


    Travel Lanes

    Travel lanes are the paths salmon use to move upriver.

    These aren’t always the deepest parts of the river. A travel lane might be the softer side of a seam, the inside edge of a bend, the edge of a faster chute, or a narrow path between heavy current and soft water.

    Good travel lanes often include seams, inside edges, current transitions, soft water beside faster water, edges of slots, bank-side lanes, and paths along natural structure.

    If I’m fishing a travel lane, I want my bait, lure, or rig moving naturally through it at the right depth and matching the speed of the current in that lane as closely as possible.

    If I’m fishing holding water, I want to slow down and keep the presentation in front of the fish longer.

    That difference in approach matters more than most people realize.


    Best Places to Cast for Salmon in a River

    When I walk up to a salmon run, these are the spots I look at first.


    1. Seams

    A seam is where faster water and slower water meet, and it’s one of the first places I look on any run.

    Seams give salmon an efficient travel path. They can use the softer side without fighting the full push of the river, which is exactly what they want when they’re moving upriver. Active fish often move right along that transition zone, and fish that stop to rest will frequently hold just inside the soft side of a seam.

    When fishing a seam, you don’t want your presentation ripping sideways across it. You want your bait, float, lure, or drift rig traveling along the edge as naturally as possible. Moving with the seam, not cutting across it.

    The best seams usually have some depth to them. A seam in six inches of water is less useful than a seam sitting over a deeper slot or defined lane.


    2. Current Edges

    Current edges are similar to seams but often broader and less defined.

    A current edge is any place where heavy current fades into softer water. Salmon use these edges because they can keep moving without burning unnecessary energy. They’re also one of the most bankable spots for shore anglers because you can often reach them without casting all the way across the river.

    Good current edges show up along the inside edge of a main flow, beside faster choppy water, below riffles, along gravel bars, next to deeper slots, and along the edge of a pool.

    If you can see a defined line where the water changes speed, that transition is almost always worth a cast.


    3. Deep Slots

    Fishing rod pointed at deep green holding water in a salmon river slot

    Deep slots are especially important for Chinook, and they’re where a lot of beginners struggle.

    A slot is a deeper lane within a run. Sometimes it looks darker or has a smoother surface than the water around it. Sometimes you only find it by fishing through the run and noticing where your gear drops deeper or takes noticeably longer to come through.

    The mistake I see most often is casting into a slot and immediately starting the retrieve or drift before the presentation has time to get down. If the fish are holding near the bottom and your bait or lure is riding above them, you’re not really fishing the slot. You’re just passing over it.

    When casting to a deep slot, give your rig enough room upstream to reach depth before it gets to the best part of the lane. This applies whether you’re drifting bait, throwing spoons, or fishing a float rig.

    For a deeper breakdown on how depth affects salmon presentations, my salmon float fishing depth guide covers that in detail.


    4. Tailouts

    A tailout is the downstream end of a pool or run where the water starts to shallow and pick up speed before moving into the next section.

    Tailouts are easy to overlook because they don’t always look dramatic, but they can be excellent salmon water. Fish pause there before making their next push upstream, especially in low light or when they’ve been actively traveling. The natural narrowing of a tailout also creates a funnel. Salmon often pass through a relatively small lane, which makes positioning your presentation much easier.

    The biggest mistake on a tailout is walking right into it before you’ve fished it. Treat it carefully, especially in clear or lower water. Stop short, fish the close edge first, and work your way out before you ever put a boot in.


    5. Heads of Pools

    The head of a pool is where faster water pours into deeper water, and it’s one of my favorite spots on any run.

    Salmon get depth, oxygenated water, current, and cover all in one area. The head of a pool also tends to collect fish that are moving up through a run and stopping to rest before pushing farther. In rivers with heavy fishing pressure, fish will often stack at the head of a pool because they feel protected there.

    When fishing the head of a pool, focus on the exact lane where the current drops into deeper water. That transition is usually the sweet spot. Not the flat, dead-looking water off to the side, and not directly in the fastest part of the chute.

    If your bait or lure is blowing through that section too fast, change your angle. Small adjustments in where you cast can make the presentation ride the lane completely differently.


    6. Inside Bends

    Inside bends can be some of the most productive water for bank anglers, and they’re often underrated.

    On a river bend, the outside current is heavier and deeper. The inside bend creates a softer path where salmon can move without fighting the strongest push. That doesn’t mean every inside bend is worth your time. A shallow inside bend with no lane, no depth, and no cover may not hold much. But an inside bend with a defined edge, a slot, or softer current alongside deeper water is absolutely worth working.

    Inside bends are also often easier to fish from the bank because you don’t have to reach across the whole river to put your presentation in the lane.


    7. Behind Boulders and Structure

    Rock ledge and current break in a salmon river where fish can hold near structure

    Boulders, logs, ledges, and other structure create current breaks. Salmon will sit in those breaks because the water is softer there.

    The challenge is fishing structure without hanging up constantly. Accuracy matters here more than distance. You want to work the soft pocket or edge right beside the structure, not throw directly into the snag.

    Float fishing and drift fishing can both be effective around structure if you control your depth carefully. Lures can work too if you can swing them through the soft pocket without burying the hooks. In general, I’ll err on the side of swinging past structure rather than trying to drop right on top of it. A lot of fish will come out of a pocket to eat something that passes nearby.


    8. Close Water Near the Bank

    This is the one beginners miss constantly, and it’s probably the most important point in this whole guide.

    Not every salmon is across the river.

    Some fish travel right along the bank, especially in softer inside edges, tailouts, and bank-side seams. If you stomp to the edge, crunch through gravel, or wade into the close lane without fishing it first, you may spook fish before you ever make your first real cast.

    Some of the easiest fish to blow up are the ones you never even knew were sitting five feet from your boots.

    When I approach new water, I fish close first. Then I work out from there. Short cast, middle cast, long cast.

    That simple habit has put more fish on the bank for me than any other single adjustment.


    How to Cast from the Bank Without Spooking Fish

    Where you cast matters, but how you approach the water matters just as much.

    If you’re loud, rushed, or standing in the lane before you’ve fished it, you can ruin a good run before your first real presentation. Salmon, especially in lower, clearer water, are more aware of bank pressure than a lot of people give them credit for.

    Here’s how I approach new water:

    Stop short of the edge and look at the close water before you do anything else. Make a few short casts before stepping any closer. Avoid stomping down gravel bars because that vibration travels through the water. Stay lower when you’re in shallow or clear conditions. Don’t stand in a lane you haven’t fished yet. Work the near water before you start bombing casts across the river.

    In heavy, stained water you can get away with a little more movement and noise. But in clear conditions, especially on pressured rivers, the approach can be the difference between a fish and a spooked run.

    If you fish mostly from shore, my full bank fishing for salmon guide goes deeper into positioning, approach, and how to work water from the bank.


    Where to Cast a Float Rig for Salmon

    Salmon float rig setup diagram showing bobber stop, bead, corky, float, weight, swivel, leader, and hook

    Float fishing is one of the most effective ways to cover salmon water from the bank, but the cast has to set up the drift correctly. That’s where a lot of beginners go wrong.

    With a float rig, you’re not trying to land directly on the fish’s head. You’re trying to land far enough upstream that your bait reaches the correct depth before it enters the productive part of the lane.

    If you cast directly at the seam or slot you’re targeting, your bait may still be sinking when it drifts through the best water. By the time it gets down to where the fish are sitting, it’s already past them.

    How far upstream should you cast? That depends on your depth setting and current speed, but a general rule is to give yourself at least one and a half to two times the depth of the water in upstream distance. In ten feet of water with a moderate current, you want the float landing fifteen to twenty feet upstream of your target lane so the bait has time to reach the bottom before it arrives.

    Managing the drift is just as important as where you cast. Once the float is in the water, you want it traveling at the same speed as the current in the lane. Not dragging behind, not getting pushed sideways, and not racing ahead. If your float is tilting hard or veering off course, the bait is likely being pulled unnaturally and fish will ignore it or refuse it.

    Mending your line after the cast helps keep the float tracking correctly. A gentle upstream mend right after the cast settles can give the bait more time to sink and keep the float in the lane longer.

    Good float casting targets include seams, soft current edges, deep slots, tailouts, inside travel lanes, and soft water running beside faster current.

    If you need the full rig breakdown, start with my salmon float rig setup, then use the salmon float fishing depth guide to dial in how deep your bait should be running.


    Where to Cast Lures for Salmon

    When fishing lures, casting angle might matter more than anything else. More than color, more than lure size, and sometimes even more than the specific lure you’re using.

    You’re not throwing a spinner into the river and reeling it straight back to you. The current should be helping the lure work through the lane, and the angle of your cast controls how the lure enters and tracks through the water.

    Spinners: Cast slightly upstream or across the current and give the spinner a moment to sink before you start the retrieve. Retrieve just fast enough to feel the blade working through the rod. That thump is your signal. The goal is to swing the spinner through the travel lane without letting it ride too high. If you’re not occasionally ticking near the bottom, you’re probably above the fish.

    One thing worth paying attention to: as the spinner comes around at the end of the swing and hangs directly downstream of you, slow your retrieve or let it pause for a moment. That change in speed and angle can trigger a strike from a fish that was following but hadn’t committed.

    Spoons: A cross-current or slightly downstream cast usually works best. Let the spoon sink, then let the current help it wobble through the lane on a controlled swing. You want a clean wobble, not a spoon spinning out because you’re retrieving too fast. Similar to spinners, that moment when the spoon slows at the end of the swing is often when fish commit. Don’t just reel in and recast the second the swing stops.

    Twitching jigs: Target deeper holding water, soft edges, and slower pools. Cast into the water where fish are likely holding, let the jig fall on a semi-slack line, pop the rod tip, and let it fall again. The depth of the cast matters here. You want the jig landing in the lane where fish are sitting, not beyond it or short of it. Cast angles that put the jig directly over the slot, rather than swinging through it, usually work better for this technique.

    Good lure casting spots in general include seams, current edges, tailouts, deep slots, heads of pools, soft pockets beside faster water, and inside bends.

    If you’re still working on which lures to carry, my guide to the best salmon lures for river fishing breaks down spinners, spoons, jigs, plugs, and soft beads.


    Where to Cast When Drift Fishing for Salmon

    Drift fishing setup for salmon showing braided mainline, fluorocarbon leader, weight, current direction, and hook

    Drift fishing is less about bombing distance and more about getting the right drift through the right lane at the right depth.

    The basic idea is to cast slightly upstream, let your weight find the bottom, and allow the rig to drift naturally through the slot, seam, or travel lane you’re targeting. You’re looking for controlled bottom contact. Not dragging hard, not floating too high, just enough ticking to know your rig is in the zone.

    Casting angle is everything in drift fishing. If you cast too far upstream, your weight may drag unnaturally before it reaches the productive part of the lane. If you cast too directly across the current, the weight may skip along too quickly without giving the bait time to work naturally. A cast that lands slightly upstream and across, roughly a 45-degree angle in most situations, gives you the best combination of natural drift and depth control.

    Line management after the cast is just as important as where the cast lands. Once your weight is ticking bottom, you want to follow the drift with your rod tip and keep just enough tension to feel the weight without dragging it. Too much pressure and you’re pulling the bait unnaturally. Too much slack and you’ll miss bites and lose feel for the bottom.

    Reading the ticks takes some practice. A slow, steady tick as the weight moves through a slot is what you want. A sudden stop or a change in the rhythm of those ticks can be a fish. Don’t always assume it’s a snag before you set the hook.

    Good places to cast when drift fishing include deep slots, seams, current edges, tailouts, soft lanes beside faster current, and heads of pools. In most cases, your cast needs to land upstream of the best-looking water so the weight has time to settle before the bait enters the lane.

    For the full technique breakdown, read my guide on how to drift fish for salmon.


    How to Cover a Run Without Wasting Casts

    One of the most common things I see beginners do is cast randomly.

    They stand in one spot, throw to the far bank over and over, then leave after ten minutes without ever really working the water. They covered a lot of distance on the map but none of the actual productive lanes.

    I’d rather make 20 thoughtful casts through three good lanes than 50 random casts across water that only looks good from the far bank.

    Here’s the system I use:

    Stop short of the water and look before you cast. Fish the close lane first. Short presentations before big ones. Work the middle lane. Cast to the far seam if it’s reachable from where you’re standing without a sloppy presentation. Change your angle before you change your gear. Adjust your depth before you assume the fish aren’t there. Take a few steps downstream and repeat.

    This approach keeps you from skipping productive water. It also keeps you from burning out a run before you’ve actually fished it.

    And it teaches you something. If you work a run in lanes and pay attention to where the bites come from, you start to understand which parts of that water are actually holding fish. Random casting doesn’t give you that information.


    Common Mistakes Beginners Make

    Most casting mistakes come down to rushing, casting too far, or not thinking about what the presentation is doing after it lands.


    Casting as Far as Possible Every Time

    Long casts feel productive, but they’re not always better. Sometimes the best lane is close. Sometimes the far water is too fast, too shallow, or impossible to fish naturally from your angle. Fish the close and middle water first.


    Casting Across Good Water Instead of Through It

    If your cast makes the bait or lure rip sideways across the lane, it may only be in the strike zone for a second. Change your angle so the presentation travels with the lane instead of cutting across it.


    Standing in the Lane Before Fishing It

    Bank anglers do this constantly. They step into soft inside water to reach the far bank, not realizing salmon were using that exact lane. Fish before you wade.


    Ignoring Depth

    You can cast to the right lane and still miss fish if your presentation is too high. Salmon, especially Chinook, are often deeper than beginners expect. If your bait, drift rig, or lure is riding above them all day, you may never get a real look.


    Moving Too Fast

    Cover the close, middle, and far lanes. Adjust your angle and depth. Then move. Five casts across the far bank and leaving is not covering a run.


    Fishing Dead Water Because It Looks Easy

    Not all soft water is good water. Slow, flat water with no depth, no lane, no cover, and no connection to a travel path may not hold fish. Look for soft water that’s connected to something useful, like current, depth, structure, or a travel route.


    Not Adjusting the Cast for the Technique

    Float fishing, drift fishing, and lure fishing don’t all use the same casting angles. A float rig needs to land upstream of the lane. A drift rig needs enough angle to tick bottom naturally. A spoon or spinner needs to swing across the current. Match the cast to the method.


    Final Thoughts

    Learning where to cast for salmon in a river isn’t about finding one magic spot and parking there all day.

    It’s about understanding how salmon use current and putting your presentation in their path.

    Look for seams, current edges, deep slots, tailouts, inside bends, and close bank-side lanes. Start close before you cast far. Work the water in sections instead of throwing randomly. Give your bait, lure, or drift rig enough room upstream to reach the right depth before it hits the best part of the run.

    The more you fish this way, the more the river starts making sense.

    You stop asking, “how far can I cast?” and start asking, “where is the best lane, and how do I get my presentation through it naturally?” That’s a much better question to be chasing.

    If you want to keep building this skill, my guide on how to read a river for salmon is the next logical step. And if you’re still building your gear system, my complete salmon fishing setup for rivers will help you match the right setup to the water you’re fishing.


    FAQ

    Where should I cast for salmon in a river?

    Cast to seams, current edges, deep slots, tailouts, inside bends, and soft water beside faster current. These areas give salmon a travel lane or a comfortable resting spot without forcing them to fight the strongest current all day.

    Do salmon stay close to shore in rivers?

    Yes, salmon often travel close to shore, especially along soft inside edges, tailouts, and bank-side seams. Bank anglers make the mistake of wading into close water before they fish it. Always make a few short casts before stepping into the river.

    Should I cast upstream or downstream for salmon?

    It depends on the technique. Float rigs and drift fishing usually work best when cast slightly upstream of the target lane so the bait has time to reach depth. Spinners and spoons are often cast across or slightly downstream and swung through the current.

    What water do salmon hold in?

    Salmon often hold in deep pools, deep slots, tailouts, current breaks, soft edges, and behind structure like boulders. Chinook salmon especially tend to use deeper water where they can rest close to a travel lane without sitting in the heaviest current.

    How far should I cast for salmon from the bank?

    Only cast as far as needed to reach the productive lane. Many salmon are hooked in close or middle water, not always on the far side of the river. Start with the close water, then work the middle lane and far seam if you can reach it naturally.

    Where do Chinook salmon hold in rivers?

    Chinook salmon often hold in deeper slots, pools, seams, tailouts, and slower current edges. In bigger water, they are usually deeper than beginners expect, so your bait, drift rig, or lure needs enough time to get down before it reaches the best lane.

    Where should I cast a float rig for salmon?

    Cast a float rig slightly upstream of the seam, slot, or current edge you want to fish. The goal is to give your bait enough time to sink to the right depth before it drifts through the salmon’s lane. If you cast directly at the target, your bait may still be too high when it passes the fish.

    Why am I not catching salmon even though I see fish rolling?

    Rolling salmon are not always biting salmon. You may be casting too high in the water column, fishing the wrong lane, retrieving too fast, or not giving your bait or lure enough time to reach depth. Before changing gear, adjust your casting angle, depth, sink time, and drift speed.

  • How to Fish Salmon with Lures: Beginner Guide for Rivers

    Affiliate Disclosure: Some of the links below may be affiliate links. As an Amazon Associate, I may earn from qualifying purchases at no extra cost to you. I only recommend gear that makes sense for this style of fishing and fits the way I would actually approach salmon fishing in Northwest rivers.


    Learning how to fish salmon with lures can feel like a lot when you’re first getting into river fishing.

    Spinners, spoons, twitching jigs, plugs, beads, soft plastics, and about a hundred color options for each one. Everyone at the shop has a different opinion and half of them contradict each other.

    The problem most beginners run into isn’t buying lures. It’s knowing when to use each one and how to actually fish it once it’s on the line.

    I see guys throw every lure the same way. Same retrieve speed, same angle, same depth, and just hope a salmon decides to grab it. That can work every once in a while, but it’s not much of a plan.

    What changes everything is understanding how to match your lure to the water in front of you. Spinners shine when you’re covering moving travel lanes. Spoons are great for swinging through bigger water. Twitching jigs are deadly when fish are holding in deeper pools and slower edges. Plugs can stay locked in the strike zone for a long time when the current is doing the work for you.

    That’s what this guide is about. Not just which lures to buy, but how to actually fish them. If you want a breakdown of specific lure options, I put together a separate guide to the best salmon lures for river fishing. This one is about what you do with them once you’re on the water.


    Quick Answer: What Is the Best Way to Fish Salmon with Lures?

    Match your lure to the water you’re standing in front of.

    Use spinners when salmon are moving through active current and you want vibration and flash on a simple retrieve. Use spoons when you need to cover wider or deeper water with a swinging presentation. Use twitching jigs when fish are holding in slower pools, deeper slots, or soft current edges. Use plugs when you want the river to help hold a lure right in front of the fish.

    But here’s the thing most beginners miss. The lure itself is only half of it.

    You can tie on a perfect spinner, spoon, or jig, and if it’s riding too high, moving too fast, or drifting through the wrong lane, it’s not going to matter. For most river salmon fishing I want my lure working near the bottom third of the water column. That’s where fish typically are, especially Chinook in bigger, deeper water.


    Quick Picks: Good Salmon Lures to Start With

    These aren’t the only salmon lures that catch fish, but they’re solid examples of each style I’d want a beginner to understand first.


    Best Beginner Spinner: Blue Fox Vibrax

    The Blue Fox Vibrax is one of the easiest salmon spinners to learn on because you can actually feel the blade working through the rod. That feedback matters when you’re starting out. For Chinook I usually think in the #4 to #6 size range, depending on water size, current speed, and how fired up the fish seem to be.

    Blue Fox Vibrax silver and blue spinner for salmon fishing in rivers

    My take: If you want to learn what a properly working salmon spinner feels like in current, this is where I’d start.


    Best Spoon: 1 oz Dardevle Spoon

    A 1 oz Dardevle is what I’d reach for when I want flash, wobble, and enough weight to get through real river water. The most important thing with a spoon is not burning it back too fast. A spoon should have a clean, lazy wobble, not spin out like a pinwheel.

    Dardevle black chartreuse brass back spoon for salmon fishing in rivers

    My take: The Dardevle teaches the right lesson about spoon fishing. Slow down, let it wobble, let the current swing it through the lane.


    Good Backup Spoon: 1 oz Krocodile Spoon

    A 1 oz Krocodile is another metal lure worth having when you want flash and a compact profile. I use it as a backup spoon when I want to cover water quickly without overthinking it.

    Krocodile spoon for salmon fishing with lures in river current

    My take: Worth having in the box. Gives you another option without cluttering up your setup.


    Best Twitching Jig Example: Mustad Addicted Tailout Twitcher Jig

    The Mustad Addicted Tailout Twitcher Jig is exactly what twitching jig fishing is supposed to look like. Cast into deeper holding water, let it fall, pop the rod tip, let it drop again. Bites happen on the fall. If your line is too tight after the pop, you’re killing the action.

    Mustad Addicted Tailout Twitcher Jig for twitching jigs for salmon

    My take: This is the jig I’d reach for when fish are sitting in softer edges, deeper slots, or slower water where a spinner just blows through too fast.


    Best Soft Bead Example: BnR Soft Beads

    BnR Soft Beads sit somewhere between a traditional lure and an egg-style presentation. They’re not the same as fishing real cured eggs, but they give you that natural egg profile and can be really effective when salmon are keyed in on that look.

    BnR Soft Beads Sweet Pink Cherry 20mm for salmon egg style presentations

    My take: A good option when you want something more subtle than hardware but still want to fish an artificial.


    Best Plug Example: Yakima Bait Mag Lip 4.0

    The Mag Lip 4.0 is a great example of how plugs are different from everything else. Instead of you working the lure, the current does a lot of the work. The plug digs, wiggles, and holds in the water column. That’s what makes plugs so effective for keeping a lure in front of fish long enough to make one react.

    Yakima Bait Mag Lip 4.0 Fire Starter plug for salmon fishing in rivers

    My take: The Mag Lip 4.0 shows you what a plug is really doing. It’s not just passing through. It’s sitting in the zone and making fish uncomfortable until one finally commits.


    Why Salmon Hit Lures

    One of the first things I’d tell any beginner is this: river salmon aren’t always hitting your lure because they’re hungry.

    By the time Chinook are pushing upriver, feeding isn’t really what’s driving them anymore. A lot of bites come from reaction, aggression, curiosity, or just flat-out irritation. The fish sees something flashing through its lane and something in its brain fires.

    That’s why depth, placement, and presentation matter so much more than having the “perfect” lure.

    Most river salmon aren’t going to cross the river to chase something. You need to get close enough to make them react. That might mean swinging a spinner right through a travel lane, wobbling a spoon across a seam, or dropping a jig in front of a fish that’s been sitting in the same slot all morning.

    The lure doesn’t need to be flawless. It needs to get noticed, stay in the zone, and move naturally enough that the fish commits.


    The Main Types of Salmon Lures

    There are a lot of salmon lures out there, but they really fall into a handful of categories. Once you understand what each type is actually supposed to do, the whole thing gets a lot simpler.


    Spinners

    Spinners are one of the best lure styles for beginners because you can feel when they’re working.

    That blade thump through the rod is real-time feedback. It tells you the lure is doing its job. When you lose that thump, something’s off. You’re either reeling too fast, too slow, or the lure is tangled. That feedback loop is genuinely helpful when you’re still learning.

    Spinners are good for moving water, travel lanes, current seams, medium-depth runs, and covering water from the bank. They’re also great when fish are active and willing to commit.

    A Blue Fox Vibrax is a solid example of this style. For Chinook, I’m usually in the #4 to #6 range. For coho or smaller water, I’ll size down. The goal isn’t to reel it as fast as you can. You want the blade working, the lure tracking near the bottom, and the spinner swinging naturally through the lane without riding high.

    For a deeper breakdown of sizes and styles, see my guide to the best spinners for salmon fishing.


    Spoons

    Spoons are all about wobble and flash.

    They can be excellent when you need a lure that casts well, gets down, and covers a wide lane through bigger river water. And a spoon can be especially good when you want that flash action without the constant vibration of a spinning blade.

    Good spoon water includes bigger runs, wider river sections, deeper slots, and anywhere you’re swinging through current from the bank.

    A 1 oz Dardevle or 1 oz Krocodile are the kinds of spoons I’d have in my box for salmon water. The most important thing is keeping that wobble clean and controlled. A spoon that’s wobbling correctly is a completely different presentation than one that’s spinning out. The first one catches fish. The second one mostly just wastes your time.

    For specific spoon options, check out my guide to the best spoons for salmon fishing.


    Twitching Jigs

    Twitching jigs are a different animal.

    Forget the steady retrieve. You’re working these with a lift-and-drop motion. Cast into holding water, let the jig sink, pop the rod tip, and let it fall again on semi-slack line. That fall is where most of the bites happen.

    The biggest mistake beginners make is keeping the line too tight after the pop. You want enough contact to feel the bite, but you also need to let that jig drop naturally. If you’re strangling it on the way down, you’re killing what makes the technique work.

    Twitching jigs are great in slower pools, deep slots, current edges, and anywhere hardware is moving through too fast to stay in front of holding fish. They’re especially popular for coho, but don’t sleep on them for Chinook in the right water.

    Something like the Mustad Addicted Tailout Twitcher Jig fits this style well.


    Plugs

    Plugs work differently than everything else on this list.

    Instead of you driving the action, the current does a lot of the work. A plug like the Yakima Bait Mag Lip 4.0 digs into the current, wiggles in place, and holds in the strike zone. That’s what makes plugs so effective from a boat. You can backtroll or hold a plug right in front of fish until one finally can’t stand it anymore.

    Plugs are great for boat fishing, backtrolling, working a specific piece of holding water, and any situation where staying in the zone longer is more important than covering ground.

    I wouldn’t make plugs the first thing a bank angler learns, but they’re absolutely part of the salmon lure toolbox and worth understanding early.


    Beads, Soft Beads, and Bait-Style Presentations

    Soft beads occupy a different lane than traditional hardware.

    They don’t flash like a spoon or thump like a spinner. What they do is imitate an egg profile drifting naturally through current. And there are days when that’s exactly what salmon want. BnR Soft Beads in larger salmon sizes, around 20mm, are a solid option when fish are keyed in on egg-looking presentations but you still want to fish an artificial.

    This is also where lure fishing starts to blend into bait fishing. If you want to go all the way down that road, I put together a full guide to the best bait for Chinook salmon.


    How to Choose the Right Lure for the Water

    Picking the right salmon lure is mostly about reading what’s in front of you.

    A lure that absolutely kills it in one run can be completely wrong 50 yards downstream where the current speed and depth have changed. Current speed, depth, clarity, and fish behavior all factor in.

    If you’re still working on how to break down river water, my guide on how to read a river for salmon will help give you a framework for that.


    Fast Current

    In faster water, you need a lure that can actually get down and stay under control without blowing out of the lane.

    Good choices include heavier spinners, heavier spoons, and compact lures that don’t get pushed up by the current too fast. A lot of beginners underestimate how quickly moving water lifts a lure. If your spinner is immediately riding toward the surface, you probably need more weight, a different casting angle, or a slower retrieve.


    Slow Pools

    In slower pools, you usually don’t need as much speed or vibration to trigger a fish.

    This is where twitching jigs really earn their place, along with slower spoon presentations and soft beads. In clear, slow water, going subtle with your colors and profile can also make a real difference.

    The main advantage in slower water is that you can keep your lure in front of holding fish longer than you can with a fast-moving spinner. Use that to your advantage.


    Deep Slots

    Deep slots are where beginners consistently struggle. Usually it’s not the lure, it’s the depth.

    If you’re casting and immediately starting your retrieve, there’s a good chance your lure is spending most of its time above the fish. Sink time matters. Let the lure get down before you start working it.

    Good choices for deep slots include twitching jigs, heavier spoons, and spinners with enough weight to actually reach the zone.


    Shallow Riffles and Tailouts

    Shallow, clear water calls for more care than people give it.

    This isn’t where you throw the biggest, flashiest lure in your box. Salmon in shallow water can spook faster than you’d think. Go smaller, go more natural, and keep your presentation controlled. A subtle swing through a shallow tailout with a smaller spinner or light spoon can surprise you.


    How to Fish Spinners for Salmon

    The basic approach is simple, but the details matter.

    Cast slightly upstream or across the current and give the spinner a moment to sink before you start retrieving. Then reel just fast enough to feel that blade thump through the rod. That’s your signal the lure is fishing.

    From there, let the current help swing it through the lane. You don’t want to reel so fast the spinner rides high over the fish, and you don’t want it dragging bottom the whole retrieve either. If I can feel the blade working and I’m occasionally ticking near the bottom, I know I’m in the game.

    Good spinner water is seams, current edges, tailouts, and defined travel lanes. Swing it through at the right depth and you’ve got a real shot.


    How to Fish Spoons for Salmon

    Spoons are all about the wobble, and the biggest mistake is reeling too fast.

    When a spoon is fished right, it has a clean side-to-side wobble as it swings through the current. When it’s going too fast, it spins out and looks like nothing a salmon would bother with.

    Cast across or slightly downstream, let the spoon sink, then retrieve slowly enough that it wobbles while the current helps swing it through the lane. You’re not cranking it straight back to you. You’re using the water to work it.

    Pay attention to the end of the swing too. Salmon will often hit right when the spoon slows down, lifts, or changes direction. That transition is a trigger. Don’t just reel in and recast the moment the swing stops.


    How to Fish Twitching Jigs for Salmon

    Twitching jigs take a little more feel to get right, but once you dial it in, they’re incredibly effective.

    Cast into deeper holding water. Let the jig fall. Pop the rod tip upward. Then let it fall again on semi-slack line. That’s the whole move, and most of the bites happen on the drop, not on the pop.

    The tricky part is managing your line. Too tight and you kill the natural fall. Too loose and you won’t feel the bite. You’re looking for that middle ground where you have enough contact to detect a fish but enough slack to let the jig do what it’s supposed to do.

    This technique takes some practice, but it’s worth putting time into, especially if you’re fishing coho in slower, deeper water.


    How Deep Should You Fish Salmon Lures?

    Salmon lure depth guide showing spinners, spoons, and beads fishing the bottom third of a river

    Most beginners fish too high. It’s one of the most common problems I see on the water.

    Salmon aren’t usually sitting high in the water column waiting to chase something down. In most river situations, especially deeper slots and heavy current, they’re holding near the bottom. A good general rule is to work the bottom third of the water column.

    You can adjust depth by changing lure weight, sink time, retrieve speed, casting angle, line diameter, and rod angle. If you’re constantly snagging, you’re probably too deep or too slow. If you never feel like you’re in the zone, you’re probably running too high.

    For a more detailed look at depth control in river presentations, my salmon float fishing depth guide breaks that conversation down pretty thoroughly.


    Where to Cast Lures for Salmon in a River

    You don’t need to cover every inch of the river. You need to find the lanes salmon are using and run your lure through them at the right speed and depth.

    The spots I look for first are seams, current edges, tailouts, inside bends, deep slots, soft water sitting next to faster current, and travel lanes between heavy and slow water.

    Seams are usually my starting point. Salmon use current edges to travel without fighting heavy water the whole time. Work those transitions and you’ll find fish.

    From the bank, I try to be methodical. I’ll cover the close lane, the middle, and the far lane instead of just bombing casts to the other bank every time. Long casts aren’t always better. A lot of salmon get hooked much closer than people expect.


    Best Lure Colors for Salmon

    Color matters, but it’s not the first thing I’d worry about.

    Depth and presentation are going to affect your results more than color on most days. That said, matching your color to the conditions makes sense.

    In clear water I go more natural, darker, and smaller. Too much flash in shallow, clear water can work against you. In stained water, low light, or bigger river sections, brighter colors earn their place. Chartreuse, orange, pink, silver, brass, and glow patterns all have days where they’re the right call.

    Simple framework: clear water means natural and subtle, stained water means bright and high contrast, low light means strong silhouette or bright color, and bright sun means metallic flash can help but don’t overdo it in clear conditions.

    If I’m not getting bit, I’m adjusting depth, angle, and speed before I start blaming the color.


    What Gear Do You Need to Fish Salmon with Lures?

    You don’t need a completely different setup for every lure style, but salmon are strong fish and river current adds load fast. Gear that’s too light gets outmatched quickly.

    For most salmon lure fishing, you want a medium-heavy to heavy salmon rod, a quality spinning or casting reel, strong braided mainline, a good leader, sharp hooks, pliers, spare leaders, and a small box with a core set of trusted lures.

    If you’re building a setup from the ground up, my complete salmon fishing setup for rivers walks through the whole system.

    For line specifically, I run braid as my mainline almost always. It casts well, cuts current better than heavy mono, and gives you sensitivity that matters when you’re twitching jigs or feeling for a subtle spinner bite. My guide on what pound line for salmon fishing breaks down braid and leader sizing in more detail. You can also check out my guides to the best braided fishing line for Chinook salmon and best leader line for Chinook salmon if you want specific options.


    Common Beginner Mistakes with Salmon Lures

    Most lure mistakes come down to fishing too fast, too high, or too randomly. Here’s what I see on the water most often.


    Reeling Too Fast

    The most common mistake with spinners and spoons. If your spinner is riding high or your spoon is spinning out, slow down. The retrieve speed that feels natural in your hands is usually too fast for the lure to fish properly.


    Fishing Too High in the Water

    Salmon are lower than you think. If you’re not getting near the lane, you may be fishing right over the top of them the whole time.


    Using Lures That Are Too Light

    A lure that looks perfect in your hand might never actually fish correctly if the current is pushing it up. Match lure weight to the depth and speed of the water you’re in.


    Standing Where the Fish Are

    Bank anglers do this constantly. They walk right to the edge, set up in soft inside water, and start casting over fish that were sitting five feet away. Fish the close water before you move into it.


    Changing Lures Too Often

    Switching every five casts because nothing happened isn’t a strategy. Try adjusting your angle, sink time, retrieve speed, and lane before you pull the lure off.


    Ignoring Seams and Travel Lanes

    Random casting doesn’t put fish on the bank. Focus your presentations on the water salmon are actually using.


    Using Dull Hooks

    Salmon have tough mouths. Dull hooks miss fish that should have been yours. Check your points regularly and replace or sharpen when needed.


    Not Checking Local Regulations

    Before you ever make a cast, check your local fish and wildlife regulations. Barbless hook rules, bait restrictions, seasonal closures, and species-specific gear rules vary by river and season. Don’t assume. Look it up.


    When Bait Works Better Than Lures

    I’ll be straight with you. For Chinook in rivers, I generally prefer bait.

    Cured eggs, shrimp, or an egg-and-shrimp combo under a float gives me a slower, scent-based presentation that I have a lot of confidence in. When Chinook are holding deep, moving slow, or just not reacting to hardware, bait is often hard to beat.

    That said, bait isn’t always the answer. There are days when fish won’t touch it, the water calls for covering more ground, or you just need to show them something different. That’s when I grab a spinner, spoon, jig, or plug and start working through the run.

    It also comes down to personal preference. Some guys would rather throw hardware all day and only go to bait when they’re desperate. Others like me usually start with bait and use lures as a changeup. Neither approach is wrong. The important thing is knowing when to adjust instead of forcing one method all day.

    If you lean toward bait fishing, I put together a full guide to the best bait for Chinook salmon. And if you want to fish eggs or shrimp under a float, my salmon float rig setup and how to rig salmon eggs guides will help you dial that in.


    My Simple Beginner Lure Plan

    If I were teaching someone how to fish salmon with lures from the bank, I’d keep it simple.

    I wouldn’t tell them to buy 40 different lures. I’d start with a small, focused group: a couple of spinners, a couple of spoons, a few twitching jigs, a plug or two if the water calls for it, and some soft beads if they want an egg-style artificial option.

    Then I’d focus almost entirely on water reading and presentation.

    Start with a spinner in medium-speed travel water. If the water is wider or deeper, go to a spoon. If fish are sitting in slower pools or soft edges, try a twitching jig. If the current setup is right for it, run a plug. If fish seem locked in on eggs but you don’t want to deal with real bait, tie on a soft bead.

    More than anything, pay attention to depth.

    If your lure is riding above the fish, it almost doesn’t matter what it looks like. If it’s in the right lane, working at the right speed, and staying near the bottom of the water column long enough to trigger a reaction, you’ve got a genuine shot.


    Final Thoughts

    Learning how to fish salmon with lures isn’t about stocking every possible option in a giant tackle bag.

    It’s about understanding what each lure type does, where it belongs, and how to keep it in front of fish long enough to force a reaction. Spinners for covering moving water. Spoons for flash and bigger runs. Twitching jigs for holding water and slower pools. Plugs when the current can do the work. Soft beads when you want an egg-style option without dealing with real bait.

    Start simple. Learn how each lure feels when it’s working right. Pay close attention to depth, current speed, and casting angle. Those three things will do more for your catch rate than anything else.

    For specific lure recommendations, head over to my full guide to the best salmon lures for river fishing.


    FAQ

    What is the best lure for salmon fishing in rivers?

    Spinners, spoons, twitching jigs, and plugs are all good salmon lures for rivers. Spinners are the easiest for most beginners to learn, spoons work well in bigger water, twitching jigs are strong in deeper holding water, and plugs can stay in the strike zone when the current helps work them.

    What is the best salmon spinner for beginners?

    A Blue Fox Vibrax is a good beginner salmon spinner because the blade vibration is easy to feel through the rod. For Chinook, sizes #4 to #6 are common depending on water depth, current speed, and fish size.

    Are spinners or spoons better for salmon?

    Spinners are usually easier for beginners because the blade feedback tells you the lure is working. Spoons can be better in wider or deeper water where you want a slower swing, more flash, and less blade vibration.

    Should salmon lures be fished near the bottom?

    In most river situations, yes. Salmon usually hold near the bottom third of the water column, especially in deeper slots, seams, and travel lanes with stronger current. If your lure is too high, you may be fishing above the fish.

    What color lure is best for salmon?

    Bright colors like chartreuse, orange, pink, silver, brass, and glow can work well in stained water or low light. In clear water, smaller, darker, or more natural colors usually make more sense. Presentation and depth usually matter more than color.

    Can you catch Chinook salmon on lures?

    Yes, Chinook salmon can be caught on spinners, spoons, plugs, and twitching jigs. The key is getting the lure deep enough and putting it through the right travel lane so the fish sees it and has a reason to react.

    Are lures better than bait for salmon?

    Lures are better when you need to cover water, trigger reaction bites, or show fish something different. Bait is often better when Chinook are holding deep, moving slowly, or responding to scent. I usually start with bait for Chinook and use lures as a changeup.

    When should I use bait instead of lures for salmon?

    Use bait when salmon are holding deep, not reacting to hardware, or the water calls for a slower scent-based presentation. Cured eggs, shrimp, and egg-and-shrimp combos under a float are common bait options for Chinook in Northwest rivers.